Flight Simulator 2020 & Real World VFR

Microsoft has just released the latest version of Flight Simulator – after an absence from the market for about a decade. And although there is a lot of frustration and a general feeling “the product has been released too early” and some bugs indeed impact the experience quite negatively (e.g. the infamous CTD – also known as “Crash to Desktop”) – the general question remains: how good is the flight feeling really?

My example is a tour I made with a friend in 1996 – it took us from Denver in Colorado all the way to San Francisco in California (and beyond). The tour is described in detail in other blog posts but this one puts the focus on comparing the scenery I have captured in my photos with the scenery rendered by Flight Simulator 2020.

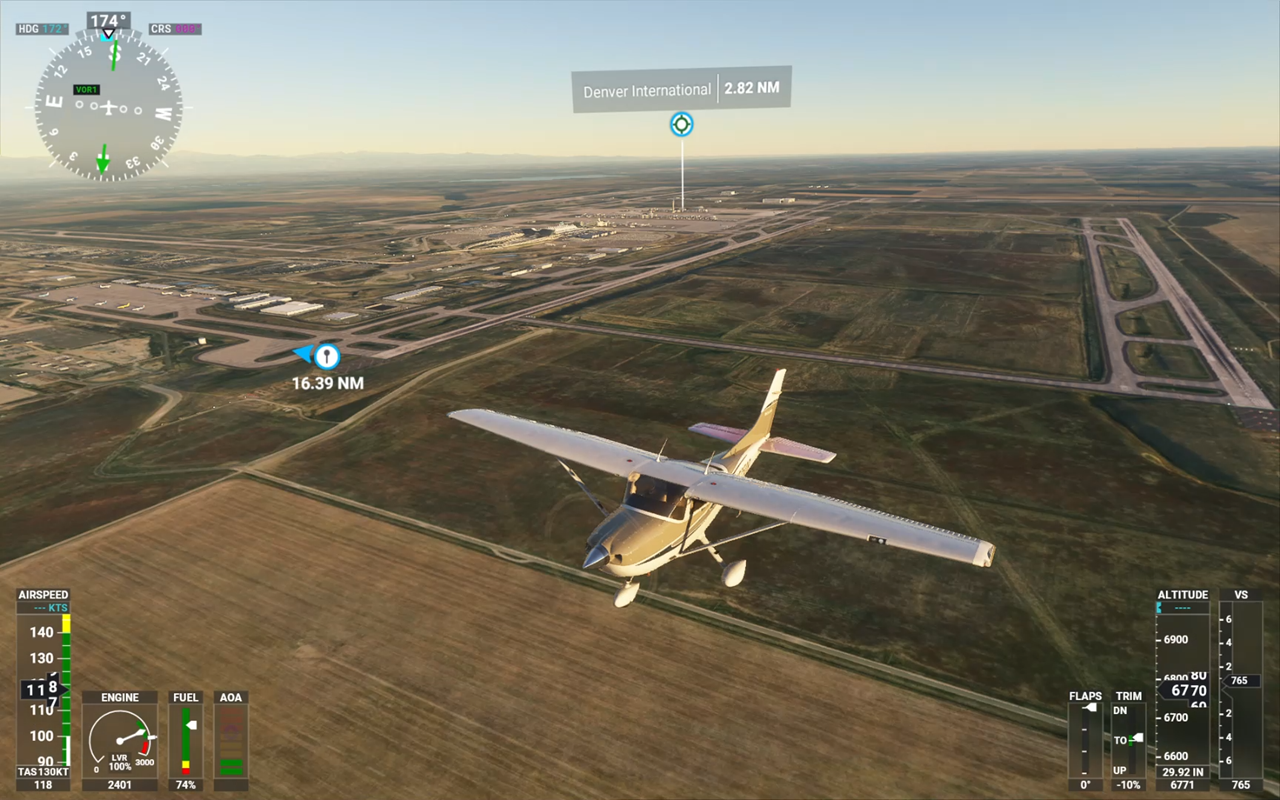
Two Add-Ons are installed – KDEN Denver International Airport and Carendado’s Cessna CT182T Turbo Prop. Flight Planning is done with Little Navmap. The screenshots deliberately have the cockpit instruments visible so the details of the current flight situation are documented.

Our Cessna CT182T at Denver International Airport – KDEN

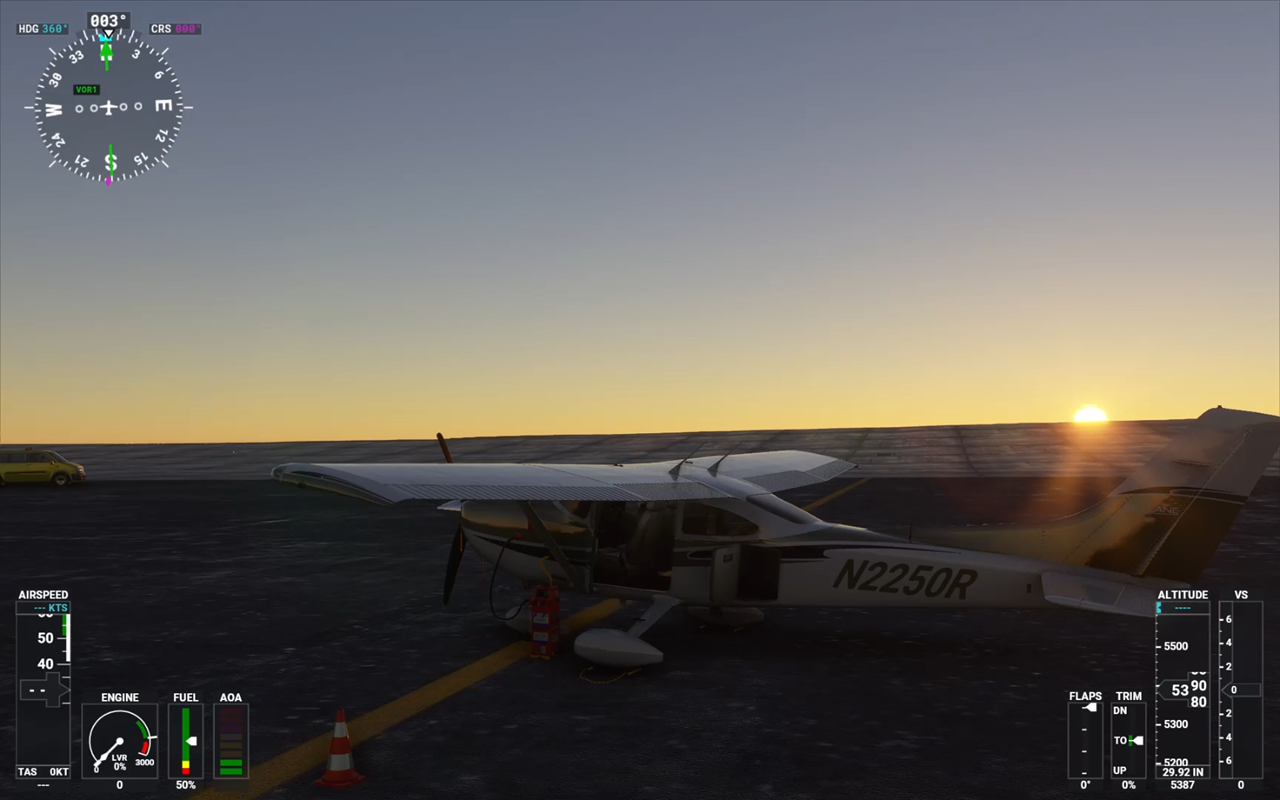
Heading out of KDEN, leaving on Runway 17 and then turning west, the flat lands east of Denver and the gigantic barrier the Rocky Mountains are presenting is more than obvious and very well rendered in FS2020.

Airborne leaving KDEN from Runway 17 – one of the more fancy Flight Simulator 2020 Bugs hit a bit earlier: a sudden loss of the avionics incl. a loss of the Autopilot.

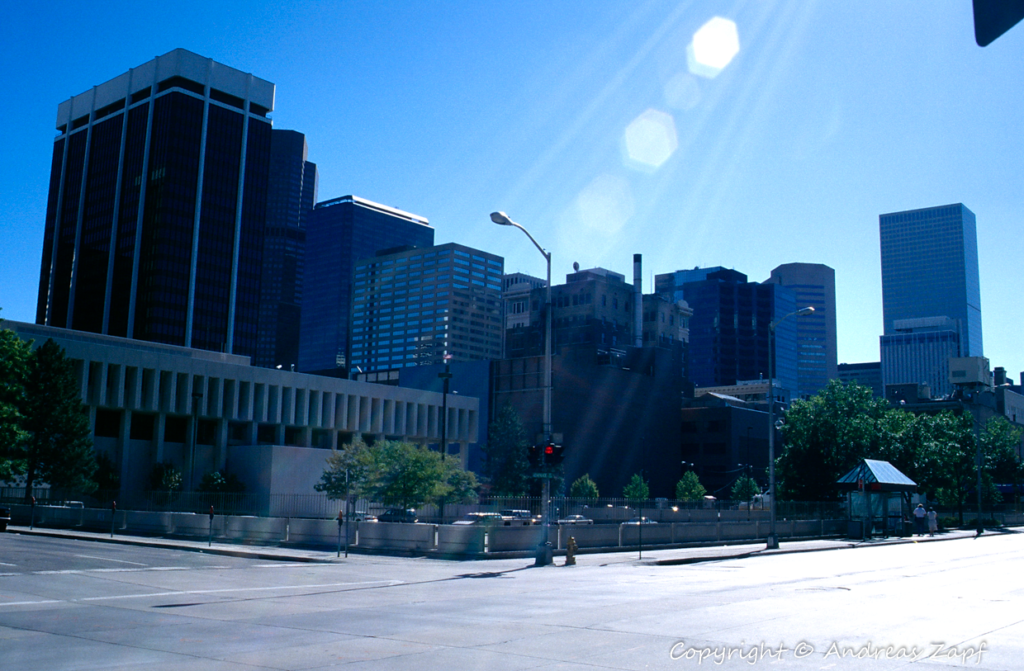
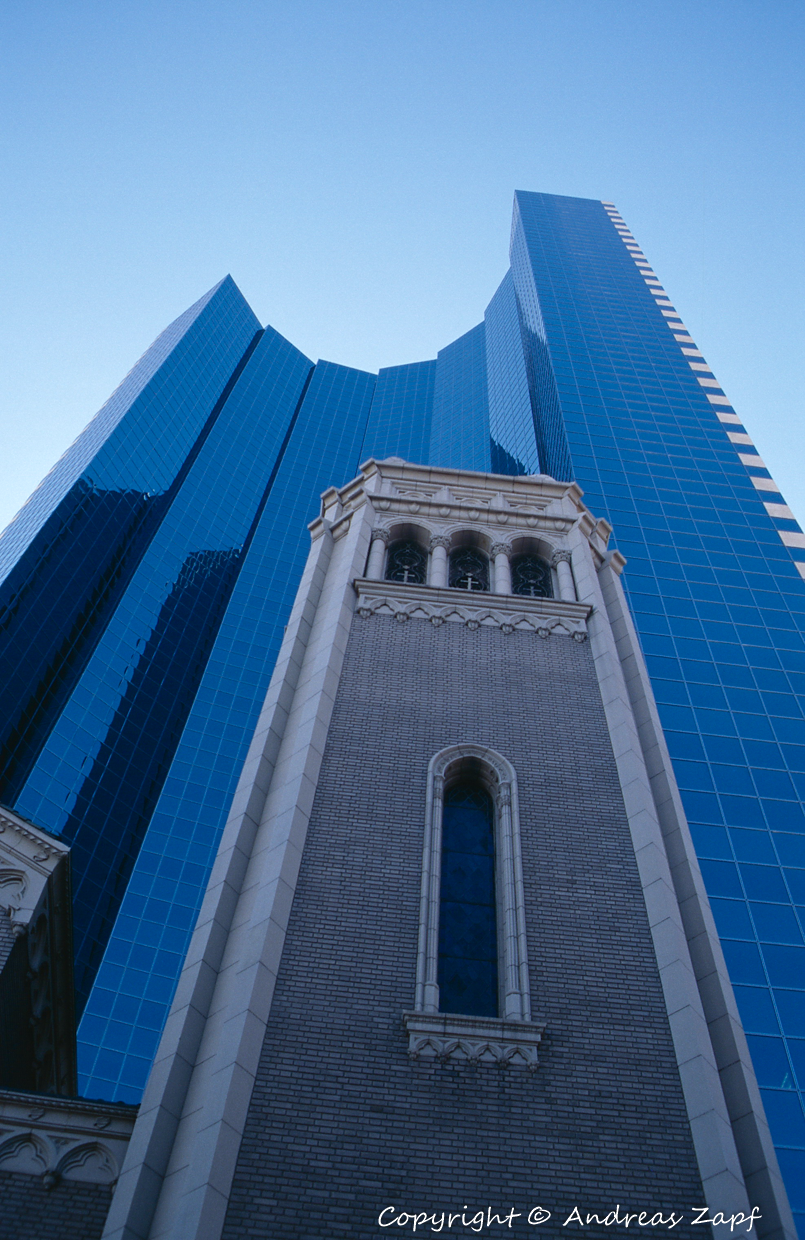
Here are a few images taken in Denver in 1996. the first one is a photo taken from the stairs of the State Capitol and showing the Civic Center and the Civic Center Park. The second one shows the Civic Center Plaza building and the third one is an image of the St. Elisabeth of Hungary Church.

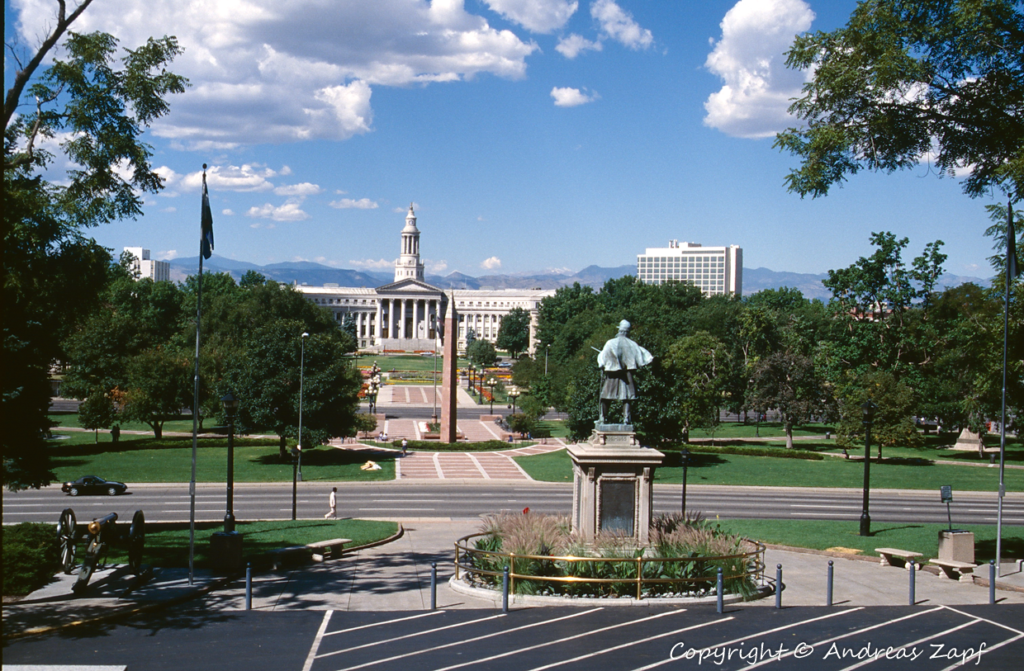
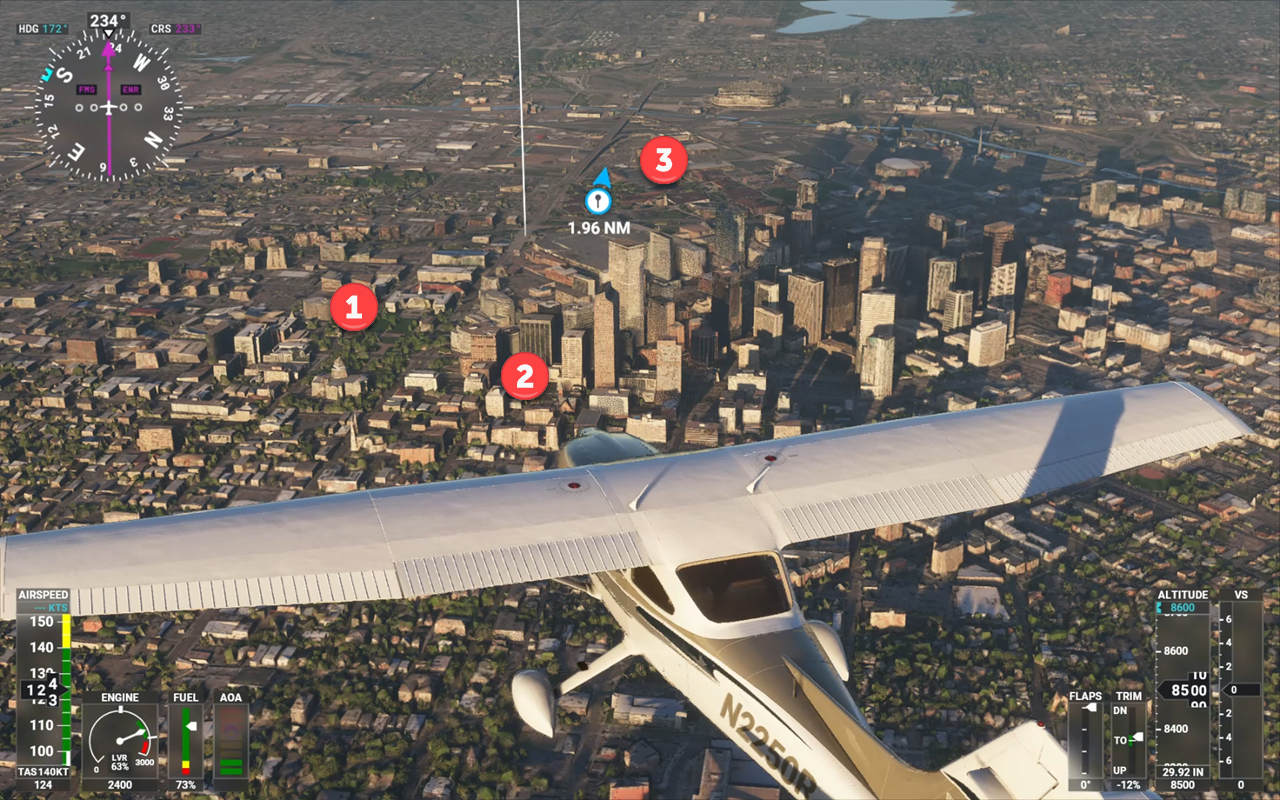
Denver – out of the box Flight Simulator 2020 – does not show the buildings in such a great detail but they are recognizable: State Capitol and Civic Center (1), the Civic Center Plaza (2) and St. Elisabeth (3).

Downtown Denver in the standard out-of-the-box rendering of FS2020

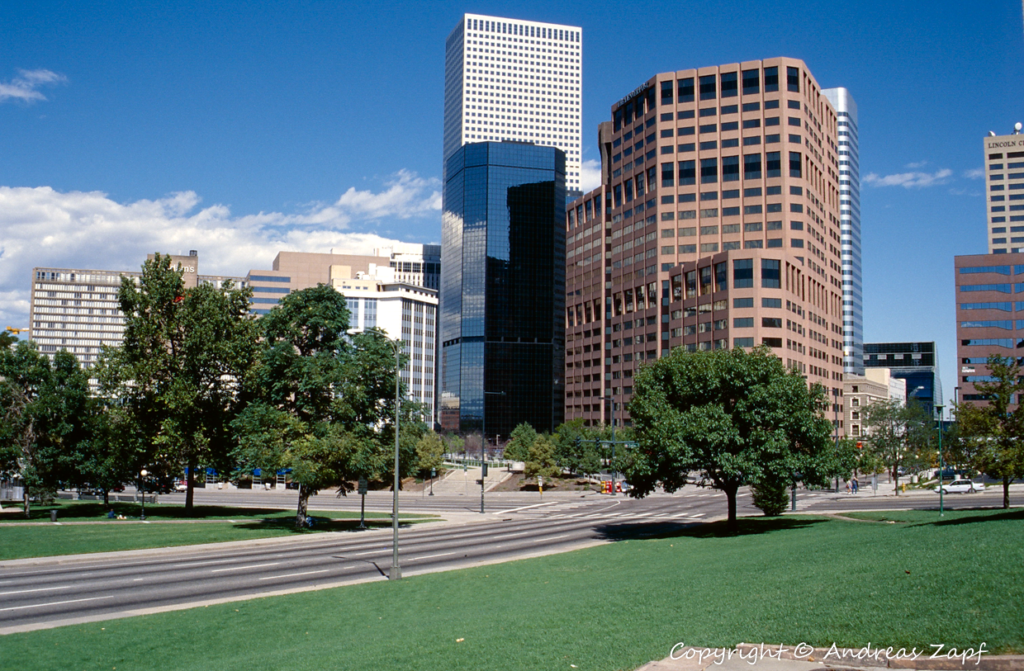
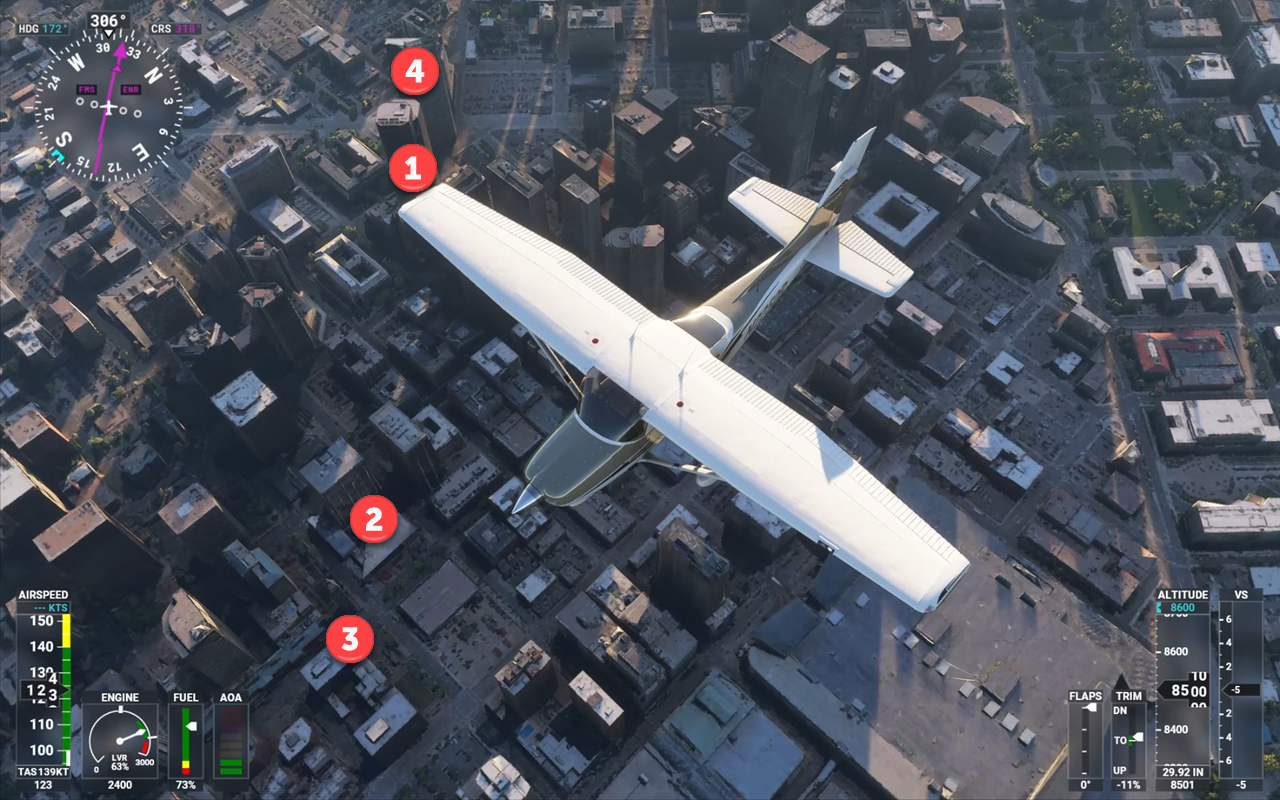
And there are some more downtown buildings that we visited way back when – and their counterparts in FS 2020.

These are from the images above: 18th Street / California, the Independence Plaza with the 950 Curtis Street Tower next to it, the Daniels & Fisher Tower, and the Holy Ghost Church with the 1999 Broadway Building behind.

All of the aforementioned buildings in downtown Denver

From Downtown Denver, the route takes us right up to the foot of the mountains, Boulder is our gateway into the Rockies.

Boulder and the Rocky Mountains

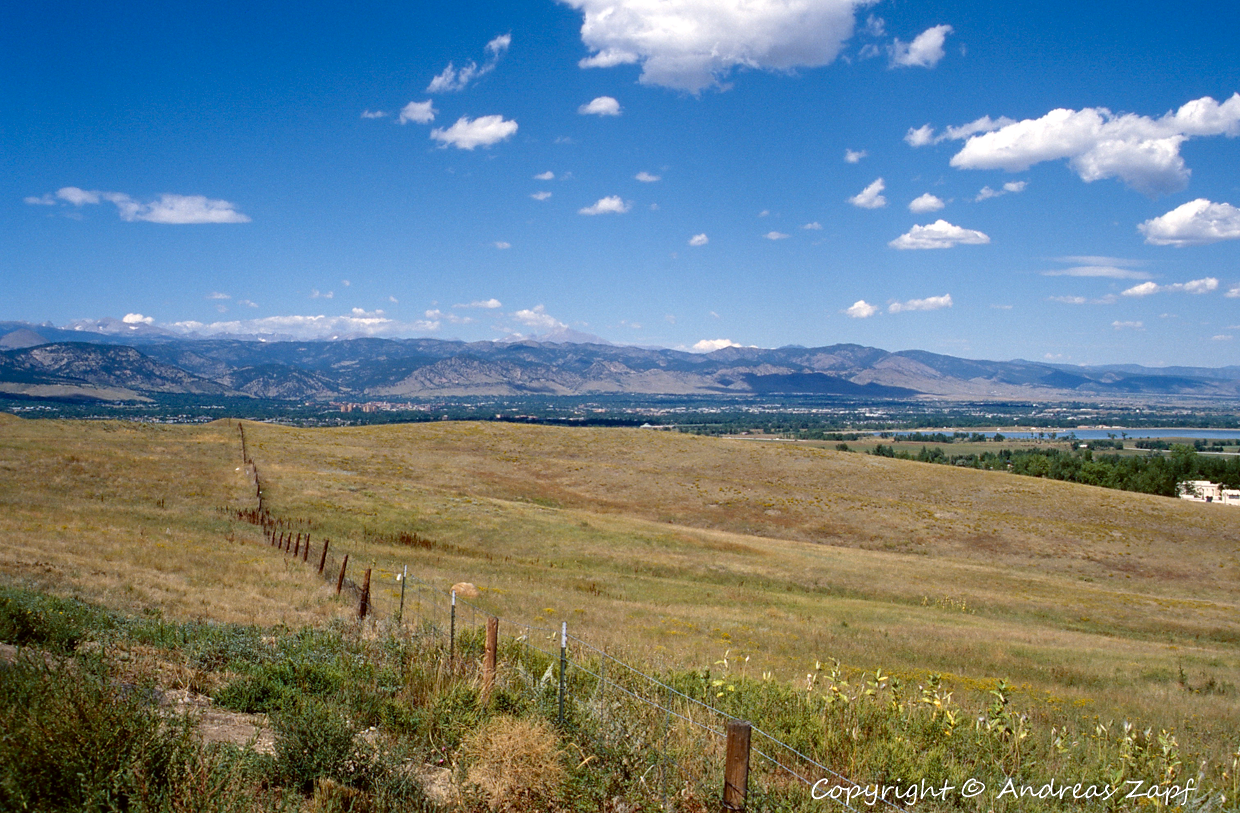
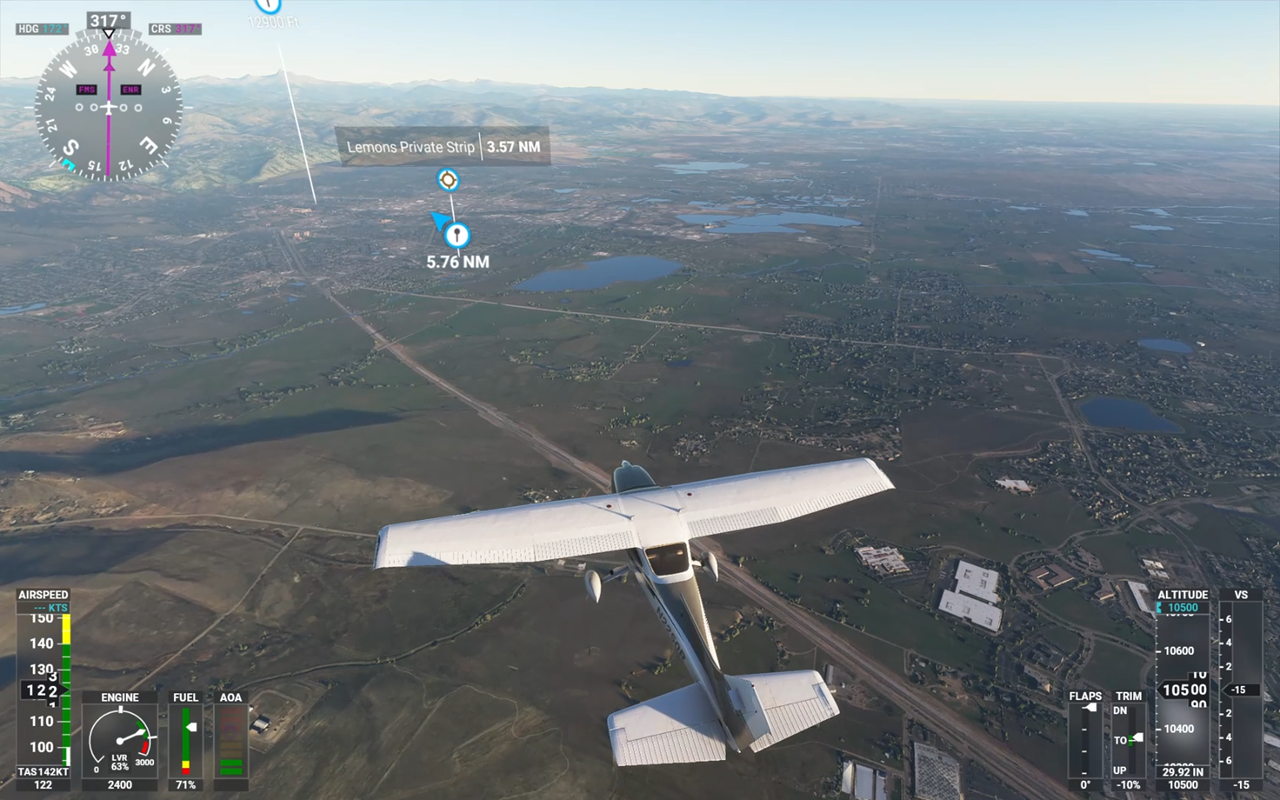
Following Highway 36 from Denver to Boulder, we are pulling over to the curb in 1996 – and we are enjoying the same view from the Cessna in FS 2020.

It is amazing how well the terrain is represented – the small hill slope left of the route marker is actually visible “in real life” in the 1996 photo.

From Boulder, things start getting “mountainous” – the Highway 119 is cutting into the Rockies, following the valley the Boulder Creek has cut into the stone throughout the ages.

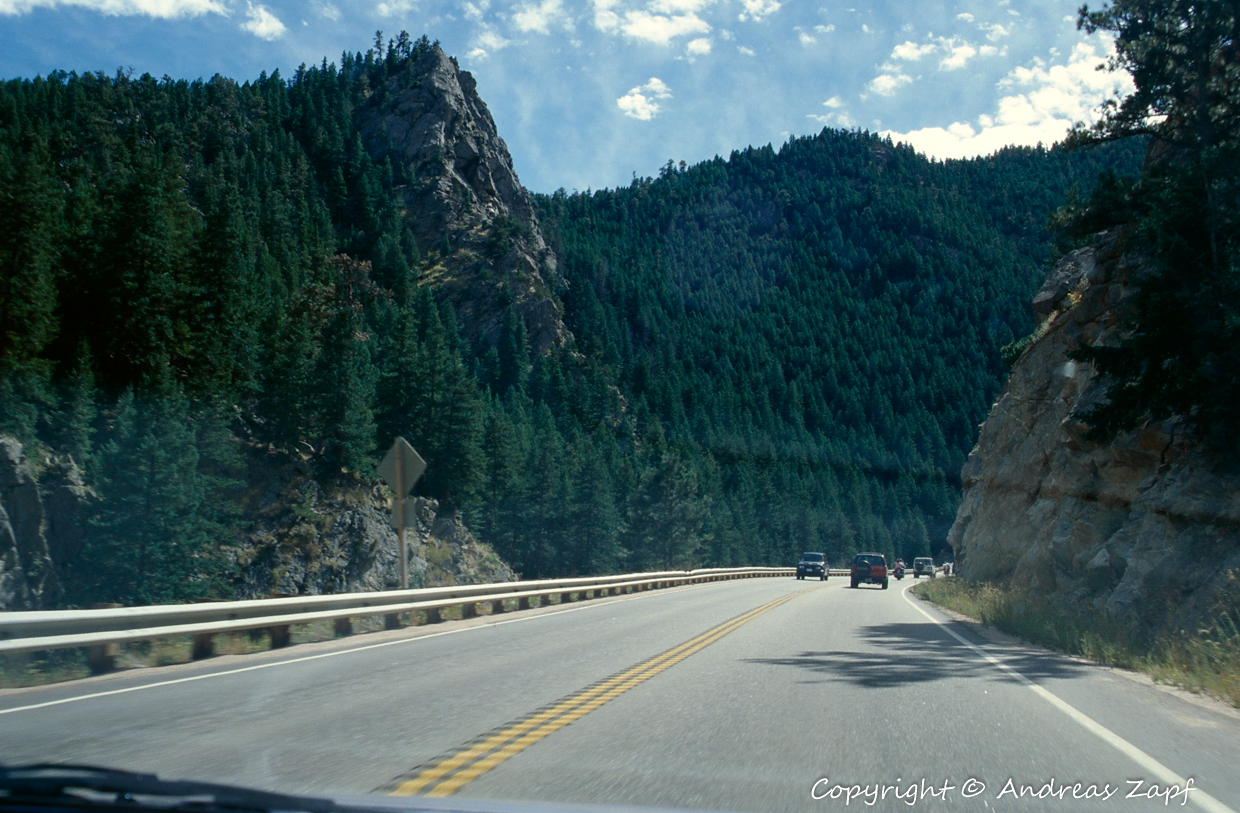
The first images shows a stretch of the Highway 119 around the Boulder Falls area – the valley and Boulder Falls are recognizable from above as well.

Highway 119 (1) and Boulder Falls (2) from “above”

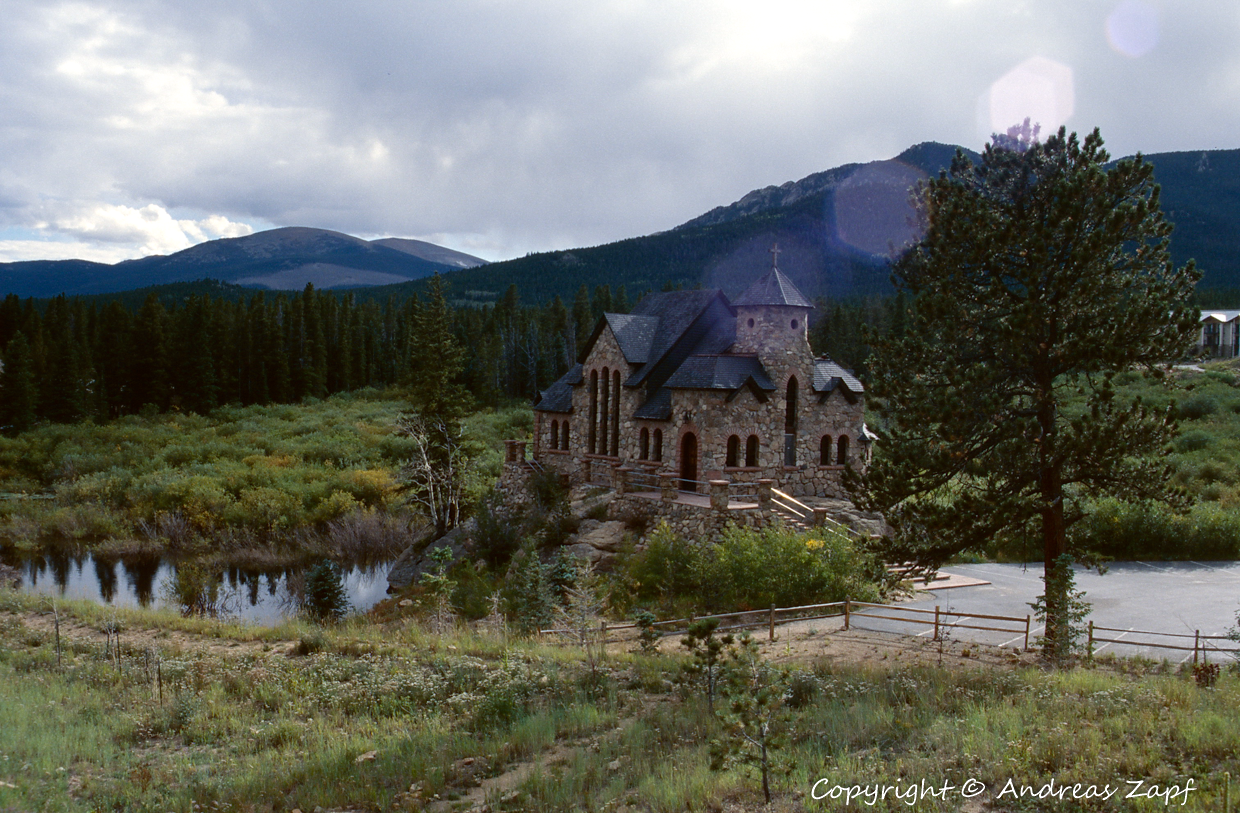
Further up Highway 72, the St. Catherine’s Chapel on the Rock is not picked up very well – but maybe, that is a bit too much to ask.

The St. Catherine’s Chapel on the Rock does not really exist – and you need to know where to look for it.

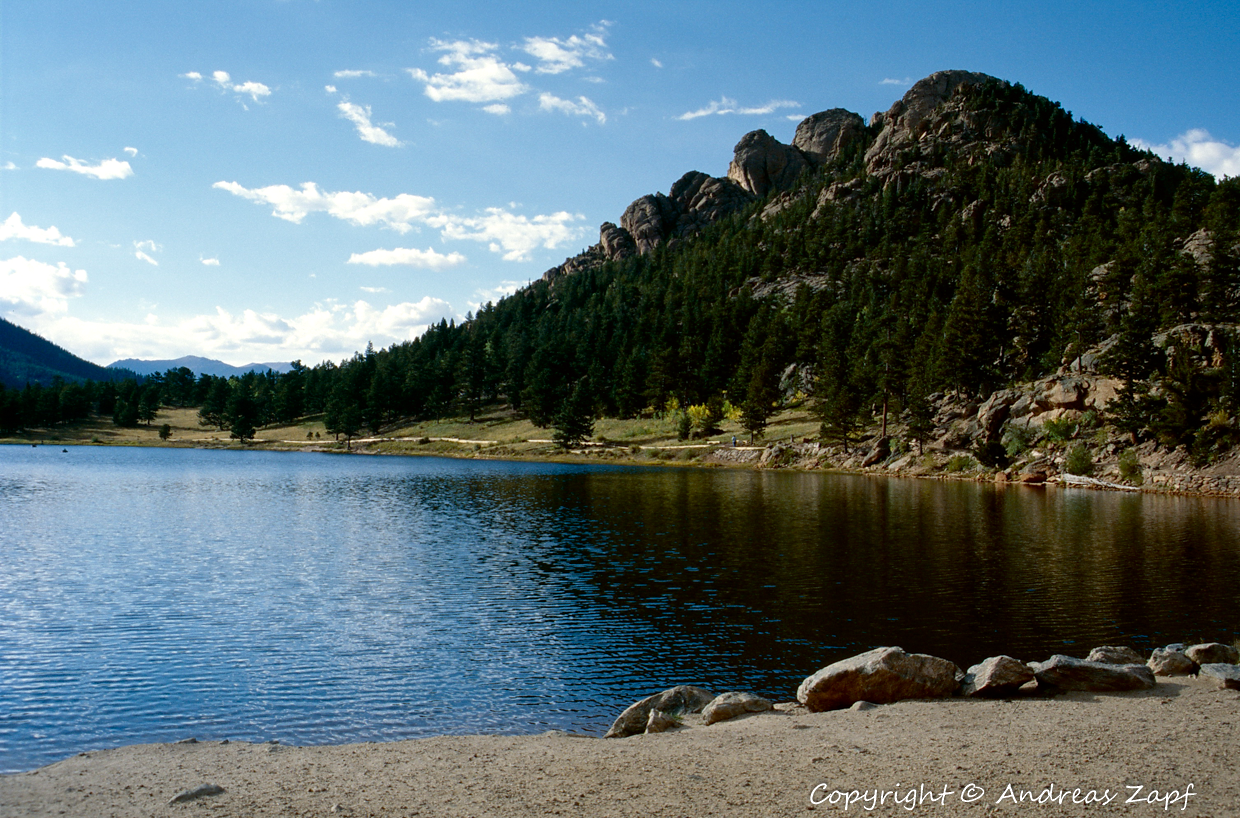
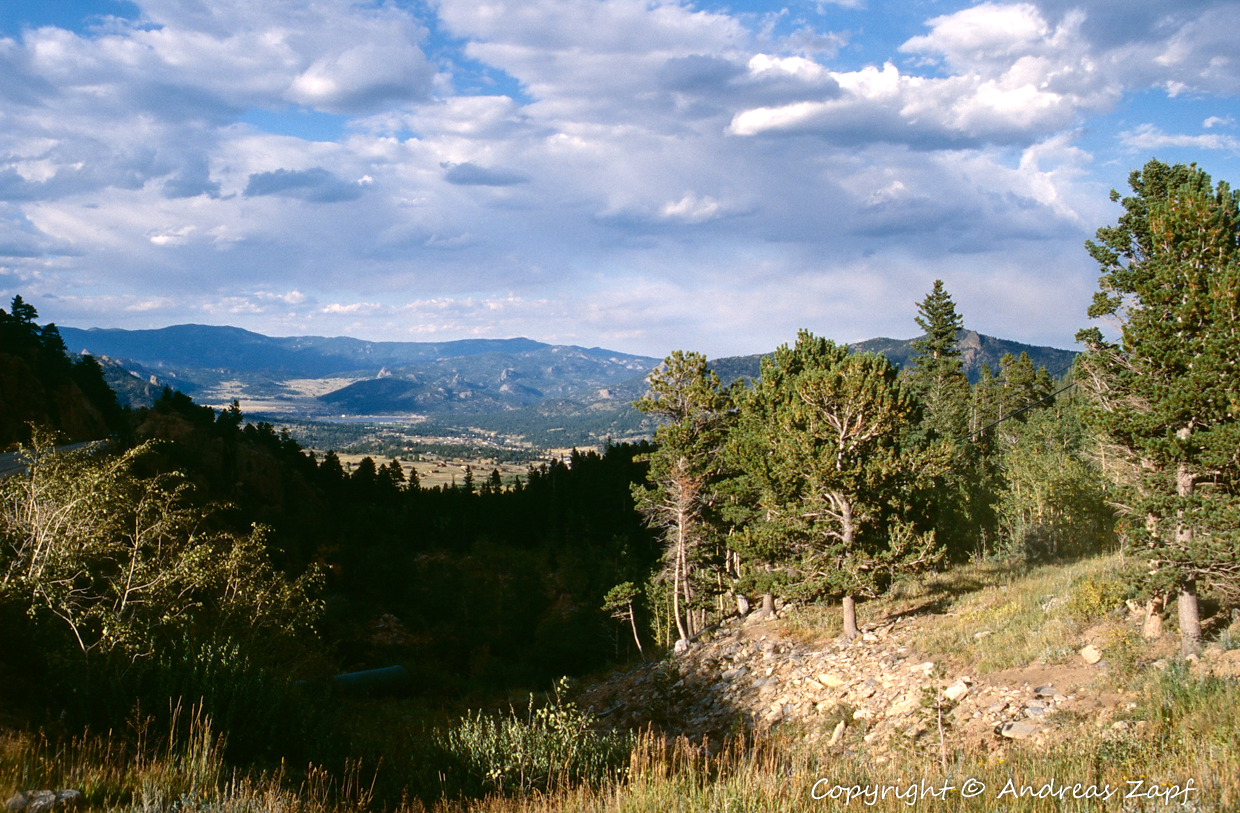
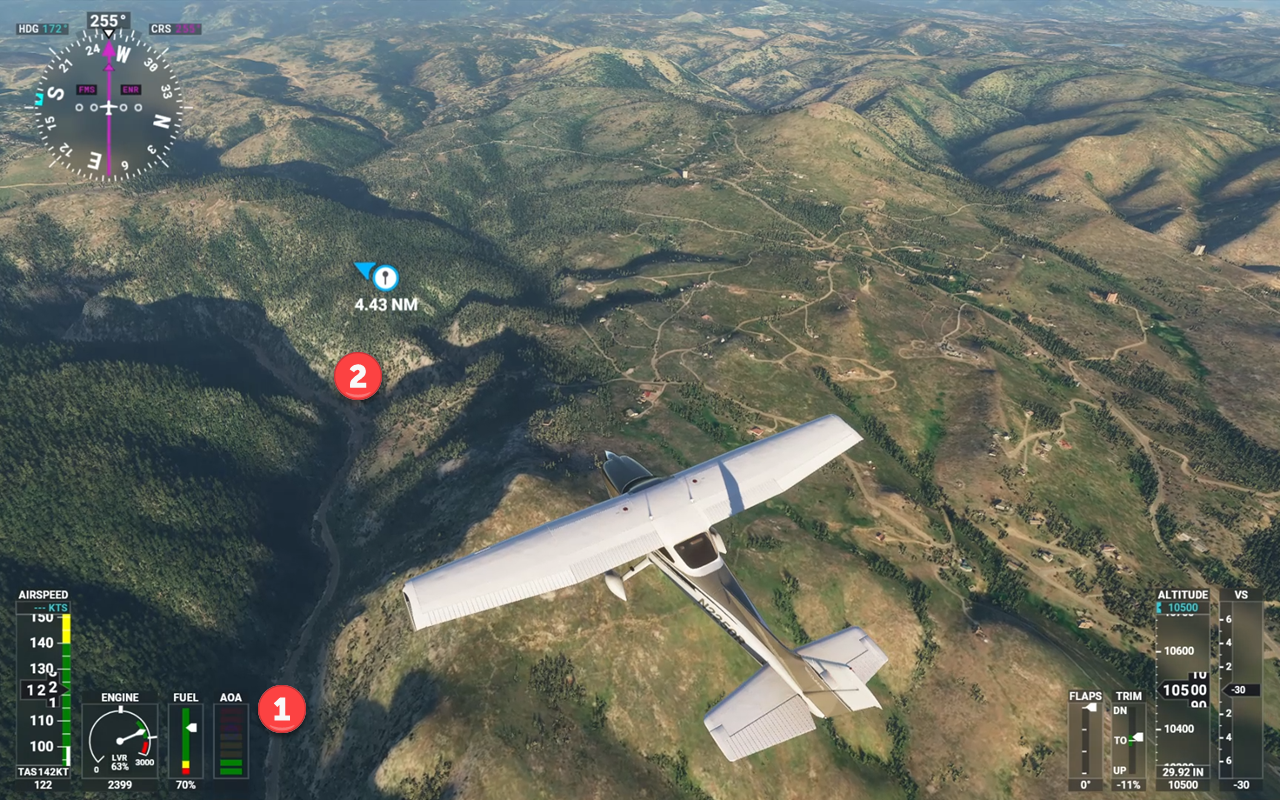
A little bit up the road Highway 72 runs past Lilly Lake, a very scenic little lake and our first entry into Rocky Mountain National Park. And although the early morning flight finds the little lake in the shadows, it is there and the view into the distance also is reflected pretty well.

Lily Lake with the positions the original photos were taken in 1996.

Following a night in Estes Park, the first target of the new morning was Bear Lake in the Rocky Mountain National Park.

Bear Lake in the Rocky Mountain National Park

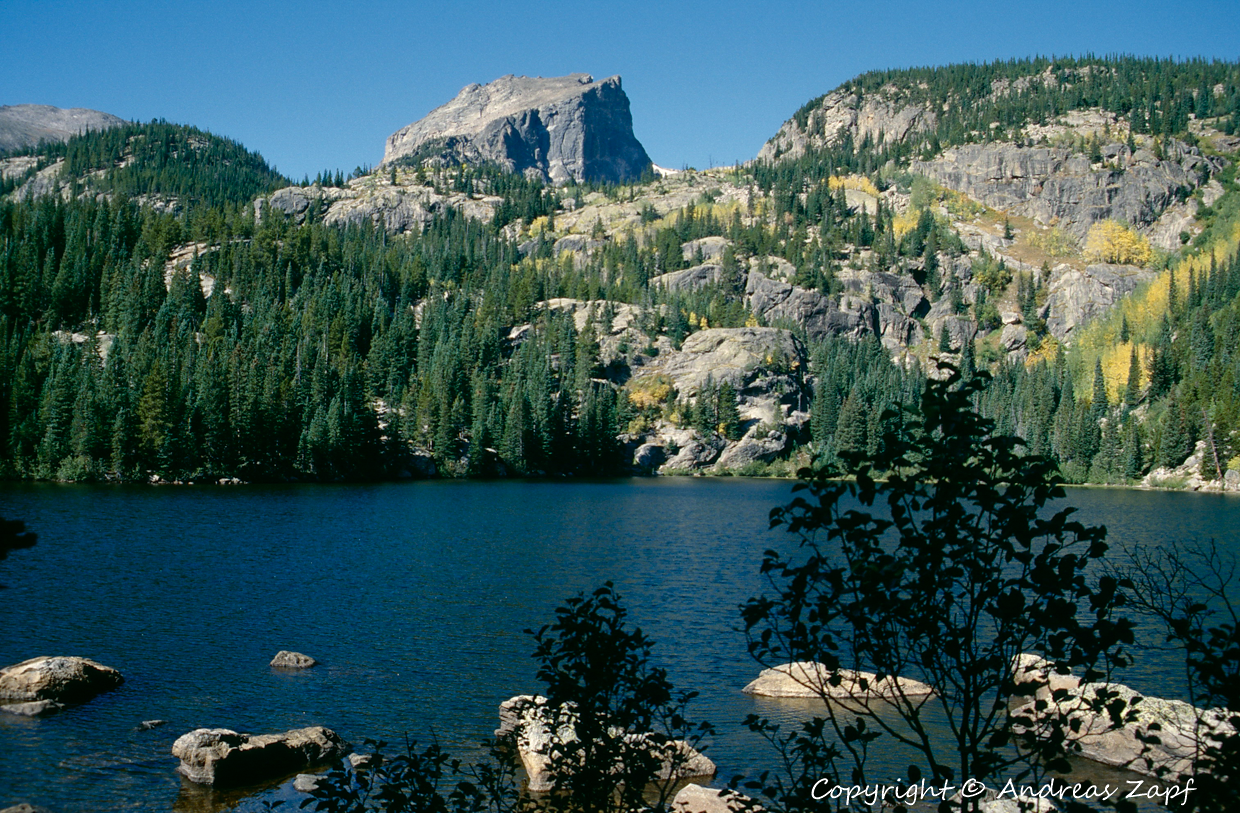
The rendering of the steep cliffs above the lake is a little bit mellowed by the Flight Simulator’s terrain mesh but all in all, the trerrain itself is very convincing.

Bear Lake in the Rocky Mountain National Park

From Bear Lake, it is back to the Beaver Meadows Entrance Station and then up to Deer Ridge Junction to intercept the Trail Ridge Road. Trail Ridge Road is a 31 km / 19 mi high alpine road that has its highest point at 12.183 ft. / 3713 m just behind Lava Cliffs. At that hight, it runs at the top of the mountain ridge, above the tree line.

If you need a map of the park, you can download one here – which might be easier to follow the individual spots the images were taken.

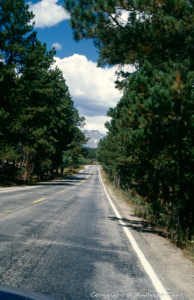
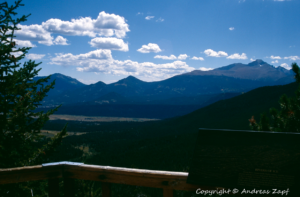
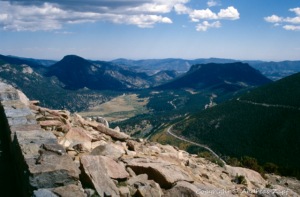
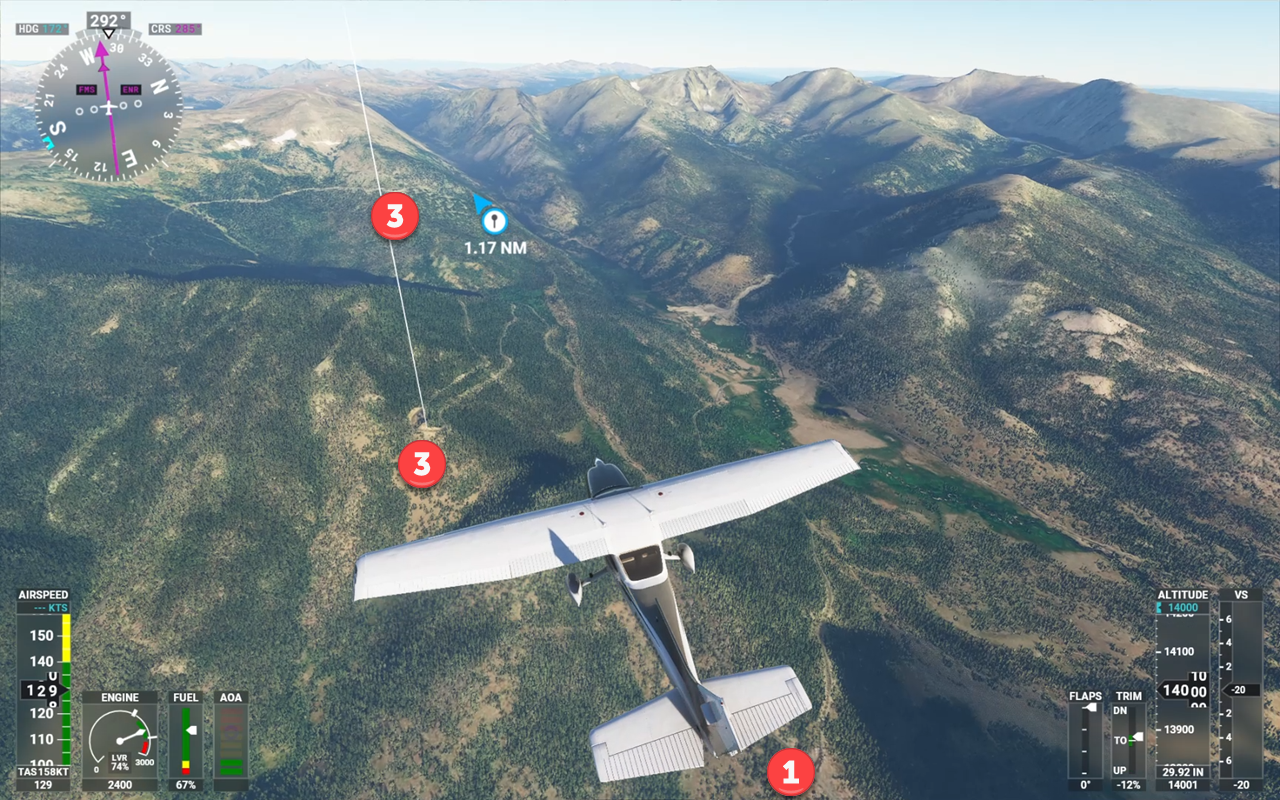
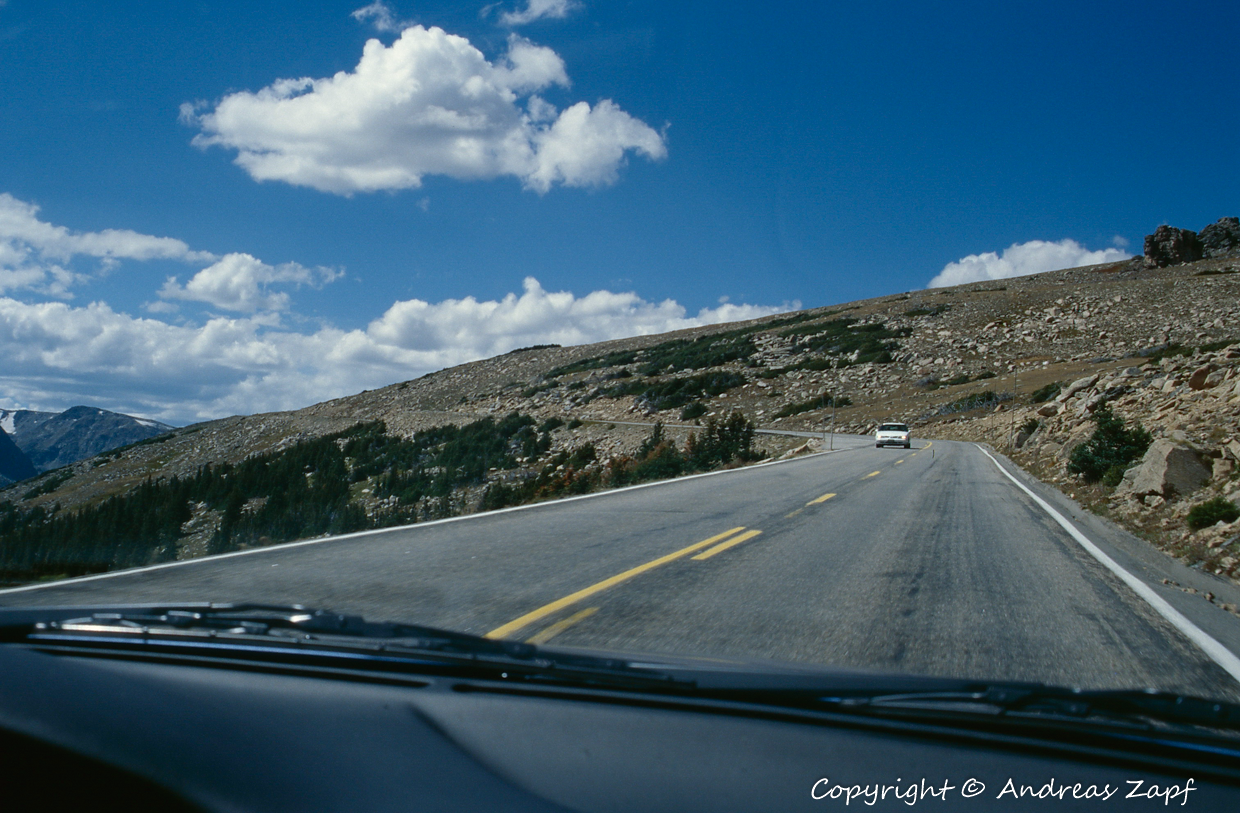
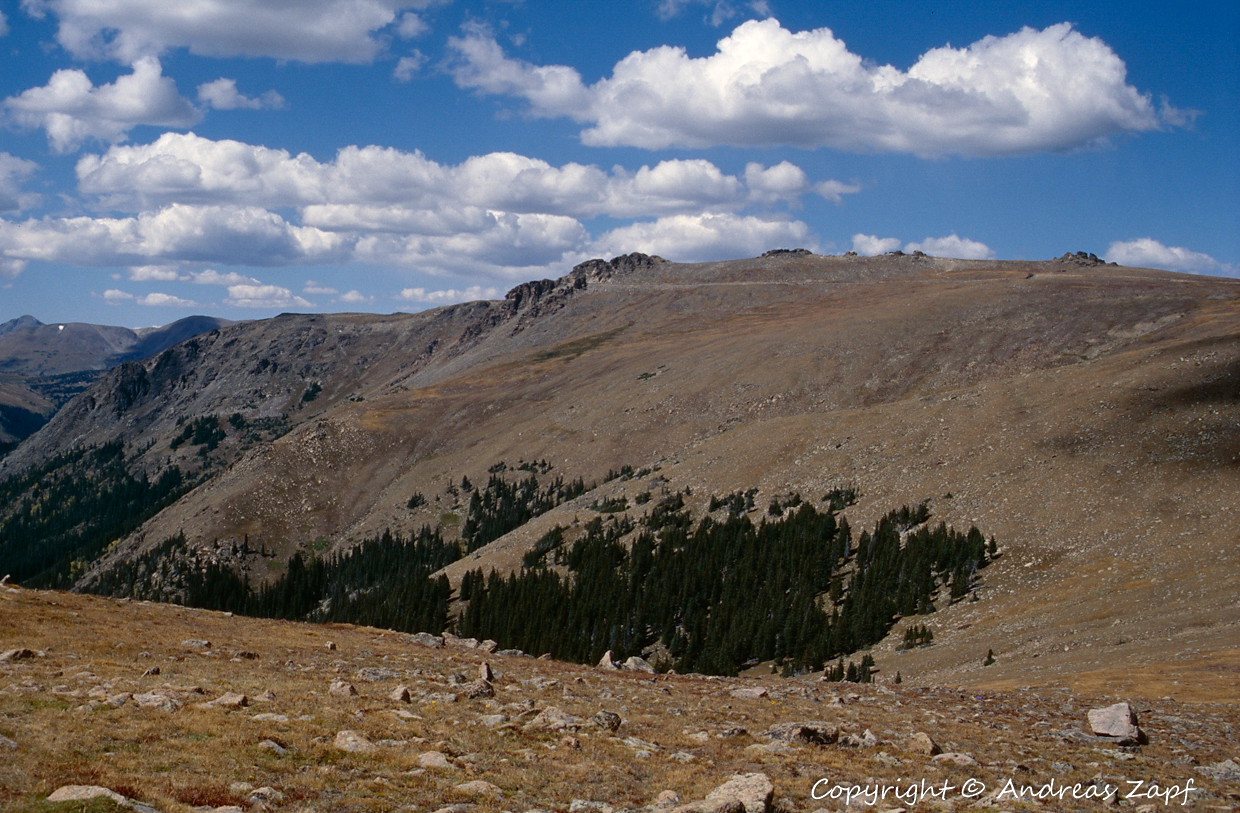
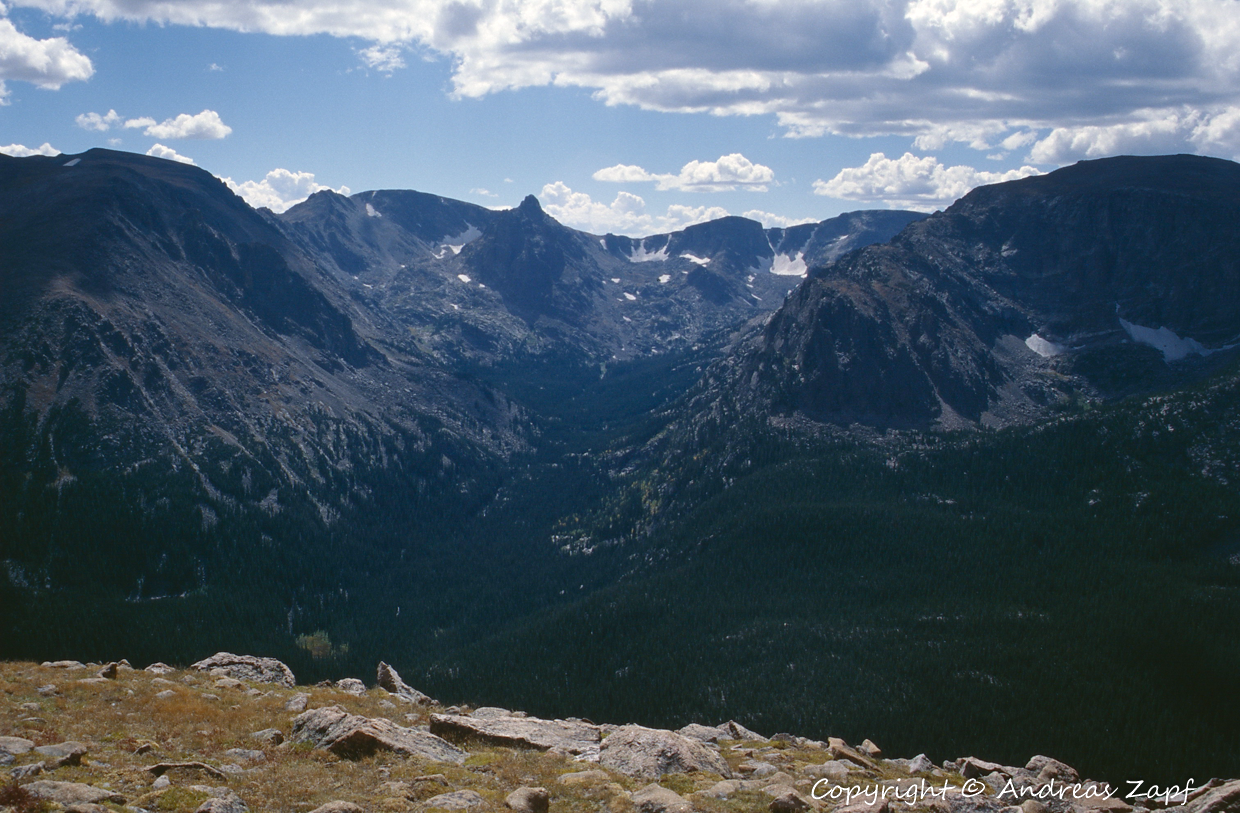
The first image was taken around Deer Ridge Junction while the road is still running through the large forest areas. The second one is taken from Many Parks Curve and the thrid one is captured at Rainbow Curve.

And in FS 2020: Deer Ridge Junction (1), Many Parks Curve (2), and Rainbow Curve (3).

And because Rainbow Curve is a bit far out (and we need to look back to re-enact the photo), here it is a few seconds later:

Looking back from Rainbow Curve (1)

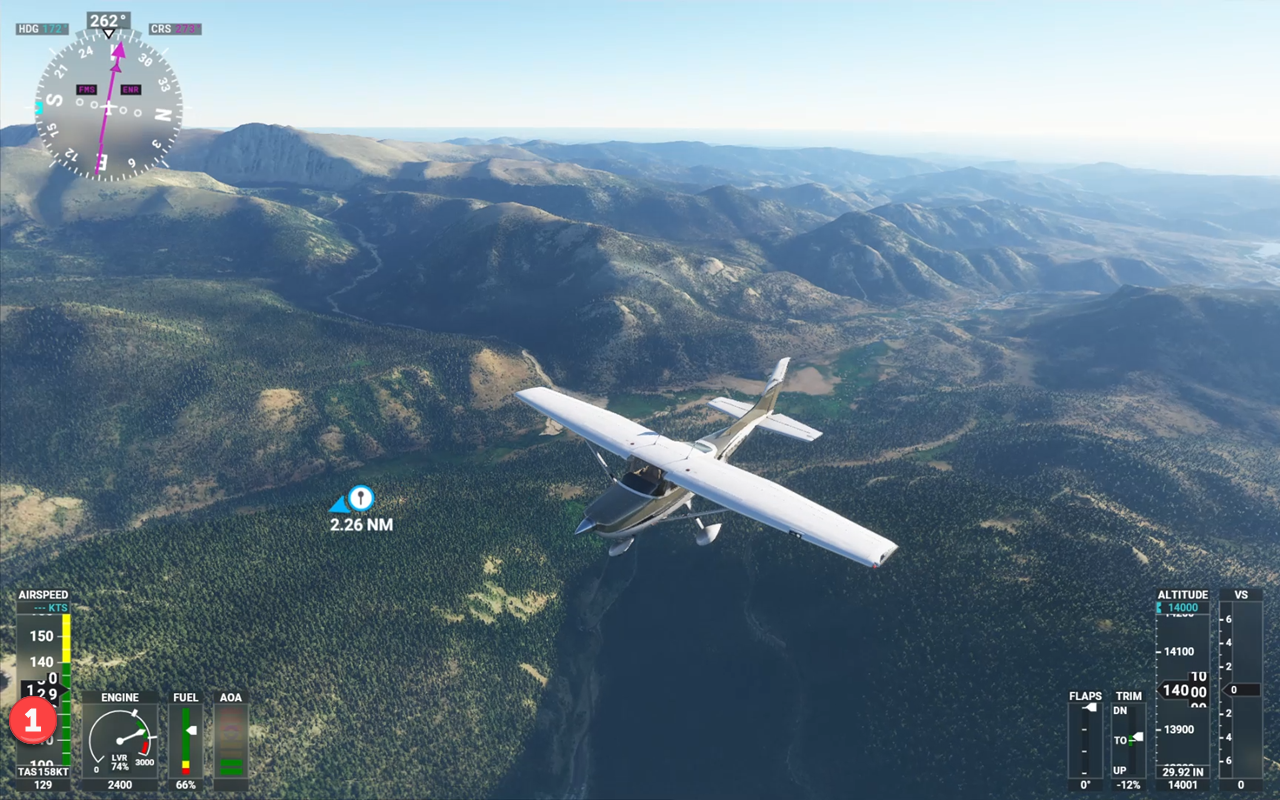
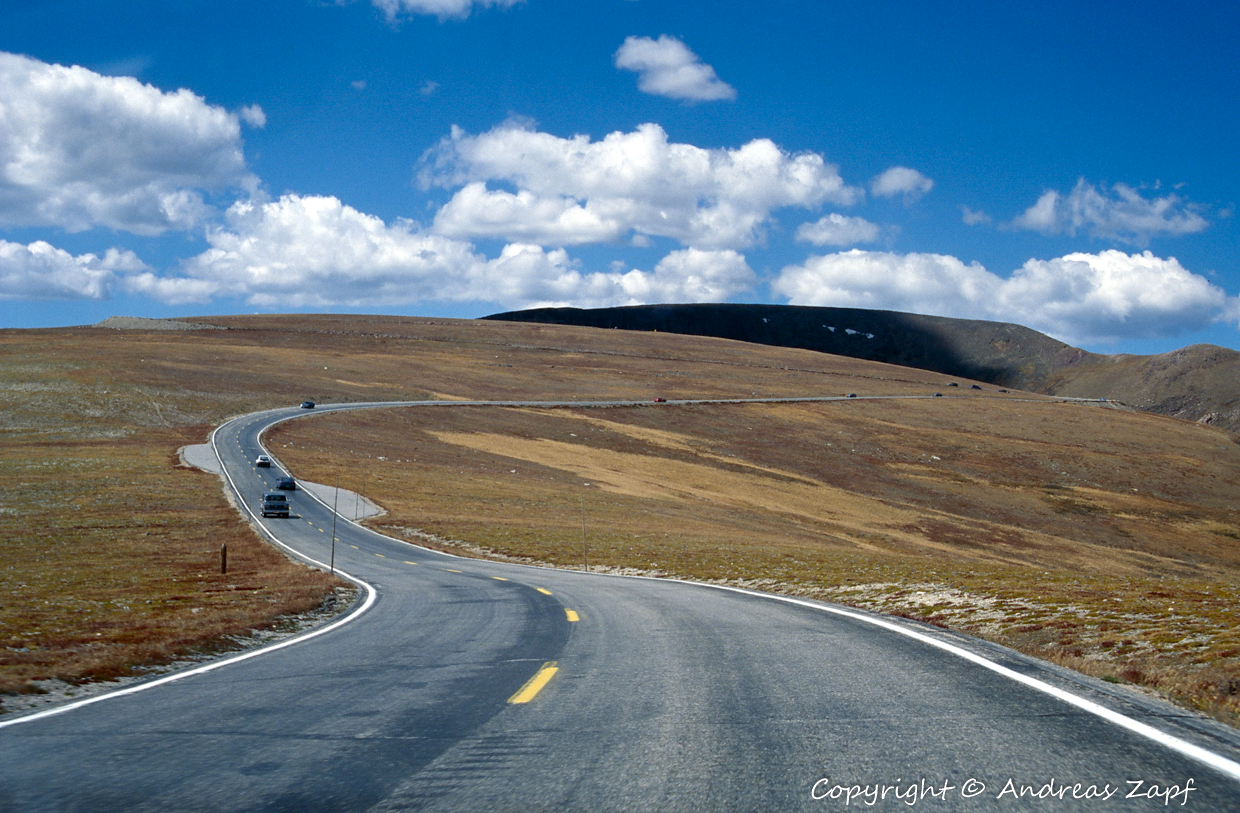
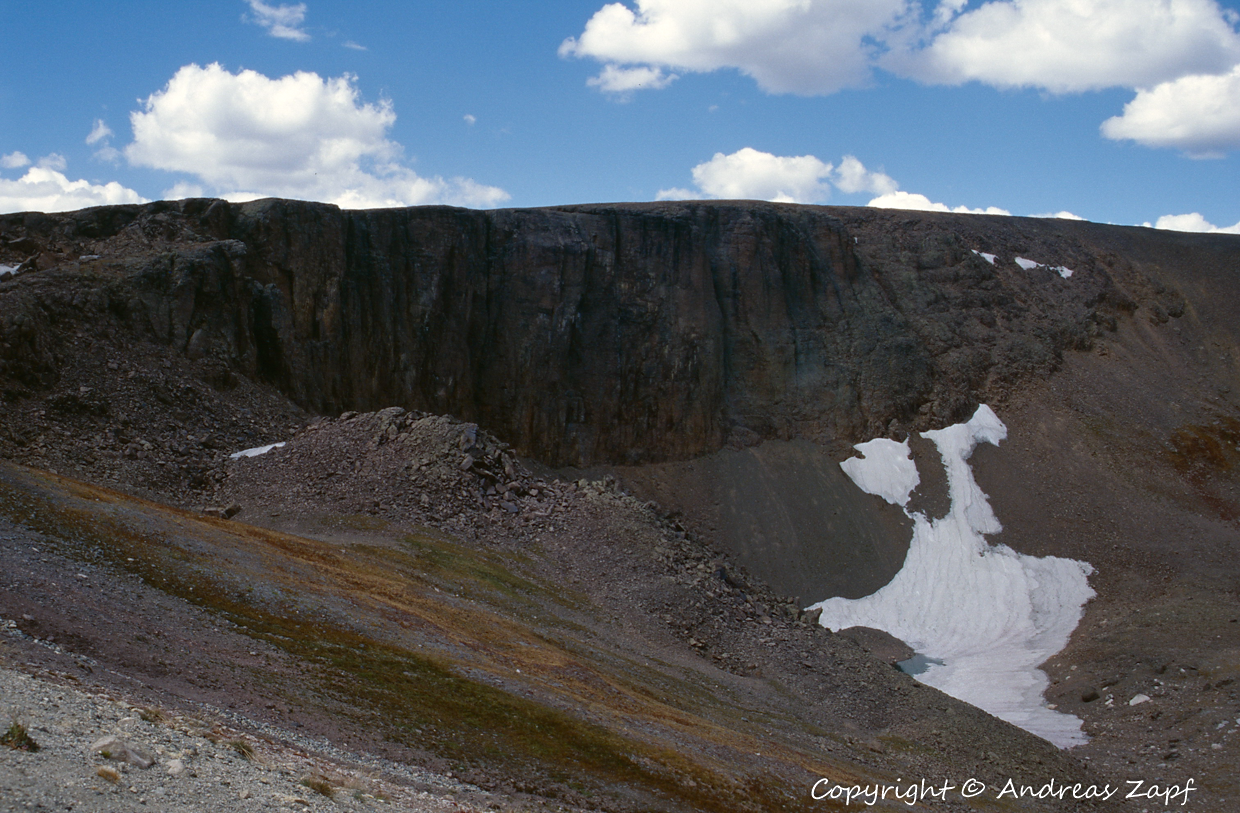
From there on, Trail Ridge Road runs above the tree line – and even in early September 1996, we had traces of snow left and temperatures around 0°C.

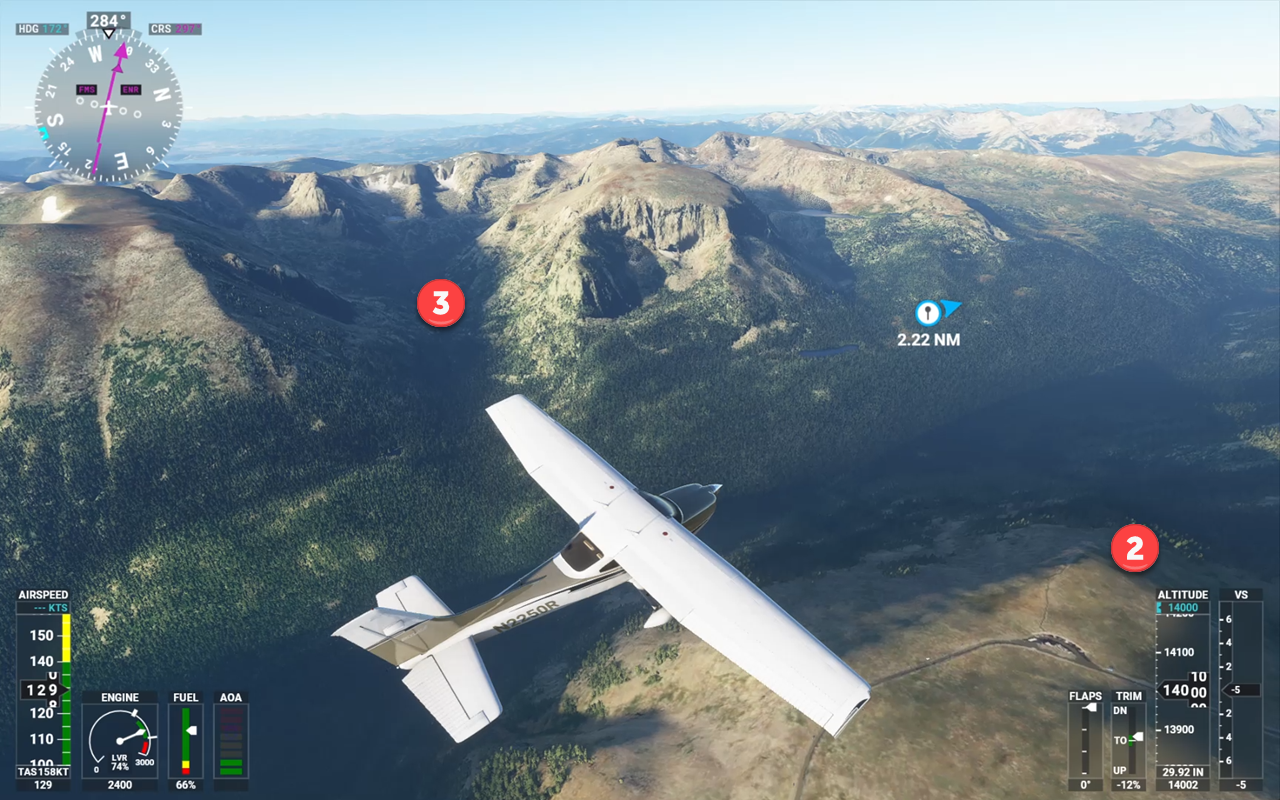
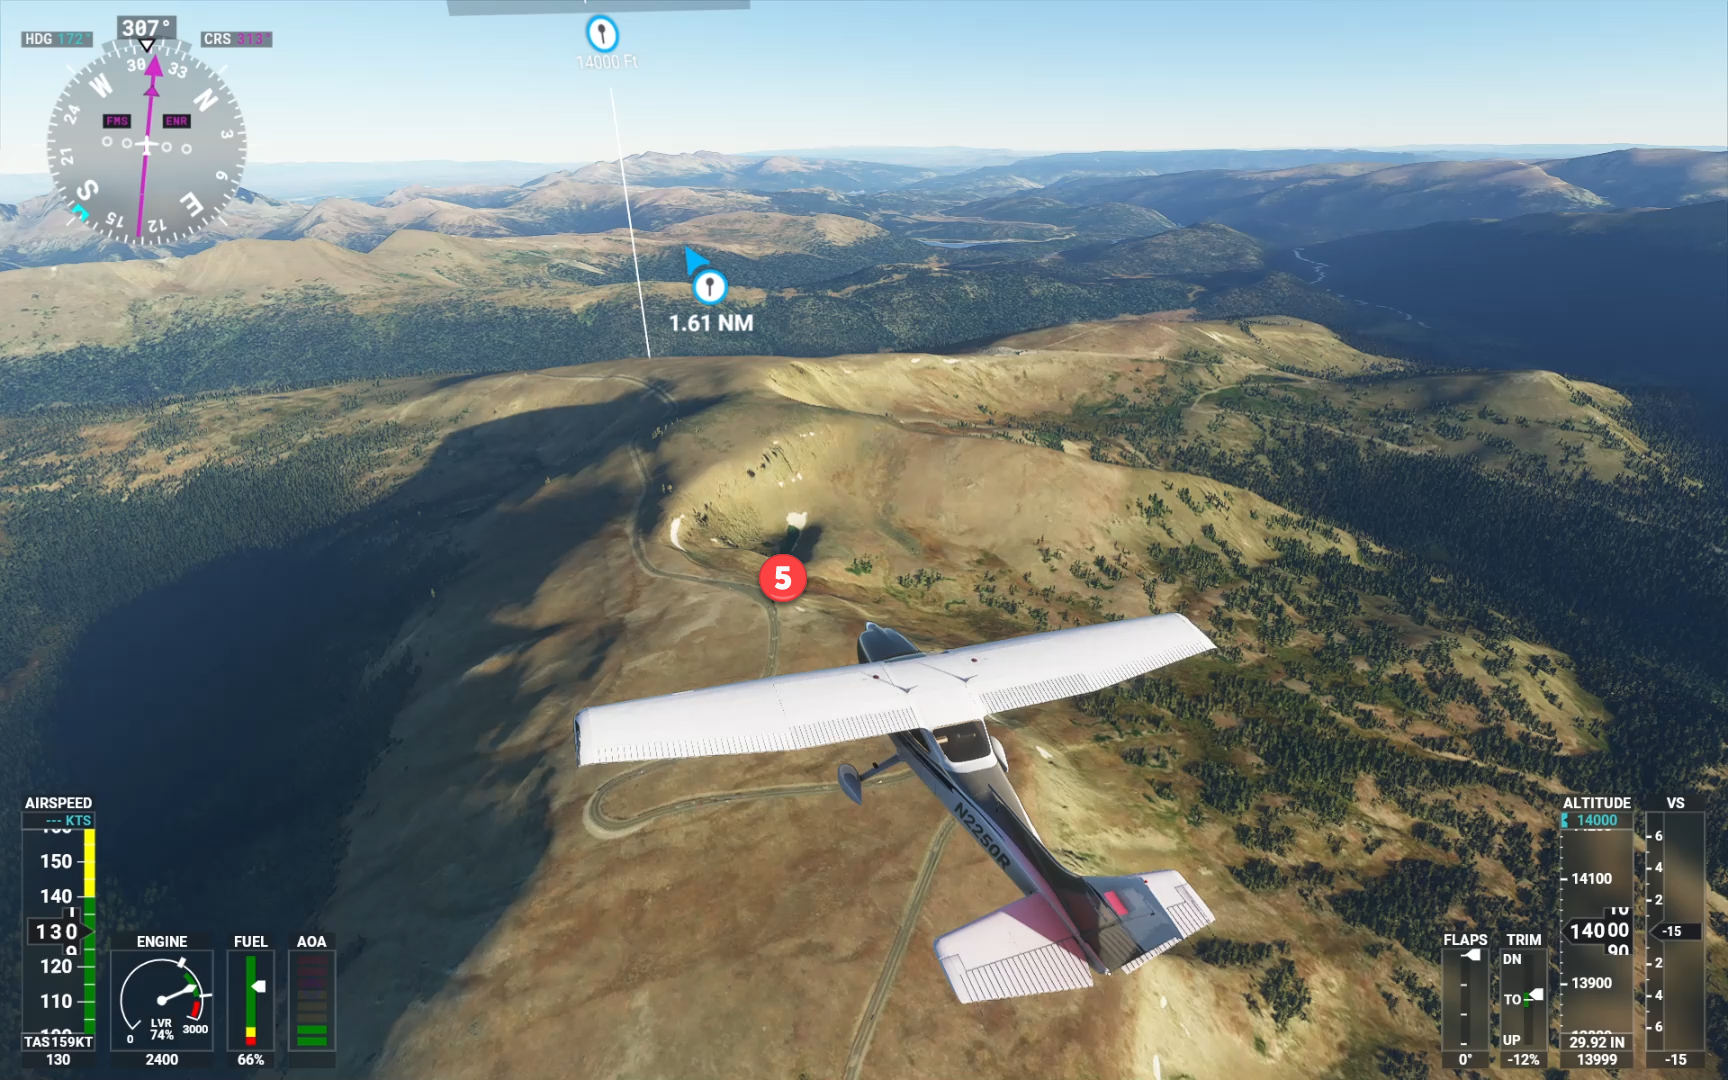
The Flight Simulator’s recreation of the country is stunningly accurate as you can see in the next gallery section. The locations of the above images are marked with their respective numbers in the FS 2020 photos.

From 12.000 ft., it is now all downhill to Shadow Mountain Lake, Lake Granby and the town of Granby, the local airport – KGNB – at 4.975 ft. We have crossed the first mountain range of the Rockies. From here, it is “go west”, with places such as Hot Sulphur Springs, Kremmling, Steamboat Springs, and Craig, our final destination for today. All following Highweay 40.

Again, those images can be directly related to the screenshots from FS2020 – numbered accordingly.

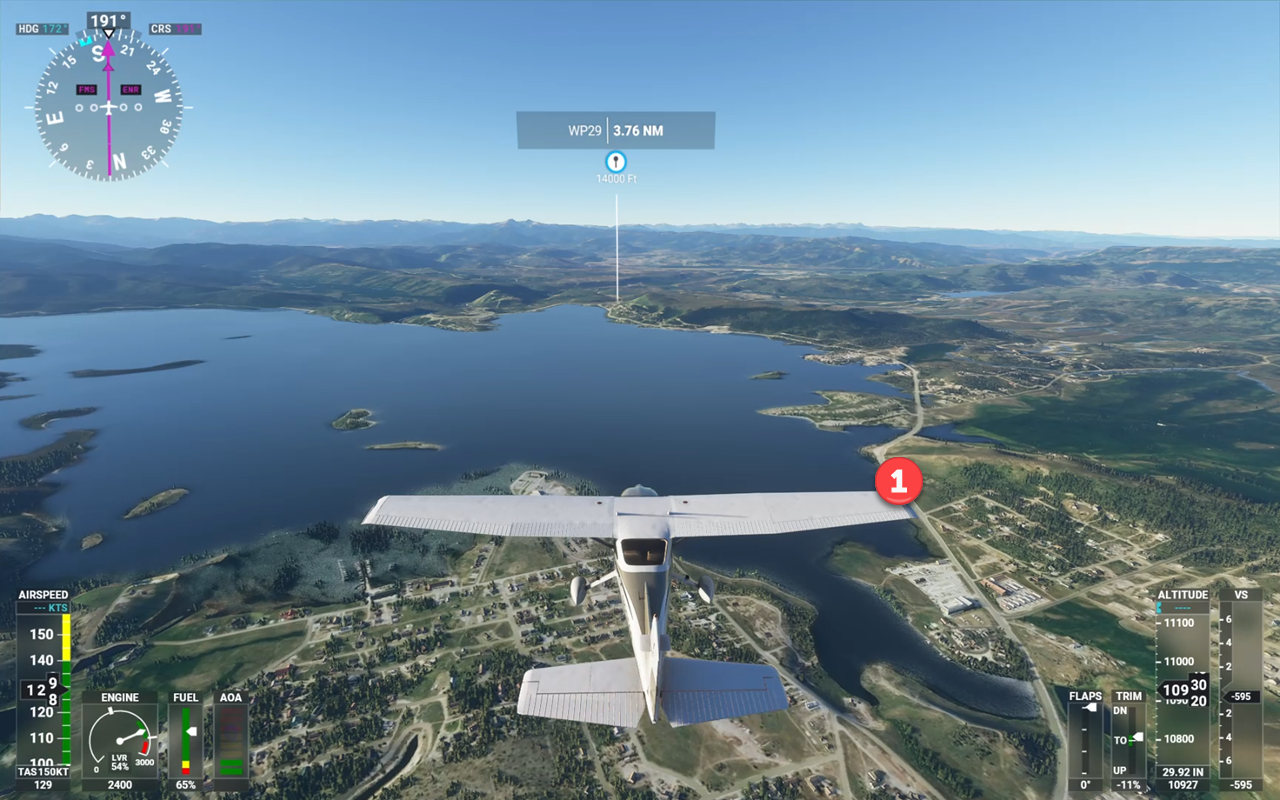
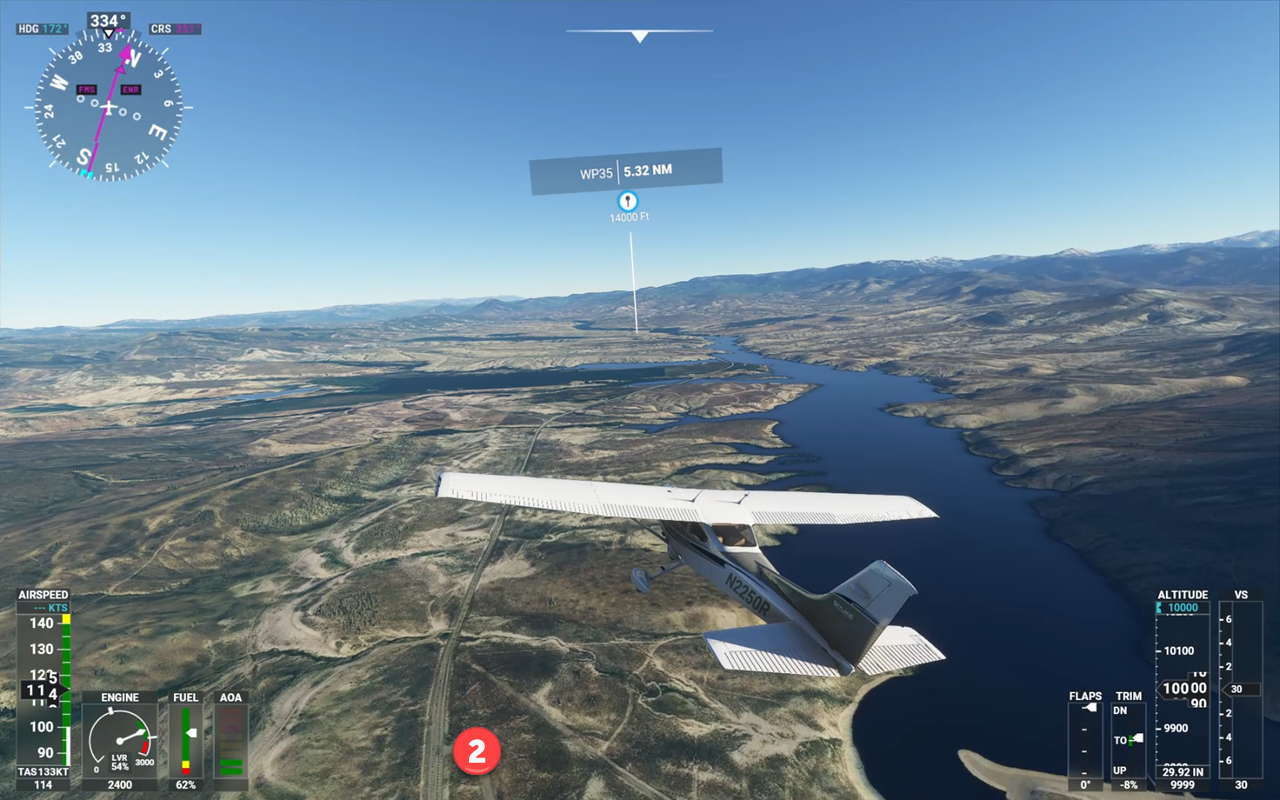
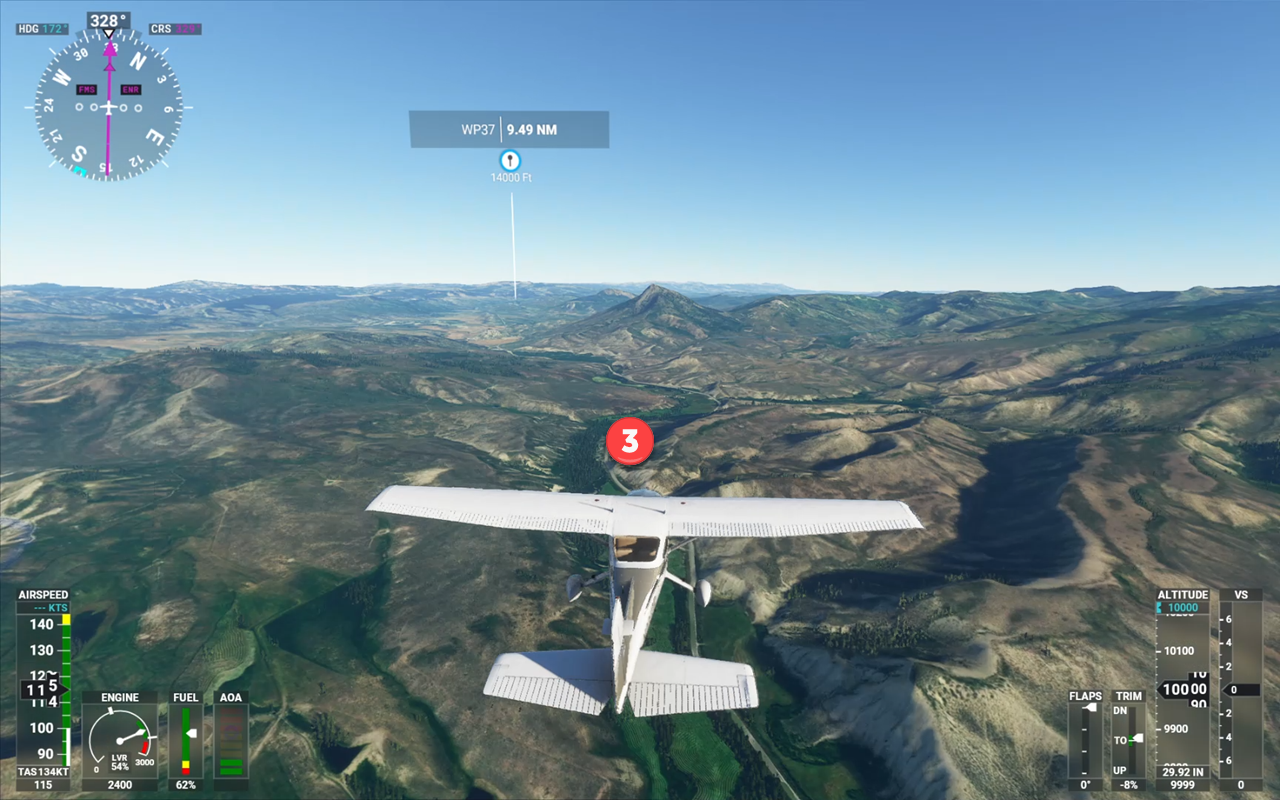
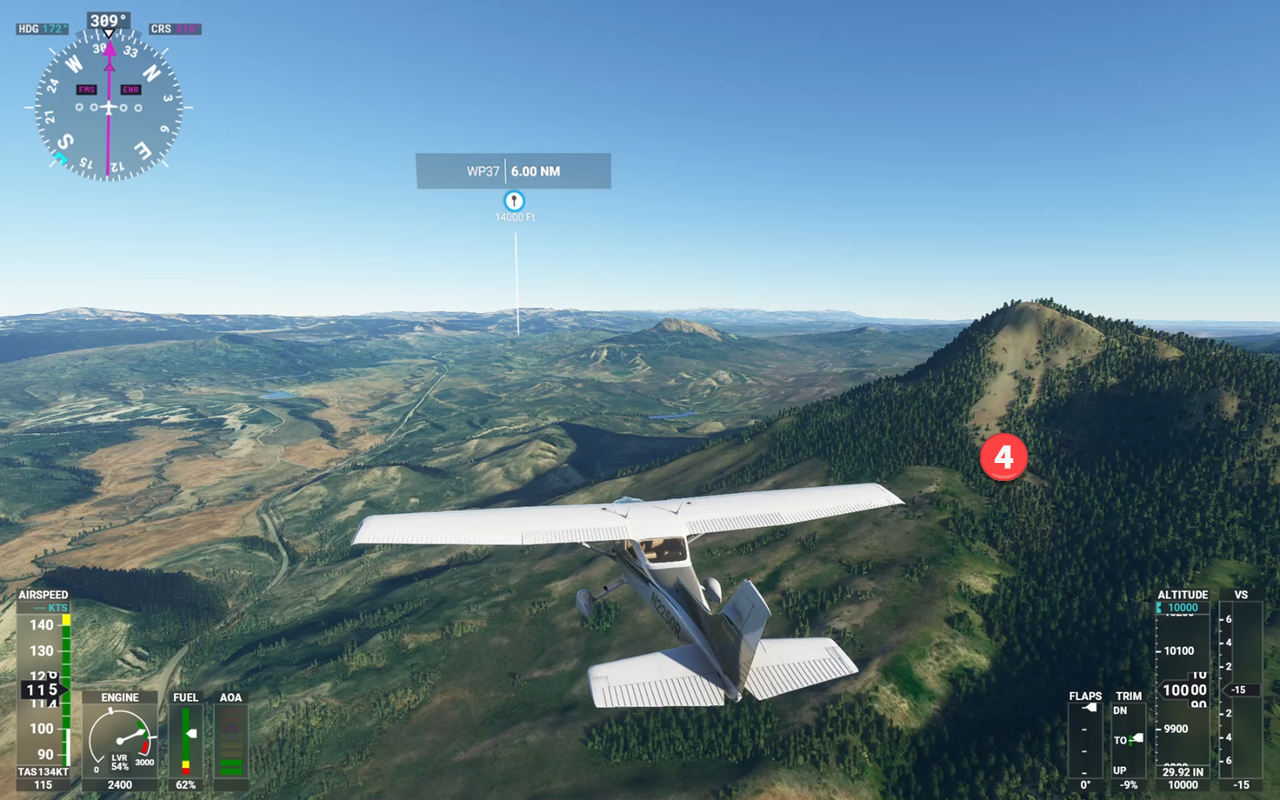
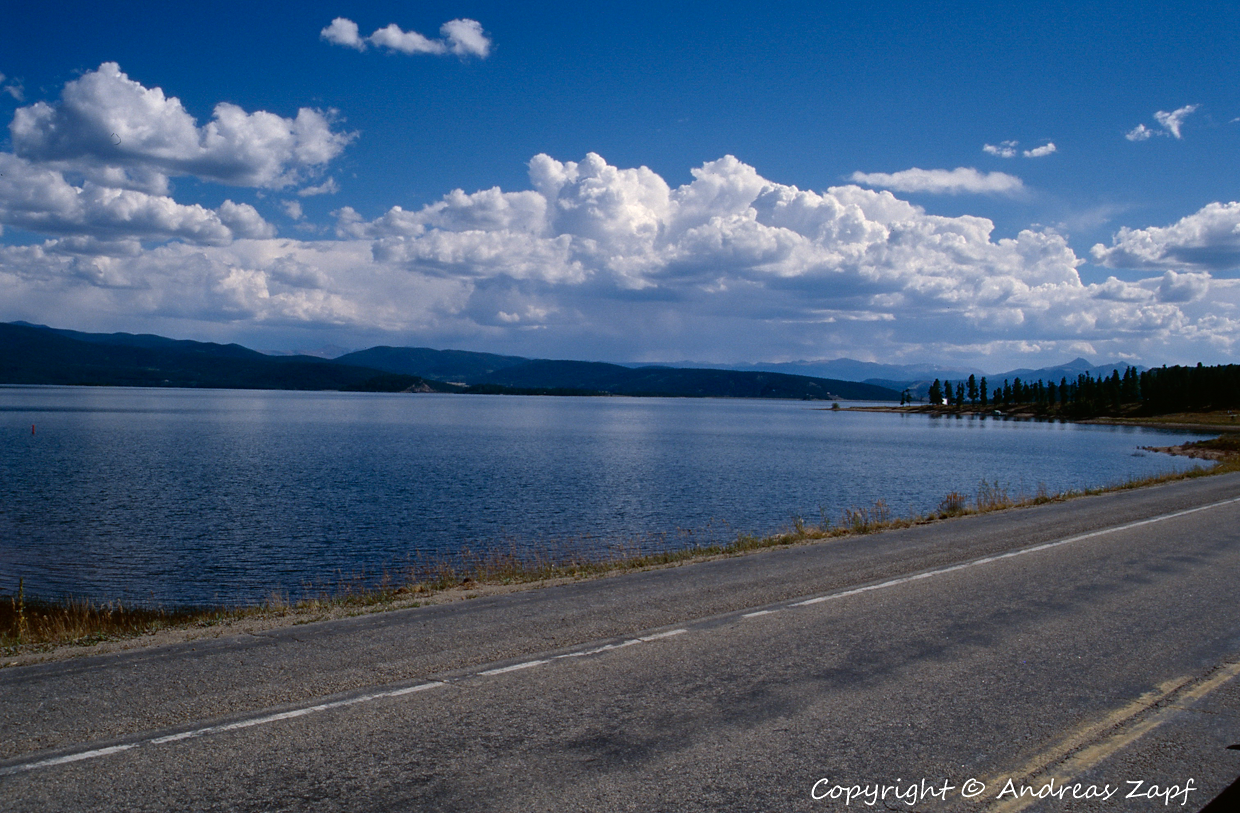
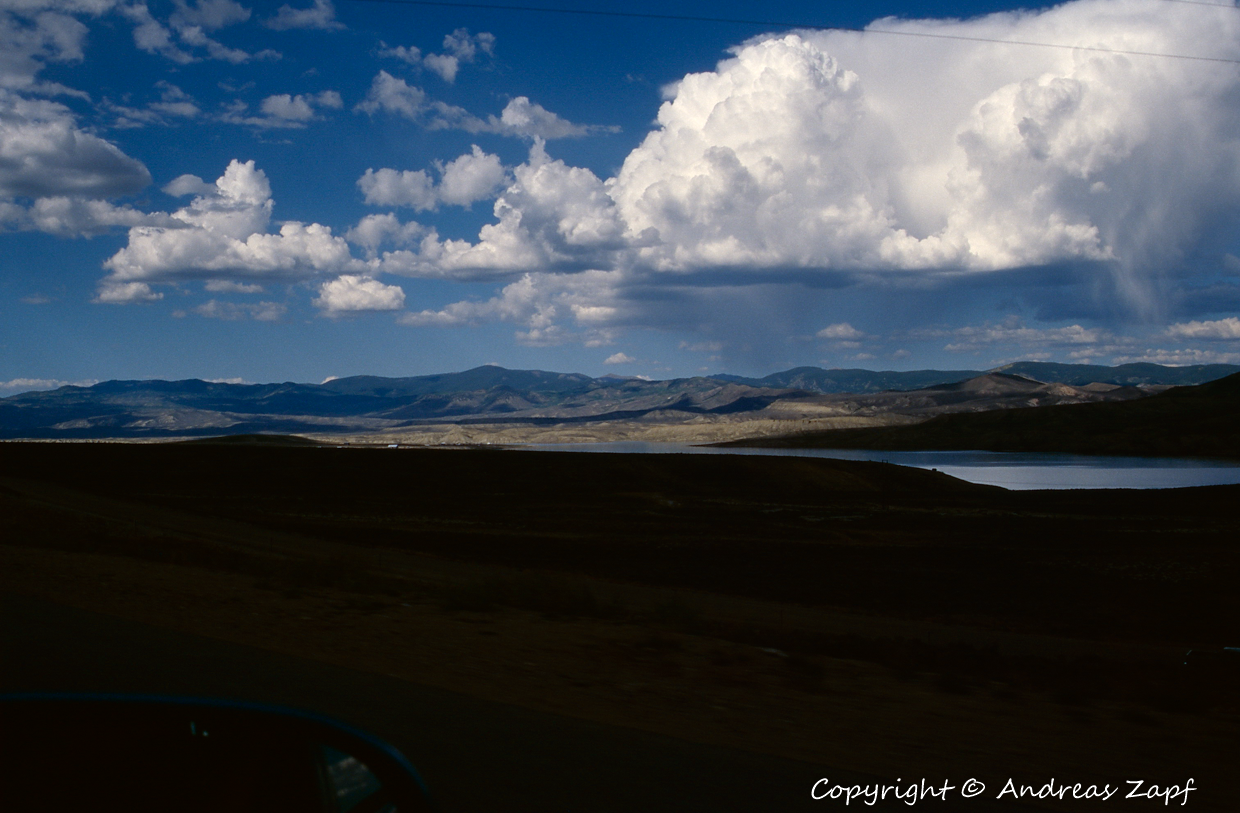
We got Lake Granby (1), Wolford Mountain Reservoir (2), Whiteley Peak from a distance (3) and close-up (4). By the way: only this flight allowed me to geo-tag the last image – I originally was under the impression that it was taken in a different location… but a Street View check in Google Maps confirmed what Flight Simulator 2020 had suggested…

I ran out of light on our trip – but the rest of the flight in FS2020 shall no go undocumented. There was some extreme low-level flying which provides a good change to get an impression of the impressive graphical handling of trees, meadows, water, etc.

Some extreme low-level flying in the Lake Catamount area – check the individual trees rendered by the system

While in the mountains, the scenery was dominated by the steep mountain ranges and the green of the forests – just a little bit past Steamboat Springs, the countryside changes, both in my photos and in Flight Simulator 2020.

Around the Yampa Valley Airport – the green is restricted to the areas around the rivers, a brownish grasland with Sagebrush starts to dominate the view.

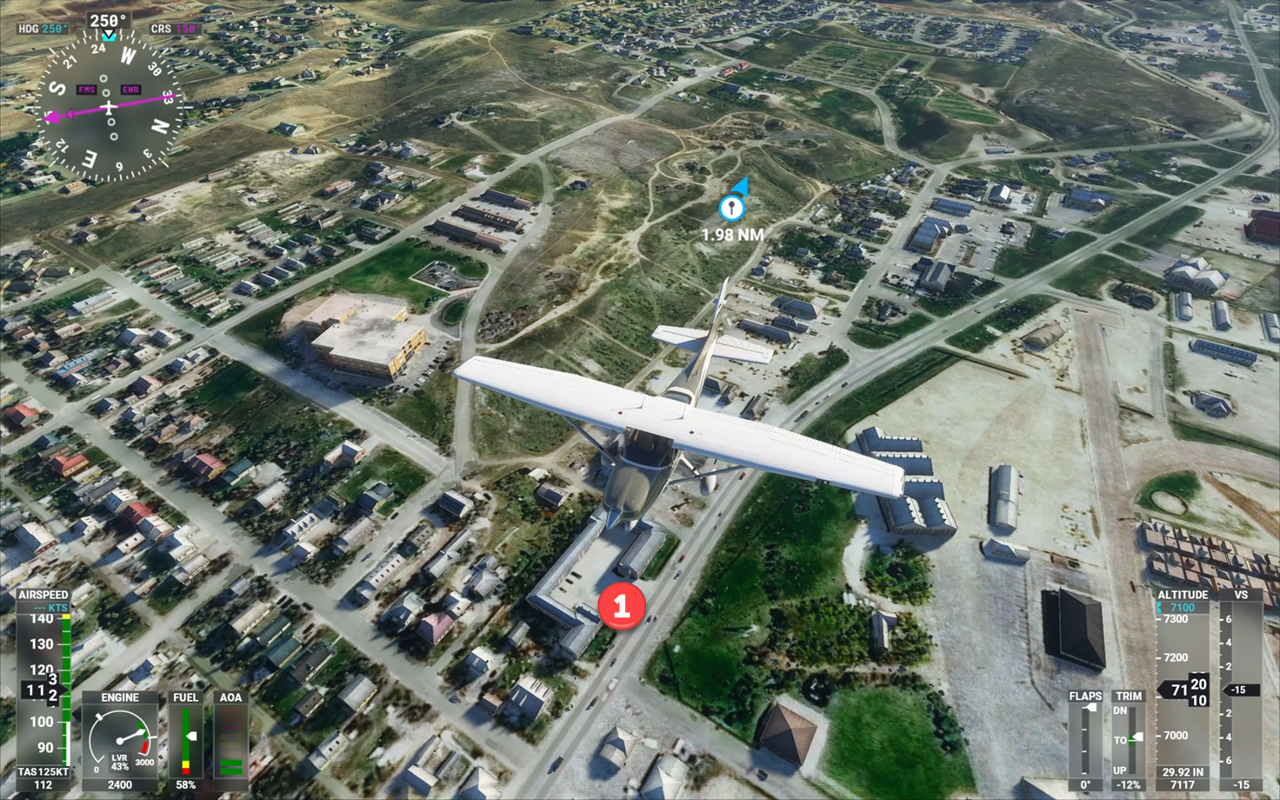
Back in 1996, we spend our night in Craig, in what is today the Bear Valley Inn of Crag (1) – I am not sure it wasn’t a Best Western Motel back then but anyway, the building is still there and the photos confirm the aerial view from above.

Craig and the Bear Valley Inn

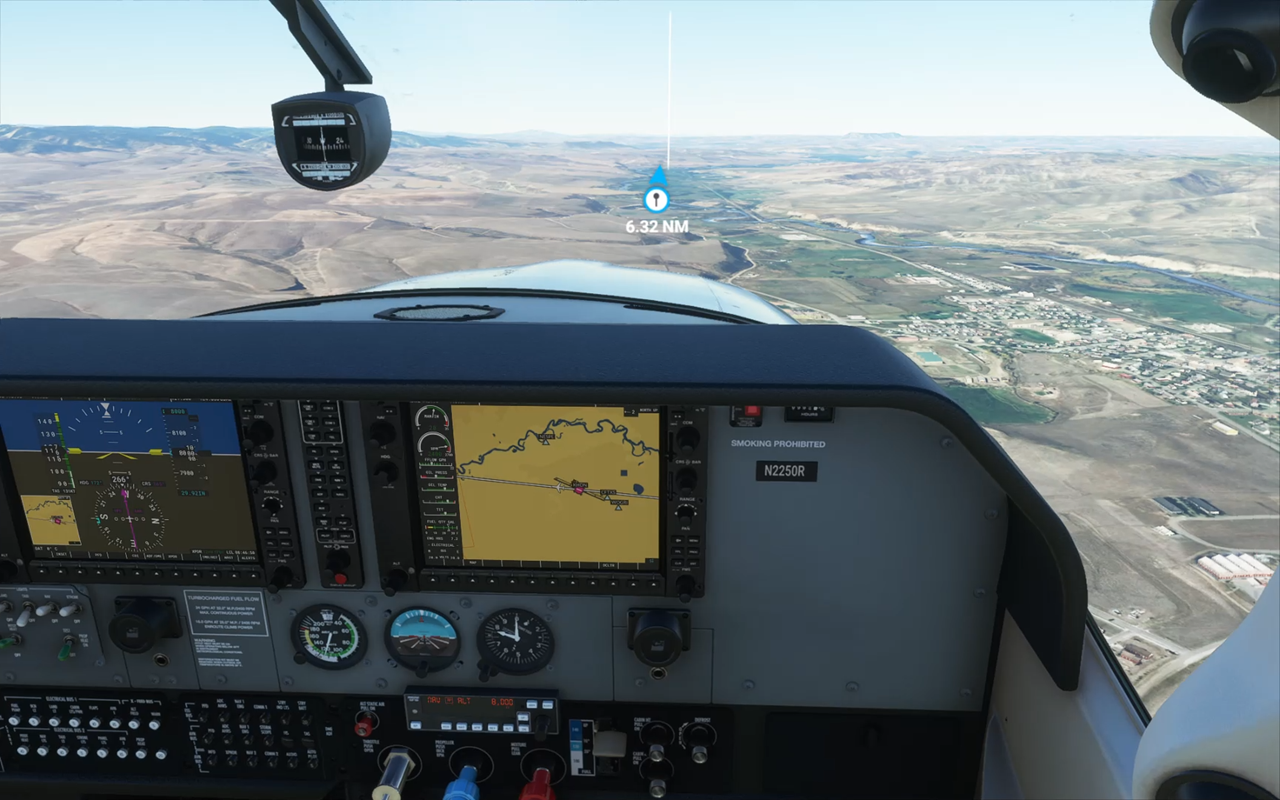
I am finally taking the Cessna into Craig Moffat Airfield (KCAG) after a flight that had taken some 90 minutes in the air (but two days on the road). Worth to mention: there was not a single glitch in the simulator after I had to deal with the “loss of avionics bug” right at takeoff. And given that my old computer is not the fastest one, the flight had a remarkable performance in terms of frames and fluent display.

Parked and secured at today’s destination

Conclusion: Flight Simulator 2020 has its quirks and bugs. But once you know what to expect, you can get around them until they (hopefully) are fixed in one of the next releases. The quality of the terrain rendering and the mapped satellite images provide for a real-time VFR flying experience – if you want to add in IFR for navigating a predefined flight plan, that is also possible and works quite well.

You need to be prepared for the occasional bug, even a “Crash to Desktop”. But it is far from happening “on every flight” and “every few minutes”. When it happens, it is upsetting, of course. But the joy of VFR and light IFR Flights still outweighs the problems. However, you need to have the right expectations: the Flight Simulator (even in the past) was never published to provide the ultimate experience when it comes to realistic aircraft handling – that was always left to the add-on developers. Same with the landscape, the scenery: the overall scenery is good (in terms of FS2020 even great) but additional scenery packages by the community or add-on developers will make the difference. In other words: if you buy, make sure you are having your expectations set straight – or the system will do it for you…

Posted in Flight Simulation, FS2020 | Leave a comment

Flight Simulator 2020 – Back in the Skies

About ten years ago, I wrote a blog post about Microsoft Flight Simulator FSX and an Add-On called “ChicagoX”. The old post can be found here. A little while afterwards, I had been giving up flight simulation, mostly because Microsoft withdrew from the market and other simulators were not mine to work with. Yesterday, Microsoft published its brand-new Flight Simulator 2020 – and of course, I had to visit good old Chicago.

The photo above is taken at about the same location than the two photos in the old post – one from Flight Simulator 5 and one from Flight Simulator X with the ChicagoX Add-On. Once more, the technology has leaped ten years ahead – literally. Microsoft is now using web-based AI and its own Bing Maps service to render a photorealistic landscape including the matching buildings. Live!

Flying into the downtown area coming from the south not only shows how far flight simulation has come in the 30 years since the very first images taken in Flight Simulator 5, it also shows what is the currently best possible result – and makes you wonder what another ten years might add?

Trying to get into a similar position to where I took my screenshots ten years ago, I probably violated a ton of flight rules but the images were worth it. Downtown, the level of detail shown by the buildings is just stunning.

Yes, it is true that this is not the same for every place on Earth and yes, the results are best for the Unites States and some other well-digitized areas – but hey, we are here to enjoy the moment!

So what have we gotten in addition? A brilliant graphics engine that work on my six-year-old PC (although I have provided it a good graphics card two or three years back). A photo-realistic ground and very detailed skylines. Live weather and air traffic. Light effects where the sun can actually shine through the clouds.

Later this year, Microsoft wants to add support for Virtual Reality Headsets – I am curious if my old one will work. For the time being, I will enjoy the scenery a bit, explore the world from the cockpit of a Cessna or other small aircraft and this time, I will focus on the VFR Flights… “visual flying” is what this simulator is made for!

Posted in Flight Simulation, FS2020 | Leave a comment

Using ISO Settings for Astrophotography

In the old days of physical films, the ISO Value indicated the film’s sensitivity. And ISO 100 film was the standard for daylight photos, ISO 400 was considered superior in terms of sensitivity and 1600 ISO was about as much as one could get (and pay).

The world changed with the DSLRs – the ISO value survived but got a different meaning. While a higher ISO value on a physical film means that the film itself differs, your camera’s sensor will always stay the same, regardless of the ISO Level you set the camera to.

The ISO Value is nowadays defined by a standard, maintained by the International Organization for Standardization. Guess what, they are abbreviated ISO. The standard in question is ISO 12232:2019, indicating the standard’s number and the year it was last revised.

Taking a photo – in the analog world as in the digital world – is all about signal collection. The signal – the “light” – is what we want as much as we can get. Unfortunately, there is a second player called “noise”. This is what we want as little as possible. Non-mathematically spoken: comparing the level of “signal” to the level of “noise” gives the Signal-to-Noise-Ratio (SNR). The higher, the better – the more light per noise, the better the image. Theoretically.

A little example on ISO Settings

Sample Shot 1 – Nikon D7500 at ISO 100, f/6.3, exposure time 0.6 seconds.

The image above is taken with my Nikon D7500 at ISO 100. All in all, it is a decent shot, the colors are OK, the details on the foreground are acceptable – not much to say about an undeveloped image.

Sample Shot 2 – Nikon D7500 at ISO 3200, f/6.3, exposure time 1/40 second.

What you are seeing in the image is “noise” – it would be a quick assumption to say “the higher the ISO, the more noise”. That is because the ISO value was not the only parameter that was changed in the image: the camera calculated different exposure times to create evenly balanced images.

“Flattening the Field” – ISO Value as the only variable

To flatten the field for the ISO Value, I have set the camera to manual mode. The aperture was set to f/3.0, the exposure time was 1/40s. All three photos have been adjusted in Adobe Lightroom to show an equal exposure (otherwise, the first one is too dark, the second one is OK, and the last one is slightly overexposed).

Sample Shot 3 – Nikon D7500 at ISO 100, f/3.0, exposure time 1/40 second. Post-processing in Lightroom.
Sample Shot 4 – Nikon D7500 at ISO 1600, f/3.0, exposure time 1/40 second. Post-processing in Lightroom.
Sample Shot 5 – Nikon D7500 at ISO 3200, f/3.0, exposure time 1/40 second. Post-processing in Lightroom.

Eh… they do look alike, more or less? Well, even a photo taken at ISO 12800 does not make much of a difference although the noise in the fine details is more visible.

Sample Shot 6 – Nikon D7500 at ISO 12800, f/3.0, exposure time 1/40 second, Post-processing in Lightroom.

One thing that did suffer from the high ISO Value, combined with the relatively long exposure time is the dynamic color range of the image – the histogram shows more or less similar curves for the first three exposures, the (rather overexposed) fourth short has lost information – we simply overloaded the sensor…

Histograms for the images at ISO 100, ISO 1600, ISO 3200, and ISO 12800

Conclusion from ISO Hopping

Apparently – at least with the Nikon D7500 – changing the ISO Value does not make a difference, at least not when you are staying in a reasonable range between ISO 100 and ISO 3200. Neither is the camera adding significant amount of noise nor is the dynamic range dropping too much. At the very high ISO Settings like ISO 12800, the sensor is “overloaded” for very bright areas and the color details are just blown out and appear all white.

So if changing the ISO Values does not really make a difference – what does?

Same ISO, different Exposure Time

The aperture of the lens will not make a difference – and in astrophotography, we are almost always are using the best f-values. So let’s find out about exposure times – I did set the camera to f/3.0, ISO 1600 and an initial exposure time of 1/60 second. I added further shots at 1/40s, 1/20s, 1/10s, 1s, 2s, 4s, 8s, 20s, and 30s. Some of them are underexposed, others are overexposed. But one thing is sure: they have recorded the “signal” (the light in a difficult low-light situation) in different quantities.

Sample Shot 7 – Lowlight Scenario, 1/60s, ISO 1600, f/3.0 – left “as shot”, right with adjusted exposure in Lightroom.

Easy to see that this first shot has captured more than there is initially assumed but when blowing up the exposure, we can see a lot of noise – and little signal. To the SNR is pretty poor. The next sample is the image taken at 1/10s – same ISO, same f/3.0.

Sample Shot 8 – Lowlight Scenario, 1/10s, ISO 1600, f/3.0 – again, left “as shot”, right with adjusted exposure in Lightroom.

This image is much better – there is still noise but there is much more signal – the SNR is not too bad. The last sample is the well-exposed picture – no adjustment in Lightroom.

Sample Shot 9 – Lowlight Scenario, 4s, ISO 1600, f/3.0 – no adjustments, entire image “as shot”.

Unfortunately, the last one is a good example for “this world” but a poor comparison to the images we are taking in astrophotography. So my next question is: how can we better manage with the unbalanced images.

Can stacking two images beat one image exposed twice the time?

The only possible way to add more signal to our image is by capturing multiple images and then “adding” the values. The process is called “stacking”. And it is not just “adding” up but I am simplifying it here.

My assumption is: my exposure time needs to be long enough to make the sensor react to the signal (and for the signal to not get lost in the background noise) – but because I cannot endlessly expose (guiding, noise, etc.) I will simply stack images. For a sample, I will take 10 shots taken at 1/10s and I will compare them to a photo taken at 1s.

Sample Shot 10 – a total of ten 1/10s exposures stacked in Photoshop and then adjusted for Levels and Curves.

So the above image does not look bad – not at all. One effect of stacking multiple photos into one is that by the math performed during stacking, noise is leveled and becomes less obvious. And here is the comparison shot of 1s, single shot.

Sample Shot 11 – a single 1s exposure, adjusted through Lightroom.

The images are not of equal quality – the stacked one has slightly lost detail in the dark areas because that information was never really recorded by the short exposure. But other than that, both images are producing an equally fine image. The histogram of the single exposure shows the better dynamics in the image but the overall result is fine, considering the overall light situation.

Conclusions from my side

The experimental session has shown:

  1. Setting a higher ISO does not allow for reducing exposure times – that only results in a poor Signal-to-Noise-Ratio!
  2. Setting a higher ISO does also not mean that the “noise” is increased – higher ISO might produce better results for the same exposure time, you need to test with your camera.
  3. Stacking a number of exposures of a given exposure time comes close to a single image taken at the total exposure time but the single-shot approach has slightly more details and vibrancy.
  4. When taking shorter exposures, they need to be long enough to allow the faintest details to be registered by the sensor (and not being lost in the background noise). The light may have reached the sensor but the electronics have lost the signal and nothing can return it!

Personally, I will put up the following for my next astrophotography session:

  • I was fine with ISO 1600 but I will try ISO 3200 in my next session. If that goes well, I will try ISO 6400 but I am ready to fall back to what looks best. At some point, it will either be the degrading SNR or I will blow out the brightest points (aka “Stars”)
  • I will try to extend my exposure time – I am currently working (with the lens I am using and the mechanical guidance) at 45s exposures which I think might be a bit on the short side…but that is owing to my mechanical guide, an Omegon LX2 Startracker
  • And finally: more images (or subs) are needed to get a better result at stacking.
Posted in Astronomy | Leave a comment

Back to LEGO Classic Space

It has been a while since I had my collection of LEGO Classic Space Sets “out and assembled”. I am still lacking the space but that is not keeping me from looking back and playing a bit with ideas, the computer, and the actual bricks.

One of the earlier sets of the Classic Space theme is a small Rocket Launcher which hit the market as early as 1978, making it one of the very first sets of the theme. The LEGO Set Number in Europe is 897, the US-Market saw the set as 462.

LEGO 897 Launcher (in the US LEGO 462 Rocket Launcher) – (3D Render with Stud.io by Andreas Zapf)

The original set is made up from 60 individual pieces and includes two Classic Spaceman mini figures.

The set shows many of the signs of the early classic themes – the vehicles are using the small wheels and mudguards. The steering wheel is the only control and the gray oxygen tank supposedly provides some sort of power or energy to the vehicle.

Other than that, the set shows that even a “simple” design can bring fun: the set is a bit fragile in as much as the satellite has a single-stud connection to the top of the rocket, the rocket itself is attached to the trailer with a gray bracket that does not provide a stable connection to the two parts of the rocket, etc. Nonetheless, this one is in fact classic and almost anyone into collection Classic Space sets will have one of these rather inexpensive sets.

An even more basic set is #886, the Space Buggy. You can build the little “car” which became the standard transportation unit for many other sets as well with just 9 bricks (assuming you count the two wheel holders as one brick).

Set #886, also known as “Space Buggy”, is the most basic set available. Without the spaceman, it is literally “a model under ten bricks”. (3D Render with Stud.io by Andreas Zapf)

MOCs – “My Own Creation”

Building your very “own” models is the spirit of LEGO since it first appeared on the marked (and certainly since it appears in my room when I was a kid). However, the time of “crude” models of my childhood is gone and that makes creation “your very own Classic Space model” difficult, both in time, construction, and… money. But nowadays, software such as Stud.io can help…

When creating a MOC of any set, the first thoughts go to the style. If you are a purist, you can limit yourself to exactly those bricks available in the theme when it was created at its time. A little “less” purist, you can try to follow the theme’s spirit, e.g. by maintaining the size factor and the coloring scheme.

As for the matter of size – it matters! The original sets were tiny, if you take the spacemen as reference, the vehicles and buildings do not really provide much room or security. But then, when designing a MOC, it cannot be too much larger than the originals, otherwise you will never be able to show both in the same scene…

The parts are another issue: if you have a collection of Classic Space sets, you have plenty of bricks for the MOCs but on the other hand, you don’t have any of the modern parts that make the models so “pretty”.

Let’s take a look at the wheels first – the original set uses the LEGO Parts #3641 and #122c01 to form the wheels. These are topped by a mudguard (#3787). Generally looking at the wheels used in Classic Space, this is what you are going to find:

Wheels used in a variety of Classic Space sets (background) and other wheels not used in Classic Space that might be useful as replacements (and a red Spaceman for size reference)

These appear in a variety of sets, some only in very few Classic Space sets, others in almost any set that has a need for wheels. Now, looking at today’s catalog of parts (for wheels), this is a sample of what you can expect… and I did not bother trying the different styles of rims for each one.

Wheel parts available from Stud.io – the original Classic Space Wheels are those four at the 45° angel next to the Classic Spaceman.

So there is plenty to choose from if you are willing to deviate from the original wheels. Some are matching the original size, some are significantly bigger. What you are going to make from them… is up to you.

As I said: Size matters!

And with that, I mean the size or rather the dimensions of the builds and your MOCs. The original Lunar Buggy (#886) is rather small – in Studs (the number of “knobs”) it measures 7 x 4 x 8 (Width x Length x Height) approximately. Which – in centimeters – is 5.4 x 3.2 x 6.1.

I have created a MOC of a more sophisticated Lunar Rover for a single spaceman – it features a closed cockpit, instruments, engine compartment, sufficient light bars, etc. but it is larger, of course: in Studs, it goes by the dimensions of 18 x 10 x 9 which is approximately a triple size compared to the original.

All in all, I am pretty happy with my MOC – although a bit oversized, I think it captures the original Classic Space spirit of the later years (blue and white) and shows a modern design (at the cost of using parts that are not from the Classic Space time).

The model is assembled from 190 parts and is “mostly build-able” as only very few parts are not available in the color that I have picked them in (and there are close substitute colors available). Although this is “my” design, there has been some inspiration by the guys from #KeepOnBricking, especially the YouTube Video on an Extreme Off Road Buggy.

Posted in Allgemein, LEGO | Tagged | Comments Off on Back to LEGO Classic Space

A new Game on the Horizon

I have been playing computer games for almost all my live – the first ones in the early 1980s in an Amstrad / Schneider CPC464 computer. And once in a while, a game comes along that is different. One such game is Foundation which is produced by Polymorph Games.

So what is different in Foundation? Well – it is a game without any actual goal or target except naturally growing your little village by adding vital functions and making sure your people are staying happy and productive. This review is based upon version 1.1.7.0308.

Foundation Main Menu – Starting a new Game

When starting a new game, you have a choice of the countryside you want to play within – hill country, coastal country, a mountain or valley layout or a river-style world. For this game, I will chose “coastal” as it gives me ample access to water (which will be an important aspect of food production later).

First and foremost, you should pause the game when it is started and give yourself a break to explore the map and make some initial decisions on the layout of your settlement. In this case, I am opting to found my village (by placing the village center) in an area that has little forest, berries and stone. These items will provide me with building material (wood and stone) as well as food (berries). I will be able to expand my territory to get some more wood and also access to water soon enough.

Your first task: pick a place for your Village Center.

Once the village center is placed, the game starts with eight initial settlers that now need to grow the settlement. The first thing we need is wood so I am going to place a a lumber camp (remember: the game is still paused!).

The beginnings – the Village Center is placed, the first eight villagers have arrived.

Foundation is all about “efficiency” but in the early stage, with only one field to worry about, this can somewhat be neglected. I am placing the lumber camp within the larger wooden area but I am intending to cut free the smaller forest areas on the right first. The workers have to walk a bit but that will change soon enough.

With the lumber camp in place, the next item that is needed is food – the berries will provide that but the settlers need a Gathering Hut nearby. The Gathering Hut requires wood so therefore, I will prioritize the Lumber Camp on the building list.

We will then need stones for the other buildings – so a Stonecutter Camp is placed near the stones on the right side. Last but not least, I am building a Well to allow the settlers some drinking water.

The first Buildings are placed – just enough to get us through the early time.

You can see that all buildings are saying “Waiting for a Builder” so the last thine to do before unpausing the game is to bring up the settler list and make at least one settler (but preferably more) builders.

The First Settlers

In this case, I have opted for Joacob and Thomas to serve as builders but I could also have picked the women – it does not make a difference in Foundation.

Now let’s run the game and wait for the first buildings to be finished – this will work without additional actions as most of the supplies needed are coming from the village center depot.

As you can see, the Lumber Camp and the Gathering Hut are done and are ready to have settlers assigned for some work. The Stonecutter Camp and the Well are not yet done – they are lacking resources: the Stonecutter Camp needs Tools, the Well needs Stones.

In order to allow settlers to perform work in a Lumber Camp, Gathering Hut or Stonecutter Camp, you need to define where they are going to perform their work and who is doing the work: the “who” is easy: simply assign available villagers to the individual sites. At this stage of the game, you don’t have to worry where they live because everyone will be near to their working place. Of our eight settlers, six are remaining without job at the moment. So let’s assign to gatherers and two woodcutters. Then, we need to define the Extraction Zones (blue) that show where the settlers will be working.

Extraction Zones for Berries and Wood

It takes a little while but once we have assigned a stonecutter and defined the Extraction Zone for the stones, the settler will produce stone which the builder will pick up to complete the Well.

All initial Buildings are done…

So far so good – but our villagers are hungry: we have gathered berries by now but there is no place to sell the berries to the settlers. We need a Market and a Market Tender to collect the berries and sell them as food, thus producing our first income.

Two Builders are setting up the Food Stand…

The Market should be located close to the Well because the actual distance to travel for a settler for food and drinks is now relatively short. And despite the fact that I currently have a limited supply in Woolen Cloth, I opt for a red tent to make my food stall visible (also to myself in case I need to find out quickly where I am selling food or other goods.

Because this is the only building site I have at the moment, my two builders are working side by side and the Food Stand is up pretty soon. I can then assign Florence as the Market Tender and define that in Slot 1, she is selling berries as food.

The finished Food Stand with its Red Tent

Now let the game run for a few moments for things to unfold… after a few minutes, you can see that things develop: food is sold at the market, producing revenue (approx. 64 gold this week). The trees are cut from the Extraction Areas. And two new villagers have joined our prospering community.

New Settlers have arrived

The next step requires a little bit of planning – so far, everything we have built we could place directly. But our villagers need homes – and those are built automatically in Residential Zones.

Unlike the Extraction Zones, the Residential Zones cannot simply be placed anywhere – settlers will only build in areas that are “attractive”. If you switch on Residential Zone marking, the green areas are the ones that settlers will build there houses in – and the red ones are those where they will (most likely) not.

At this time, I have defined that valid residential areas are around the village center and towards the right area of the screen. Which is why I have cleared the trees in that area to secure the wood first.

Residential Areas with first building activities

Just in time, I have accumulated enough money (500 gold) to acquire a second hexagon and I have opted for the one to the “south” which gives me access to the sea. It also allows me to extend my Residential Area into that zone as the initial marking might have been to narrow to support building activities.

The extended Residential Area with the first houses appearing.

As our community is growing, we will need a Warehouse pretty soon but in order to build one, we need to have the ability to process our raw wood first. However, things are not that easy now: the Sawmill and the Warehouse cost a significant amount of money and we may have to wait for a bit for it to be available.

The Money System

You will need money to grow your village – and although the money system is straight forward, you need to pay attention to your income and spending. Each building you have essentially “costs” maintenance. Territories cost tax and trade also consumes money.

On the income side, you have the trade you are profiting from – to your villagers as well as externally. Use the budget screen to get an overview.

The Budget Overview

At this moment in the game, I have 102 gold available – just enough to pay for my Sawmill. But that will produce the Planks that I need. Location-wise, this goes close to the Lumber Camp’s current position and into a place where it does not take valuable Residential Area from me.

Next to consider is the building place for the Warehouse. The Warehouse can hold up to 50 items of four different goods. And it changes the way the distribution of goods works: so far, our villagers have picked up their good from wherever they were produced and stored. But with a Warehouse, they get a second choice of where to get their goods as long as a Warehouse has them in stock as well.

So Warehouses should be placed strategically – they can greatly help to streamline the distribution and availability of goods across your settlement.

The Sawmill (upper left) and the Warehouse Locations (right, next to the Stonecutter Camp)

With the Warehouse built and four new arrivals of settlers, next things need to be considered. In order to enable the first Trade Route, 20 planks are needed in a Warehouse. Also, pretty soon some quests will start to pick up that will require Berries and later Fish. And the first Trade Route will allow to buy Tools which we will need for a variety of buildings until we can produce them ourselves. In addition, Polished Stone (which we could produce by building a Stone Mason hut and Planks can be sold for money.

So let’s define that our Warehouse shall store Planks, Berries, Fish, and Tools (when we buy them). And let’s unlock and build a Fisher’s Hut which needs to be build – surprise, surprise – on the waterline with the ladder facing seaward!

The Warehouse with the two transporters assigned (in the back) and the Fisherman’s Hut in the front.

With the Warehouse built and an initial set of 20 planks available, you can enable the first Trade Route. Once established, you can buy Tools, Bread, and Fish (if you want) – but more importantly, you can sell (and make money from) Berries, Polished Stone, and Planks.

In order to buy and sell, you need to adjust the settings on the Trading Resources screen – basically, you will need to specify which goods you want to trade at all and – when buying – to what extent to buy or – when selling – what you want to keep as minimum reserves.

In our case, we are going to trade all of the items we can sell but keep a minimum of 50 from each one. And we are going to buy Tools, again until we reach the maximum of 50 units in stock.

You correctly might have noticed that we are trading a good we don’t have yet: Polished Stone. And you are correct – but we are going to change that and build the Stonemason’s Hut to produce it.

Reason is simple: it sells for 3 gold (instead of two for the food) but we also need Polished Stone for future buildings anyway.

When you are trying to build the Hut, you will see it requires Woolen Cloth, a good we also do not have available. However, we will find that we are lucky and have some rest of it in our initial supply. With that done, we will be able to produce Polished Stone and sell it from the Warehouse for profit.

Quests

Very soon, the first quest will pop up. All it is about is delivering a certain resource (mostly bread, berries, or fish) to one of the parties to gain reputation with: the King, the Clergy, or your People. When successfully completed, you gain points with the respective party with – together with the splendor for that party – help you to unlock other important items.

The first quest pops up.

This one is a bit unfortunate: we need to provide bread (which we don’t have but could buy) but it needs to be in the Warehouse (which is currently busy in all slots). I will let this first one go by but we need a second Warehouse to stock goods for the Quests. Meanwhile, I am using my last remaining points with my own people to unlock the Lord Manor which we will need to increase the possible maximum our treasury can hold.

Resources

Typically, resources such as Berries and Stone (or later iron) are non-exhausting. A different story is wood – or rather the trees your tree cutters are cutting down: you can use a Forester to re-grow the wood… or you need to move your Lumber Camp elsewhere.

The original woodcutting area has been exploited and will serve better as residential zone.

Our original woodcutting area is now making better use as a residential zone – the new Woodcutter Camp will be setup next to the forest in the lower part of the screen. So I will abandon the initial camp and build a new one. The Sawmill will stay in the original location, the distance is larger than I want it but not large enough to justify the cost for a new one.

And then… I will simply grow my village until the next part of this tutorial…

Posted in Computer Games | Comments Off on A new Game on the Horizon