
My FHEM Server has now been working without any issues for quite some time, definitely more than a year, probably closer to two years. Time to clean up some parts, especially since the latest updates did not install successfully and I had to revert back to the installed version.
Over the last year(s), things “worked” and while they still do, it is time to also come up with a new configuration – things, that I have learnt in the meantime. Hardware that has been bought in the meantime. New ideas that have developed in the meantime. To get all these “into a new system”, I have decided to build a playground on a Virtual Machine. The operating system of choice is Debian 9, because it is so similar to the Raspberry Pi that I eventually want to move the installation to.
 So this one should be fast enough for some playing. And maybe I will regret the settings later, the Raspberry Pi is much slower.
I have decided for the “Desktop installation – that is: a graphical desktop environment (which is not the same than the Raspberry Pi will be). And a Terminal window for “command line to the bitter end”…

After the installation has finished, there are some things that should be done – the first one is to update the system to the latest patch level (the two commands can be executed from a Terminal window in superuser mode):
apt-get update
apt-get upgrade
apt-get install net-tools
Next, I need to install VMWare Tools (which, of course, is only necessary if you are running VMWare Player or VMWare Workstation). That, by the way, is the reason why in the command sequence above the net-tools package is installed…
Getting FHEM onto the Box
There are a few things that need to be done now – the first one obviously being the installation of FHEM on the box. This is best performed as “manual installation” – the most current instructions are here: debian.fhem.de
The first three steps of the instruction for the manual installation (ending with the command dpkg -i fhem-5.8.deb are responsible for installing the required libraries, fetching the FHEM Package and installing it. This includes the creation of the fhem system user:
grep fhem / etc/passwd
shows the user’s definition. It also shows that the user’s home directory is /opt/fhem (where the installation resides) and there is no shell assigned – /bin/false – which makes the user unable to login.
Technically, the last statement might not be quite correct: the user can login but it would not get any shell and therefore no command line (plus: no password unless we would set one…)
Now this presents an interesting problem: if you do the following:
cd /opt/fhem
ls -l
to display the files and their permissions in the FHEM installation directory, you will notice that all files are owned by the user fhem and the default group is set to dialout.
Catch-22 with the Configuration Files, Users, and Permissions
To me, that poses a small problem: the configuration files that we will need to create for FHEM. Of course: you can edit the fhem.cfg file straight through the web interface but that is a tedious and rather stupid way of doing it (imho). Just two reasons: there are far better editors than the built-in one (I, for example, prefer Notepad++ on a Windows Box) and it is hard to do version control on your files straight on the Unix File system.
Of course, there are plenty of ways of getting files to and from a Linux system (including direct drag & drop into my virtual machine) but considering a headless (no user-interface) environment on my Raspberry Pi, the most logical way seems to be a FTP Server on the Unix box.
Installing ProFTPD into the environment
An easy-to-install and powerfull FTP Server is ProFTPD. You can get it installed via
apt-get install proftpd-basic
Once installed and started, the default is listening on TCP/IP v6 – which is the first thing I need to change. At the same time, we can ensure that a user that is allowed to log in using FTP does not require a Shell assignment (like the fhem user discussed above) and last but not least we can control the default home directory for the FTP Users.
Most of this already plays also into the Unix Permission Concept so it will be a mixed discussion here.
Fist of all, the additional configuration for ProFTPD is applied using a custom config file located in /etc/proftpd/conf.d – that directory will be maintained even if ProFTPD is updated. Let me call my file custom.conf – it is a simple XML File:
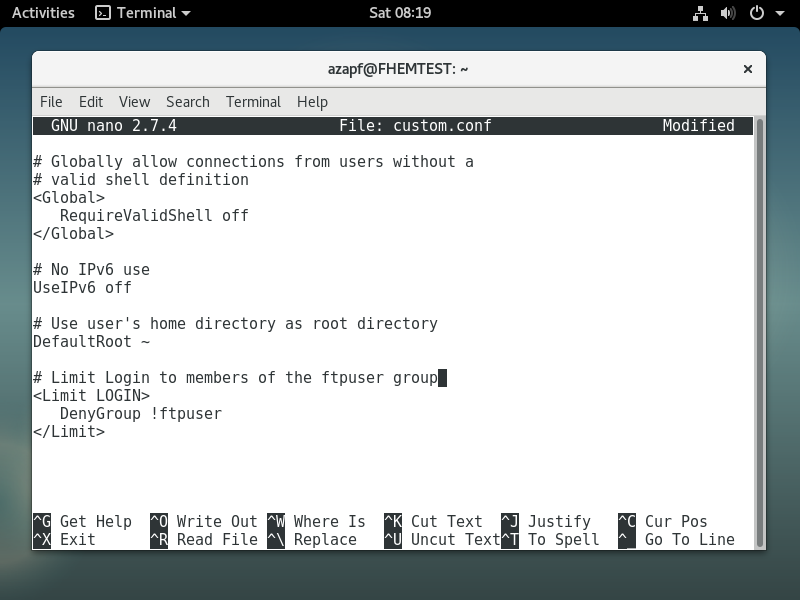
Note: Please understand that this is a most basic security setting and is sufficient for FHEM Boxes that are in a secure environment (e.g. not accessible over the Internet, only your and yourself on the network, etc.)
ProFTPD can do much more in terms of security – secured connections using SSL/TLS Encryption, non-standard FTP Ports, etc. – if you want to find out more, please make sure that you use the search engine of your choice to locate the appropriate information on the Internet. And never use the above configuration in anything else but a test environment!
Once the configuration file is placed, restart the FTP Service
systemctl restart prodtfd.service
You can then check of the service is actually running
service proftpd status
and if it is listening on Port 21, the default FTP Port.
netstat -tlp | grep proftp
With that said, you should be ready to access the server via FTP – at least, after you have added your user of choice to the ftpuser group…
groupadd ftpuser (if it does not exist yet)
usermod --append --groups ftpuser [UserName]
grep ftpuser /etc/group
The last command must return one line with the definition of users in the group.
To be or not to be…
The next question – hotly discussed, I am sure – is the user to work with. Of course, you can use ProFTPD with a more elaborate configuration to allow any user to connect and still set those users’ root directory to /opt/fhem (where you want to copy the configuration files to). You can even go as far to make sure that any file copied is placed with the appropriate file permissions, having fhem as the owner and dialout as the group (which is what the FHEM installer sets by default when you install a fresh copy).
But there are alternatives: you can work directly as the fhem user (which requires you to give the user a password and place him in the ftpuser group).
passwd fhem
I am sure there are plenty of people around that will object to that approach because fhem is considered a service account and should not be used for login…
Alternatively, you can work “as your own user” and adjust the file permissions afterwards (each file you will copy into the directory using FTP will by default have your user as owner (instead of fhem) and your primary group as group (instead of dialout).
To change the owner of all files in /opt/fhem use the following command:
chown -R fhem:dialout /opt/fhem
which you need to execute as superuser. Bottom line: there are so many ways of doing it – and each one has its own rights and wrongs. Pick your own one but make sure you understand the implications with respect to the security of your FHEM Installation!
One more thing…
One more thing about security: by default, the fhem user ends up in the group dialout. It is important that fhem also is member of the group tty which controls access to serial and USB Ports (in case you have a USB Device attached to your FHEM Server…)
usermod --append --groups tty fhem
takes care of that.
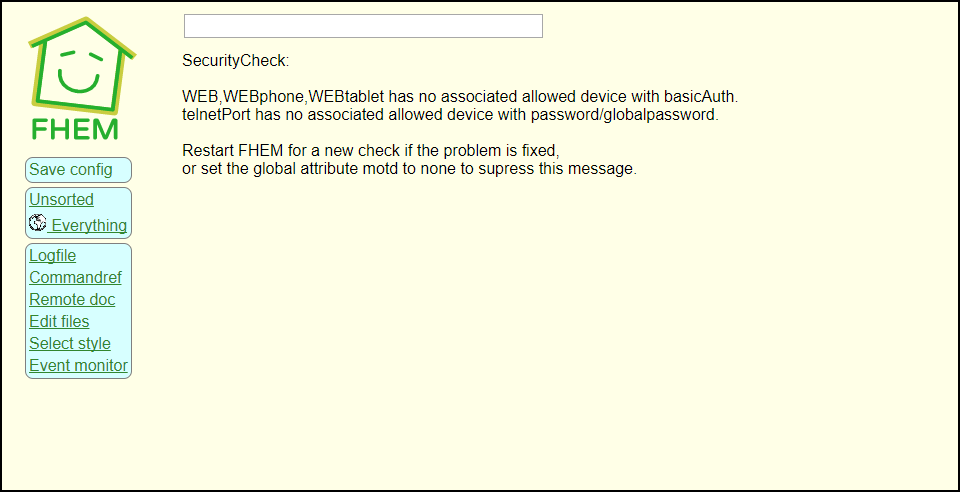
Is it working or not?
By now you might have a working FHEM Server – which you can check on the command line via
/etc/init.d/fhem status
and it might be accessible via HTTP under http://[Your server]:8083/fhem
 If the server is not working or is not reachable, it is time to take a first look at the logs (well, even if it is working, it might be a good idea…)
The FHEM Logs
The FHEM Logs are located in /opt/fhem/log and depending on your way of access to your server, you can either view them straight on the box (e.g. using the tail command) or access them through the FTP Server and view them in an editor like Notepad++:
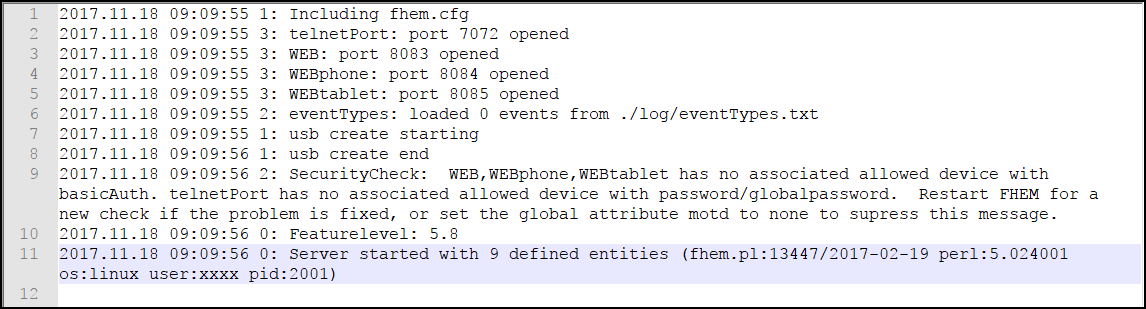
This one is a log file of the first successful start – it shows the config file that is read (fhem.cfg – oh wonder!), the status of the outbound ports (8083, 8084, 8085), a security message, the server’s FeatureLevel (5.8) and the fact that “9 entities” have been defined…
If there are errors, this is your first place to go – as we will see in a moment.
Updating FHEM
I want to provoke a situation that has caused me a lot of headache because I did not see the issue – only with the help of the FHEM Forum (suggestion to every FHEM user!) I got it solved (in minutes!).
My FHEM Installation is still the one that was installed with the package above – but FHEM is constantly updated. So in the Web Interface, go to the command line at the top and type the following:
update check
This will (likely) create a long list of files that can be updated – and should be updated (especially since we are just starting with the installation). But keep in mind: an update can cause nasty surprises as we will see…
To update FHEM, issue the command
update
and wait. After a short while, you should see more or less the following:
 The important line is “update finished, ‘shutdown restart’ is needed to activate the changes”. So issue the following command in the Web Interface:
shutdown restart
The nasty surprise in this one: the Web Interface ceases to work after the update! No connection is possible – and at the first glance, you have not changed anything! I have to admit: this pissed me off for quite some time.
I understand that if you want to run an environment like FHEM, you need to be familiar with what you are doing (and I appreciate this fact). On the other hand, if a working environment is turned “non-working” with an update that immediately renders the system inaccessible… that is not necessarily the way I would prefer it to be.
But back to the problem (and as I said: the solution was straight forward, thanks to the FHEM Forum!). Check the FHEM Log File again:
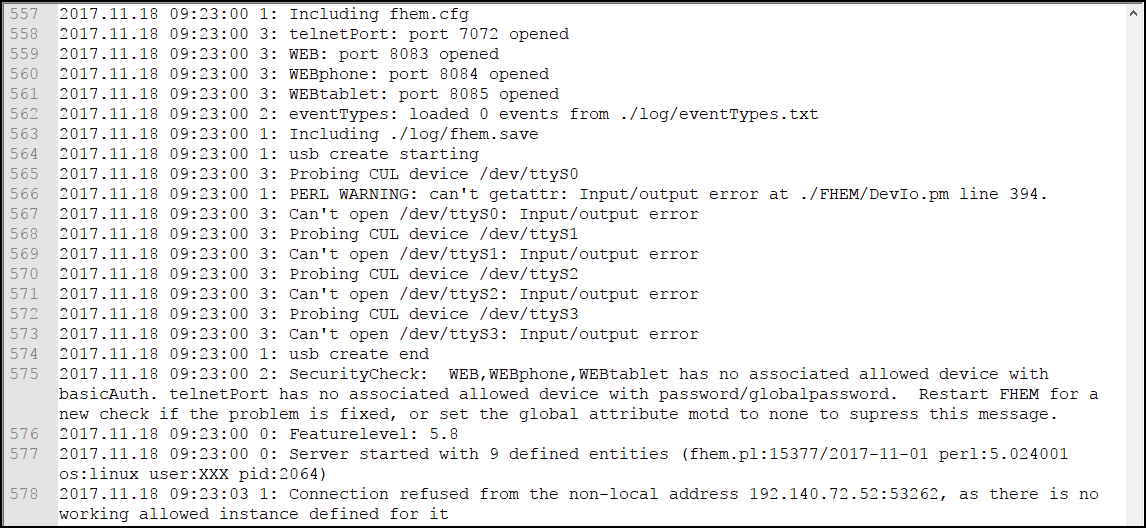
There are some significant changes compared to the previous log (and we did not change any of the configuration, just performed an update!)
There now is a PERL Warning that seems to be associated with the USB Checks. If you search for the error message, it becomes obvious that is related to the USB Check defined in the default fhem.cfg file:
define initialUsbCheck notify global:INITIALIZED usb create
It appears that the system’s behavior has been changed but I cannot see any reference to that change in change log /opt/fhem/CHANGED. In any case: you can remove or comment out the respective line and the error should be gone.
That, however, does not bring back the Web Interface. Again, a look at the CHANGED file does not bring up anything obvious. Except for:
 - feature: allowed module added. allowedCommands, basicAuth, password,
 globalpassword attributes moved to this module.
Well, look at the error message in the log again:
Connection refused from the non-local address 192.XXX.XXX.XXX:53262,
as there is no working allowed instance defined for it
At this point, it becomes a language issue: because of the wording, I interpreted the “allowed” part as part of the sentence – if you know what to look for, it tells you that a connection is refused because there is no defined instance of the allowed device.
If you would have understood, you could have looked it up in the FHEM Reference. And it could have been corrected earlier.
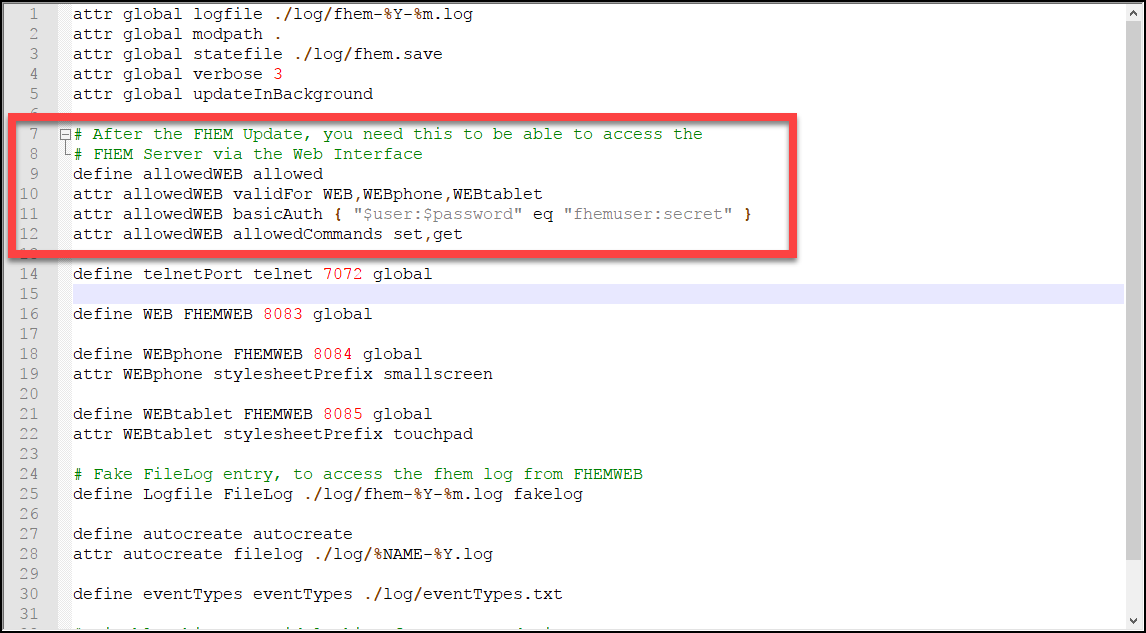 Please note that I have defined a clear text username and password in this example – which obviously is inappropriate for anything but a test environment!
The better way of doing it is to create a base64-encoded password string from the Unix Command Line and use this instead:
echo -n fhemuser:secret | base64
Creates ZmhlbXVzZXI6c2VjcmV0 as password phrase which then can be used in the config file:

So now: copy the fhem.cfg file back to the server (unless you have edited it there directly) and restart FHEM:
/etc/init.d/fhem stop (if it is not stopped anyway)
/etc/init.d/fhem start
And now try the Web Interface again – you should see it working now. With all of that done, we are through with Part I of creating a brand-new FHEM Environment. The initial configuration parts will follow in Part II.