From Zero to PowerShell 2.0 – Working with the File System

After the initial exploration of PowerShell, learning about pipelines and looking at interactive vs. scripted execution, it is time to do something useful. I have picked an example from “the real world”: an application is using a set of file-system directories including access permissions to store its data. Upon installation of this application, the person who installs the system needs to create the nested directory structure and assign access control to specific groups. And so far, the Services People have done that for every system they ever installed manually. Let’s see if there is some room for improvement here.

Setting the Scene

In a first attempt, we are going to settle for creating the file system structure required. Let’s assume we require an ApplicationData directory which itself contains sub-directories for three different types of information:

  • Configuration Data: a directory which will later host the configuration data for the application.
  • Customer Data: one or more directories which a customer can use to store specific information processed by the system.
  • Internal Data: one directory which the system uses to store its internal data structures.

Assuming that our envisioned customer where we are going to install the software is interested in having two Customer Data Areas, the following directory structure is what we need:

With this first approach, we are also going to leave some aspects on the side (deliberately):

  • We are not interested in any type of configuration file, the directories and their numbers will be hard-coded!
  • We are not interested in setting any access permissions at this point!
  • We are not interested in creating a Windows Share for the directory structure!

The three areas above are deliberately taken out of scope but we will come back to them at a later point in time. Our Task Board might look like this now:
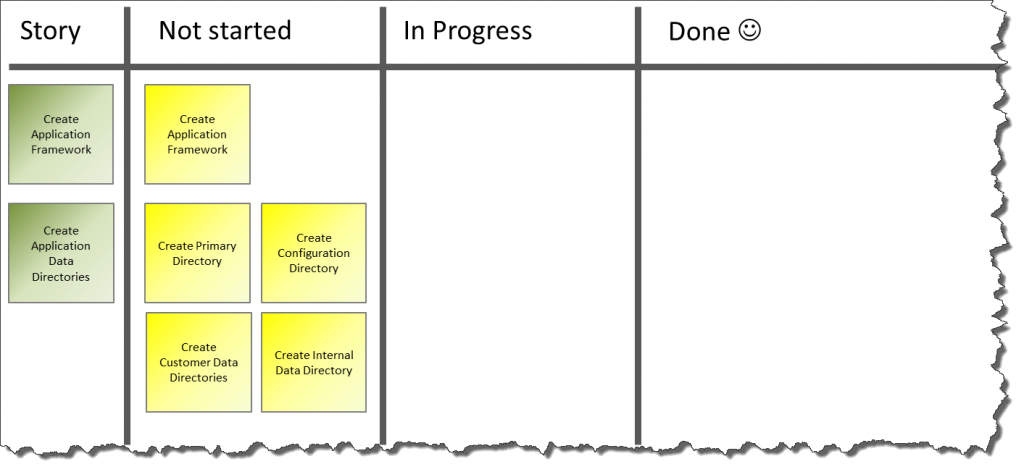
Let’s see what we can make from it…

The first Step: Application Framework & Primary Directory

Let’s get started on those two items first – the creation of the primary directory intuitively sticks our as the initial task – but requires us to also work on the application framework. Things that we have learned from doing those two tasks will help us to perform the other tasks more quickly.
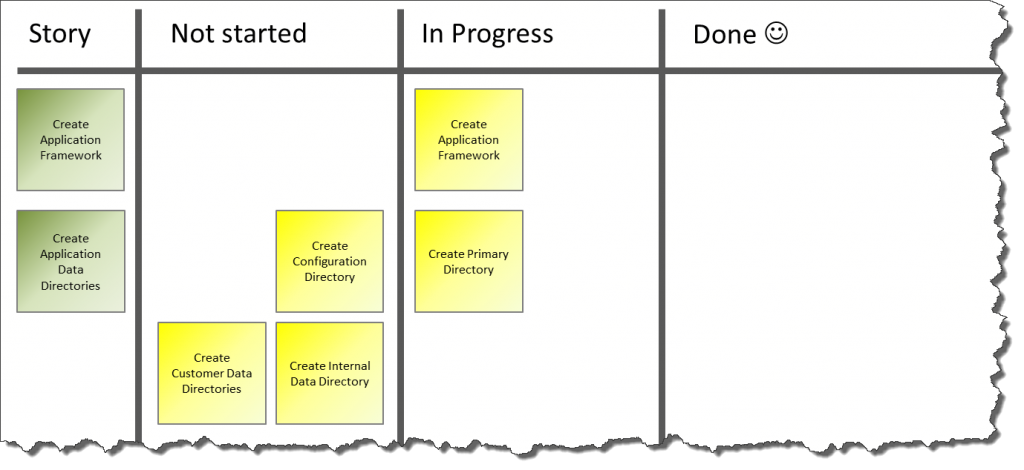
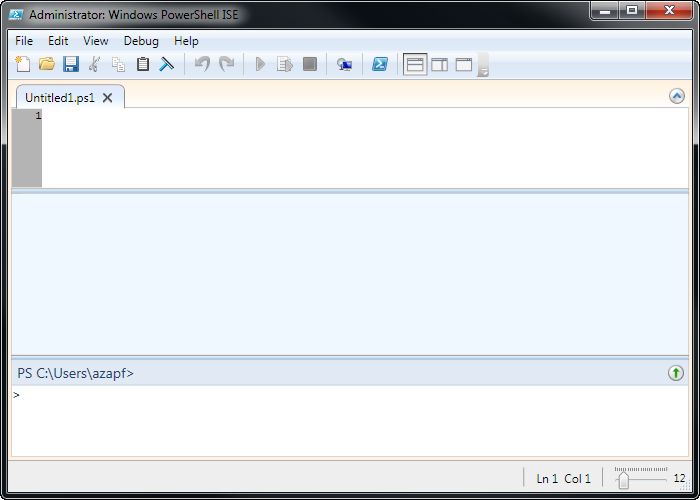
Let’s use the Windows PowerShell ISE to create a new script. Here is the script code for you to copy:

# File System Configuration Script for MyApplication
#
# Copyright (C)2011 by Andreas Zapf
#
# Please feel free to re-use and adapt as required :)

# Global Variable Definitions
$TargetDrive = "F:\"
$PrimaryDirectory = "MyApplicationData"

# Create the primary directory
New-Item ($TargetDrive + $PrimaryDirectory) -type directory
And now let’s look at what this does: first, we are creating a variable $TargetDrive which is set to F:\. The idea here is to separate the actual drive letter from the directory names to allow an easy switch to a different drive where needed.

Next, a Variable $PrimaryDirectory is defined and set to MyApplicationData. This is the name of the primary directory we want to create.

Finally, we are using the New-Item Commandlet to create a directory. If you are looking up the help on New-Item via the Get-Help Cmdlet, you will receive the following information:

The New-Item cmdlet creates a new item and sets its value. The types of items that can be created depend upon the location of the item. For example, in the file system, New-Item is used to create files and folders. In the registry, New-Item creates registry keys and entries.

Fair enough, that is exactly what we need. And New-Item only needs us to provide two parameters: the actual Item we want to create (which in our case is a combination of the variables $TargetDrive and $PrimaryDirectory) and the item-type which for us is directory. And that is it! If you run the script, a new directory will be created in the F: Drive and it will be named MyApplicationData.

Our script has one weakness though: if we run it again, it cannot create the directory because one already exists. In this case, we are receiving an IOException saying the Resource already exists.

# File System Configuration Script for MyApplication
#
# Copyright (C)2011 by Andreas Zapf
#
# Please feel free to re-use and adapt as required :)

# Global Variable Definitions
$TargetDrive = "F:\"
$PrimaryDirectory = "MyApplicationData"

# Test if the primary directory already exists
if( ! (Test-Path -path ($TargetDrive + $PrimaryDirectory)))
{
    # Create the primary directory
    New-Item ($TargetDrive + $PrimaryDirectory) -type directory
}
else
{
    # Notify the user that the directory exists
    "The directory " + $TargetDrive + $PrimaryDirectory + " already exists. Creation skipped."
}
The code above has been improved to first check if the directory exists and to create it if it does not exist. Otherwise, the system simply provides a message that the directory is already there and the creation has been skipped.

To test if a directory (or other resource) exists, the Test-Path Cmdlet is used. It returns $true if the resource exists. This has been put into the condition of an If…Then…Else construct which evaluates the If-Clause and then executes the following code block if the result is $true or the Else-Block if the result is $false.

Last but not least, our code requires a little bit of code-cleaning: the separation of the actual target drive and the directory name has forced several occasions where the fully qualified directory name has been created “on the fly” using the $TargetDrive + $PrimaryDirectory construct. That not only produces long code, it also causes concern with respect to code maintenance and readability. Better do the following:

# File System Configuration Script for MyApplication
#
# Copyright (C)2011 by Andreas Zapf
#
# Please feel free to re-use and adapt as required :)

# Global Variable Definitions
$TargetDrive = "F:\"
$PrimaryDirectory = $TargetDrive + "MyApplicationData"

# Test if the primary directory already exists
if( ! (Test-Path -path $PrimaryDirectory))
{
    # Create the primary directory
    New-Item $PrimaryDirectory -type directory
}
else
{
    # Notify the user that the directory exists
    "The directory " + $PrimaryDirectory + " already exists. Creation skipped."
}
Because the primary directory will always be in the same drive and the only reason for the separation was the ability to handle the drive letter in a single location, the variable $PrimaryDirectory can easily be defined using the variable $TargetDrive plus the directory name. As a result, the cumbersome concatenation of values in the remaining code is no longer necessary.
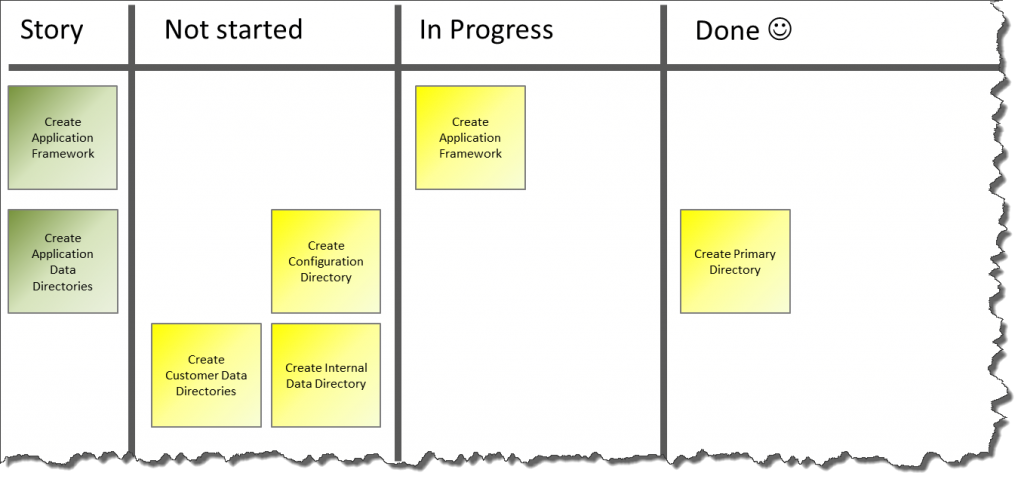
With that, our first task is also done and moved to the Done Column of the Task Board. We are keeping the Create Application Framework task in progress because there may still be some things to be done.

The second Step: Configuration & Internal Data Directories

Looking at our Task Board, we notice the tasks Create Configuration Directory and Create Internal Data Directory. Both are very similar to the finished Create Primary Directory task because they focus on the creation of a single directory in a specific location. So let’s take on those two next:
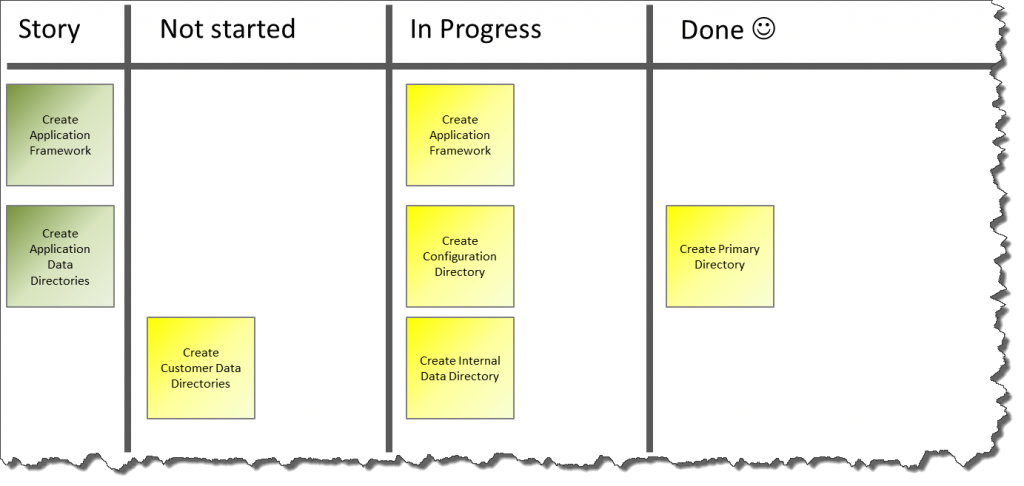
What do we need to do in our code? Well – maybe not too much! The primary directory has been created. We should now use New-Item to create the two sub-directories within. That means an extension to our Global Variable Definitions, adding one variable for each directory.

Why am I doing it this way? Well, because we have not been told that there is a need for multiple instances of those directory types (Configuration and Internal Data) and I want the script owner to have an easy identifier in the code telling what directory is referenced in the code:

# Global Variable Definitions
$TargetDrive = "F:\"
$PrimaryDirectory = $TargetDrive + "MyApplicationData"
$ConfigurationDirectory = $PrimaryDirectory + "\ConfigurationData"
$InternalDataDirectory = $PrimaryDirectory + "\InternalDataStorage"
Next, we need the system to actually create those two directories but only if the parent directory exists!

# File System Configuration Script for MyApplication
#
# Copyright (C)2011 by Andreas Zapf
#
# Please feel free to re-use and adapt as required :)

# Global Variable Definitions
$TargetDrive = "F:\"
$PrimaryDirectory = $TargetDrive + "MyApplicationData"
$ConfigurationDirectory = $PrimaryDirectory + "\ConfigurationData"
$InternalDataDirectory = $PrimaryDirectory + "\InternalDataStorage"

# Test if the primary directory already exists
if( ! (Test-Path -path $PrimaryDirectory))
{
    # Create the primary directory
    New-Item $PrimaryDirectory -type directory
}
else
{
    # Notify the user that the directory exists
    "The directory " + $PrimaryDirectory + " already exists. Creation skipped."
}

If( Test-Path -path $PrimaryDirectory )
{
    # Create Configuration Directory
    New-Item $ConfigurationDirectory -type directory
    
    # Create Internal Data Directory
    New-Item $InternalDataDirectory -type directory
}
else
{
    "Failed to create Configuration Directory and Internal Data Directory because " + $PrimaryDirectory + "does not exist."
}    
The following assumption is made in the code (for simplicity): if the primary directory does not exist, it is created. If the primary directory exists thereafter, the two sub-directories are created but we do not again check if they already exist. In this situation, we might see a change request later:

“As an Administrator, I want the script to stop execution of the Primary Directory exists to avoid configuration confusion.”

That would probably be a wise requirement – for now, it is not part of our little script! Let’s check the Task Board: two more tasks are done for the moment.
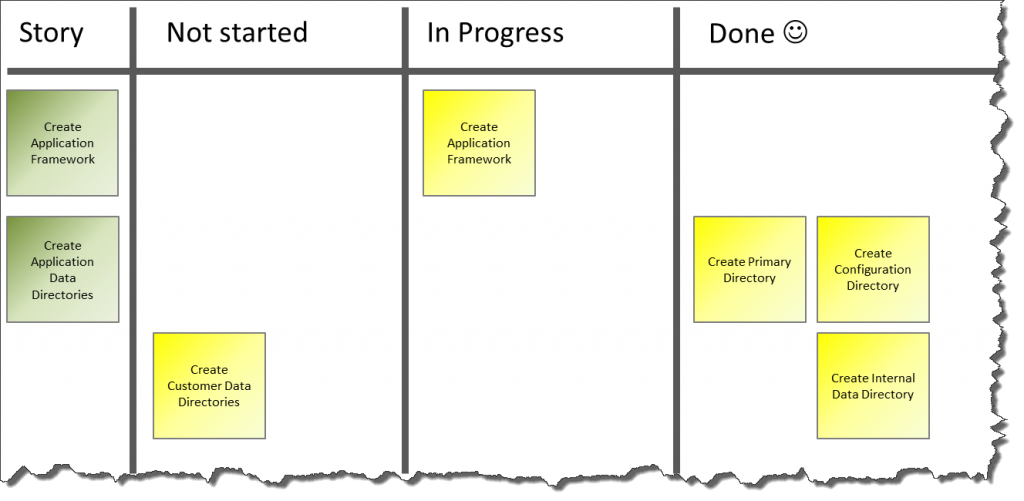
The third Step: the Custom Data Directories

The last step we are going to work on are the Custom Data Directories. In principle, the creation of these is in no way different than the creation of the previous directories. But we do not know their number! There may be one or many Custom Data Directories so there is no way to hard-code them the way we did it before.

Instead, we are going to use an Array of Strings to define the Custom Data Directories and then use a ForEach loop to process them. The definition of the Array of Strings is straight forward:

$CustomDatDirectory = "CustomDataStorage1","CustomDataStorage2"
Simply list all members of the array separated by a comma.
foreach ($myCustomDataDirectory in $CustomDataDirectories)
{
    $myCustomDataDirectory = $PrimaryDirectory + "\" + $myCustomDataDirectory
    
    New-Item $myCustomDataDirectory -type directory
}
The processing using the ForEach loop is equally simple: foreach (<item> in <collection>) tells the command processor to load an element from <collection> into the variable <item> and process it. Then load the next element into <item> until no unprocessed elements remain in <collection>.

For reference, I am including the complete script here. Please keep in mind that if you download it from the Internet, you need to allow the execution of unsigned scripts or you need to create your own script from the code!

Wrapping it up

We can wrap up now – we have achieved quite a few things today. But first things first, we need to update our Task Board:
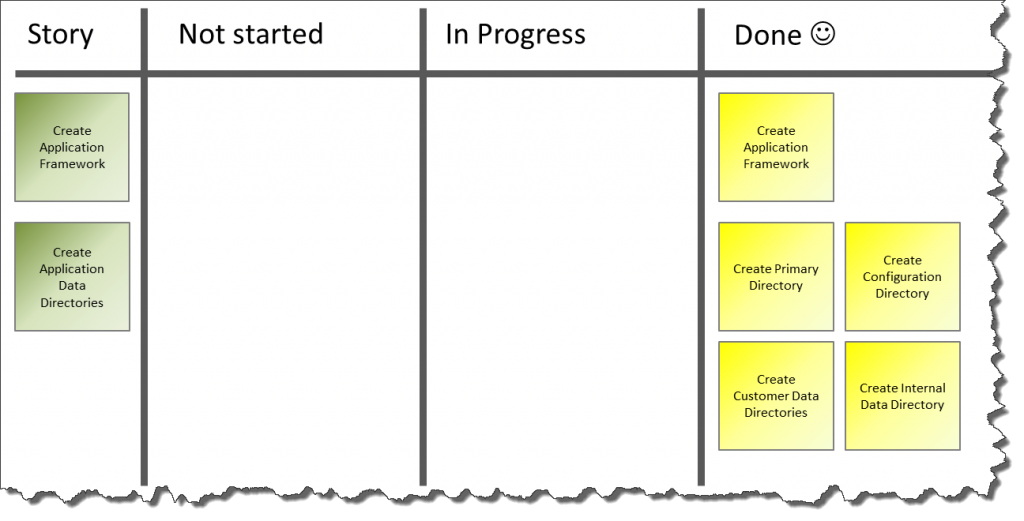
All tasks are finished and done, so what have we gotten ourselves?

  • We have a script that is capable of creating the required directory structure we asked it to provide.
  • We have a new Requirement about the script stopping when the directory already exists (but we have not implemented this in the script!)
  • We have learned about the New-Item Commandlet as well as the Test-Path Commandlet.
  • We have learned about the If…Then…Else… construct and the ForEach Loop.
  • We have used a Task Board to track our progress.
Posted in Windows PowerShell 2.0 | Tagged | Leave a comment

From Zero to PowerShell 2.0 – Interactive vs. Scripting Mode

In the previous two posts [1,2], we have used the interactive Windows PowerShell Console or the PowerShell ISE Console Window to execute commands. While this works fine for some ad-hoc processing, the reality will usually be different: you will develop, test and deploy PowerShell Scripts which you can re-use over and over again instead of typing the Commandlet in every time.

To support script creation and maintenance, the Windows PowerShell 2.0 comes with an Integrated Scripting Environment – short: ISE. You can launch it via the Start -> All Applications -> Accessories -> Windows PowerShell menu.

The Windows PowerShell ISE is a simple Script Development Studio. You can:

  • manage your script contents – loading, saving, editing the script you are working with,
  • execute the script, even in a built-in debug mode,
  • access a PowerShell Console to test commands and monitor variables
  • launch the PowerShell Console application

Windows PowerShell ISE on Windows Server 2008 R2

If you have started to look into scripting, there is a good chance you are a server operator and want to ease some management tasks. So if you are running a Windows Server 2008 R2 instead of the Windows 7 which I used for my initial examples, you will find that under Start -> All Programs -> Accessories -> Windows PowerShell you will not find the Windows PowerShell ISE.

Windows PowerShell ISE has been implemented as a Feature – and it is not installed by default. You can install it via the Server Manager’s Add Feature or – learning PowerShell – you can install it via the Windows PowerShell Command line:

Import-Module Servermanager
Add-WindowsFeature PowerShell-ISE

You will see the system working a little bit, performing the installation. Once done, a summary of the task is displayed:

You now should have the Windows PowerShell ISE available in the Start menu.

Scripting & Security

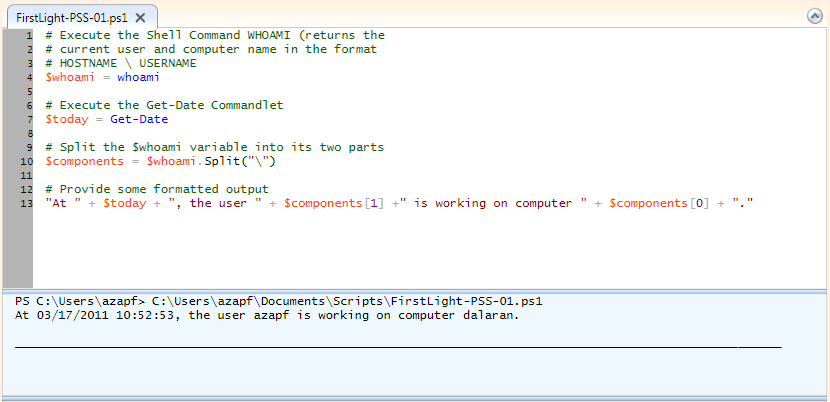
Scripts can be of any complexity – for today, I just created myself a short one and I did not really pay attention to its usefulness. But it is a few lines of code and I do not want to re-type it every time:

# Execute the Shell Command WHOAMI (returns the
# current user and computer name in the format 
# HOSTNAME \ USERNAME
$whoami = whoami

# Execute the Get-Date Commandlet
$today = Get-Date

# Split the $whoami variable into its two parts
$components = $whoami.Split("\")

# Provide some formatted output
"At " + $today + ", the user " + $components[1] +" is working on computer " + $components[0] + "."

You can simply copy & paste the code into your PowerShell ISE environment. Then save it – let’s say to FirstLight-PSS-01.ps1.

If you now try to run the script, you will most likely get an error:

Well, Scripting has always been a terribly dangerous thing – think of all those viruses that used the scripting engine to wreck havoc. Consequently, Microsoft has built in some restrictions to scripting and one of them is that the default settings will not allow you to run scripts.

You can verify the current setting for yourself: type Get-ExecutionPolicy into the to see what the current setting is. Most likely, the current mode is restricted. PowerShell 2.0 knows 6 different settings for the Execution Policy (alphabetically ordered):

  • AllSigned: you can run scripts on the system as long as they have been signed by a trusted source. If the script is signed but the source of the signature is unknown, you will be prompted.
  • Bypass: does not require script signing and – unlike Unrestricted – there will be no warnings. Not a recommended option!
  • RemoteSigned: requires a script that has not been developed on the local computer to be digitally signed. A good option if you do not want to create a local certificate.
  • Restricted: this is the default setting after installation. You are allowed to perform individual commands but running entire scripts is forbidden.
  • Undefined: clears the currently defined execution policy which will then resume a default value, assuming it is not overwritten by an execution policy of a higher scope.
  • Unrestricted: does not require script signing, any script can be run. Will only warn you when a script is directly downloaded from the Internet. Not an advisable option!

If you want to read the built-in help, try Get-Help about_execution_policies to display the detailed definitions for execution policies.

Allowing Scripts to run

If we want to run our previously saved script, we need to set an appropriate execution policy. We can go with RemoteSigned for the moment but I would not recommend this setting for systems used in any production environment. Type Set-ExecutionPolicy RemoteSigned and the system will request permission to change the execution policy which you need to approve.

Try to run the script you have loaded before – with the changed execution policy, the script will run.

Please note, that the change to the execution policy we have made is saved to the system: if you come back to the PowerShell ISE the next time, you will not have to re-set the execution policy. However, that also means that you need to be careful about using all-to-open execution policies for testing: they remain set until explicitly reset!

Posted in Windows PowerShell 2.0 | Tagged | Leave a comment

From Zero to PowerShell 2.0 – Pipelines

After the first look at PowerShell 2.0, we already know there are tons of commands – or Commandlets as they are called in PowerShell. Each one of them is a more or less powerful feature by itself but usually, you don’t get very far with a single Commandlet:

Get-WmiObject -list
As a result, you will receive a (very long) list of all known WMI Objects. WMI – or Windows Management Instrumentation – is Microsoft’s implementation of an open platform management environment, also referred to as Web-based Enterprise Management (WBEM). For us, WMI Objects are a great source of information about our computer as well as a great training object for PowerShell!

Back to our Get-WmiObject Commandlet: the result is a rather long tabular overview of all available WMI Objects. That is great if we do not know anything about available WMI Objects and allows us to browse, scan and decide on interesting ones… but what if we know that the objects we are (currently) looking for are all having a Name starting with Win32? Can we shorten the list to only those WMI Objects that actually have a matching name?

The answer is yes – and that is where “pipelining” is coming into the game. Try

Get-WmiObject -list | Where-Object { $_.name -like "Win32*" }
to see what happens.

In short, “pipelining” is the passing of a result of one Commandlet to another Commandlet for further processing: in our example, the Commandlet Get-WmiObject returns a large list of object and lists them in a tabular way. From the Column Headers, we know one of the properties of those objects is called Name.

The example above now asks the PowerShell Engine to not directly display the result of the Commandlet but to pass it on to a second Commandlet named Where-Object. Here is what you get as a result of Get-Help Where-Object:

The Where-Object cmdlet selects objects from the set of objects that are passed to it. It uses a script block as a filter and evaluates the script block for each object. If the result of the evaluation is True, the object is returned. If the result of the
evaluation is not True, the object is ignored.

And that is exactly the result you are seeing: only objects that have a Name property starting with Win32 are remaining in the list. But one things that disturbs is the long list of Win32_Perf* Objects. What if we are not interested in the Performance Data Objects?

So far, we have used the Select-Object Commandlet to retain all values that match a specific pattern – we are now going to use it to drop all objects we do not like:

Get-WmiObject -list 
| Where-Object { $_.name -notlike "Win32_Perf*" }
| Where-Object { $_.name -like "Win32*" }
What happens here is very similar to the first pipeline example:

  • Calling Get-WmiObject -list returns all known WMI Objects. The resulting list of objects is then passed to the next Commandlet in the pipeline.
  • By using Where-Object with a -notlike parameter in the pattern, we are keeping anything that does not start with Win32_Perf. The result is a list that contains any known WMI Object but the ones starting with Win32_Perf. That reduced list is then passed on to the next Commandlet in the pipeline.
  • Using the already known Where-Object with the -like “Win32*” parameter, the remaining list is filtered any only those objects with a name property beginning with Win32 are retained, further truncating the result set.

This little example demonstrates the power of pipelining: a pipeline can be of any complexity, passing its result to the next Commandlet in the pipeline. Of course, the concatenation of Commandlets needs to make sense, in other words: it is your responsibility to ensure that the result of one Commandlet contains anything the next Commandlet can reasonable handle.

Did you notice the list of returned WMI Objects is not alphabetically sorted? Well, guess what – just another Commandlet in the pipeline can do that for you as well:

Get-WmiObject -list 
| Where-Object { $_.name -notlike "Win32_Perf*" } 
| Where-Object { $_.name -like "Win32*" }
| Sort-Object Name
Enough for today – this leaves you with a very nice, alphabetically sorted list of WMI Objects available within PowerShell 2.0 – ready to be exploited in one of the next rounds.

Posted in Windows PowerShell 2.0 | Tagged | Leave a comment

From Zero to PowerShell 2.0 – The first Steps

In all honesty, I did hear about Windows PowerShell quite a while ago but never really bothered to take a closer look. Mainly, because I was thinking that this would be little more than a modern Command Line Prompt and secondly, because I did not really see a lot of use to my daily business in there… how wrong I have been!

Just recently, a colleague of mine started digging into Windows PowerShell and soon enough he was (jokingly, I am hoping) raving about “what else can be scripted”. While he was doing that on purpose and with a clear idea of what he wanted to achieve, he got me curious.

So here is From Zero to PowerShell 2.0 – or what are the first steps of someone who is trying to find out what PowerShell is all about…

What do I need to install PowerShell? And what is it?

The first question is answered easy enough. If you are running Windows 7 like me you do not need to install anything – PowerShell has been installed with the Operating System. You can find it under Start -> All Programs -> Accessories -> Windows PowerShell.

The What is it part is a bit more difficult to answer: putting it into one sentence, I am currently tempted so say “It is a modern, .NET-based scripting platform for administrative purposes” – although that might cut it a bit too short after all. But for the time being, I’d like to settle for that statement.

PowerShell Testing – Hello World!

Of course, curiosity always wins: you can read a thick book about Windows PowerShell or you can search the Internet for long examples – there is nothing better than diving into it right away to get an initial idea – remember the “Hello World!” Programs of the old days? It came back in any programming language there ever was – and to many of us it was the first line of code we ever wrote in a new language.

Go to Start -> All Programs -> Accessories -> Windows PowerShell and launch the interactive console, Windows PowerShell (not to be confides with Windows PowerShell ISE – we will see that one later).

So that is the Windows PowerShell 2.0 Console Window. Wow! – Not much different than the original Windows Command Prompt…

So back to “Hello World!” – which would be a rather boring example so let’s beef it up a bit: we want the system to write “Hello World! – It is <the current date> and this is the first PowerShell Experience I’ve ever made…”.

Before I worry in how to deal with the text, I want to show you how to actually get the current date from the system through PowerShell: type Get-Date and press the Return key:

Windows PowerShell
Copyright (C) 2009 Microsoft Corporation. All rights reserved.
PS C:\Users\azapf> Get-Date

Sonntag, 27. Februar 2011 14:25:00

PS C:\Users\azapf>

As you can see Get-Date produced the current system date. In plain words, I would call Get-Date a command but PowerShell has introduced the term Commandlet for this type of statement – often abbreviated as Cmdlet.

So a Commandlet is a PowerShell command – consisting of different parts itself: first, there is what PowerShell calls the verb: Get. Then there is the Noun – Date. Sometimes, there are additional Parameters which can be mandatory or optional.

So let’s get done with our Hello World! Example – in the PS Console, try this:

"Hello World! It is $(Get-Date) and this is the first PowerShell Experience I've ever made...".

Not necessarily nice  but it works. But what happened? Not much – except that we have silently introduced the concept of Variables.

PowerShell Variables

This is going to be a very short detour – the entire topic deserves its own post later. Nonetheless, this is important. In PowerShell, you have the ability to define variables and store data in them.

The long form of the sample above could have been

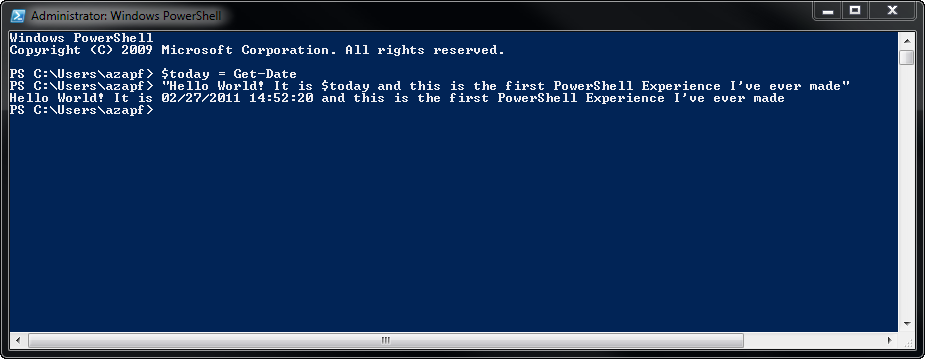
$today = Get-Date
"Hello World! It is $today and this is the first PowerShell Experience I've ever made...".

In this case, $today would have been our Variable and it would have stored the result of the Get-Date command. In the second step, we would have merely told the PowerShell Command Interpreter to insert whatever is stored in $today into the string and display it with the rest:

In the original sample, I used a construct “[…] is $(Get-Date) […]” instead of defining a variable first. This is actually an ad-hoc usage, telling the system to take whatever Get-Date returns and immediately use it in this place – the only important element to note here is that Get-Date has to be put into () – otherwise, it will not be interpreted as Commandlet!

But let’s put the Variables on the side for the moment – and take a second look at the Commandlets.

The Commandlet Reference

We already discussed that a Commandlet consists of the Verb, the Noun and potentially some Parameters.

So far, we only know the Get-Date Commandlet. How about other Cmdlets, especially those that get us something else? Funny enough, there is a Commandlet named Get-Command.

The help available for that Commandlet reads

“The Get-Command cmdlet gets basic information about cmdlets and other elements of Windows PowerShell commands in the session, such as aliases, functions, filters, scripts, and applications.”

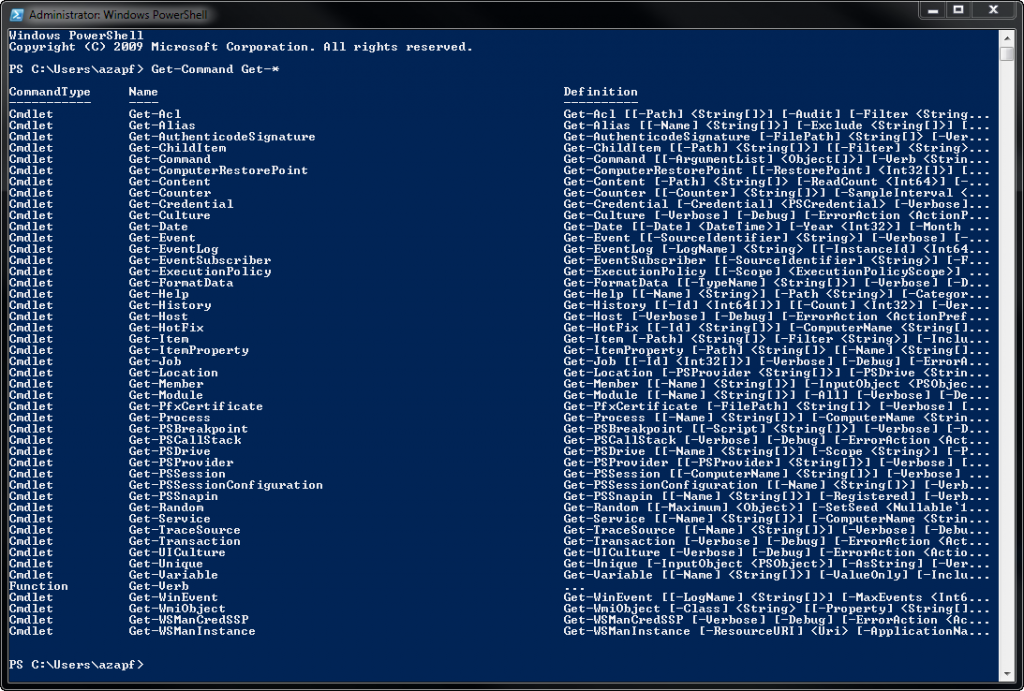
Woohoo – exactly what we want! That’s actually pretty cool! In the PowerShell Console, type Get-Command Get-* to list all Commandlets that begin with Get-. And almost en passant,  we have also used the first Parameter to a Commandlet.

Before you now go off and explore the different Commandlets, let me show you a last one for today: the Get-Help Cmdlet. The built-in help for this one reads

“Displays information about Windows PowerSHell commands and concepts”

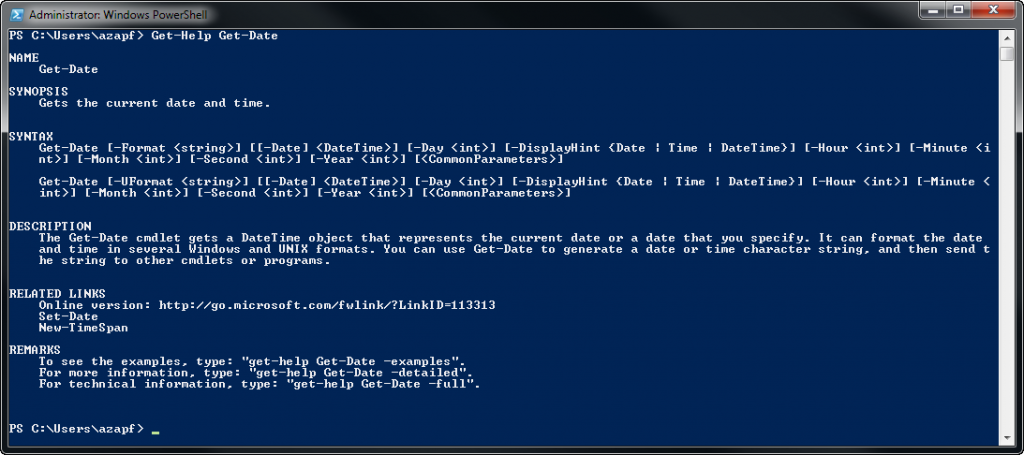
So try Get-Help Get-Date to see the following:

In other words: you can use Get-Command to explore what commands are available in Windows PowerShell 2.0 and you can use Get-Help on the command of your choice to get a more detailed information on what the command is all about and what parameters it takes.

Posted in Windows PowerShell 2.0 | Tagged , | Leave a comment

Adding Access Control to the Blog

By nature, a blog is supposed to be accessible! After all, you – as the Blogger – want people to be able to access the blog, preferably without putting up any more hurdles than knowing the blog URL. Well, at least most of the time…

I do not want my Blog to be publicly accessible!

But what if you do want to block access to the Blog? There are a couple of scenarios where this might be useful, e.g. when running a corporate blog or when using plug-ins for tracking that only make sense if your users show up “in person” rather than as guest.

Using Plug-Ins to restrict access

There is a number of WordPress Plug-Ins available dealing with the topic:

  • Members Only (see here)
  • WordPress Access Control (see here)
  • Force User Login (see here)

Well, there are certainly more – but these are the three I looked at after digging a little bit into the topic.

Members Only

I did install Members Only manually after having had a very bad experience with the automatic installation of another plug-in before. The current version at the time of this post is 0.6.7 which I installed into a WordPress 3.0.4 environment.

After activating the plug-in, it’s configuration page becomes available under the WordPress Settings menu.

There are a couple of options – first and foremost you need to activate not only the plug-in but also need to enable Members only on the configuration page!

By default, it will re-direct users to the login page but you can specify a dedicated page instead if you want (especially useful if you want to provide feedback as to why the user did not get to see what she expected to see).

With the option enabled (and the browser session restarted!), the root page of the Blog now becomes inaccessible and I am redirected to the login page just as I expect it to be… works perfectly for me and will be the plug-in of choice for me.

WordPress Access Control

Second in test is WordPress Access Control – again in a WordPress 3.0.4 environment. I am using Version 2.1 of the plug-in with WordPress auto-install.

Once the plug-in is activated, the description says the access control settings would be available on when editing or writing a new post… they are not in my system! Besides the fact that this plug-in uses a slightly different approach by securing access to the individual posts rather than the whole blog (which I might have appreciated!) I am not getting a trace of the plug-in being present after installation. Since there are no more installation instructions than install and activate, this sees to be not working (in my environment at least).

Force User Login

Third in test is Force User Login, which I used version 1.2 in my WordPress 3.0.4 environment. Having the plug-in installed and activated, the root page of the blog becomes inaccessible as well but I do receive an HTTP 404 Error because the redirect goes to http://[MyServer]/ instead of http://[MyServer]/[Blogname]

Not sure if this is caused by a change in WordPress or my installation (on a Windows Server 2008 R2) but bottom line is that the plug-in does not seem to work “out of the box” which makes it a no-go for me.

Conclusion

Having tested three plug-ins in my WordPress 3.0.4 environment, only one of them came out as “working out-of-the box”. The other two didn’t appear to do anything (WordPress Access Control) or failed (Force User Login).

Being someone who is interested in the solution and not the reason why something would not work, I am naturally picking the one that does work – so for my corporate blog, Members Only becomes the solution of choice.

Posted in WordPress Plug-Ins | Leave a comment