A Flight Simulator Retro-Trip for 14.95€ – How far have we come…

Back in the early 1990, when the Microsoft Flight Simulator (or even the subLogic Flight Simulator before it became the Microsoft Flight Simulator) was in it’s early versions – Flight Simulator 3, Flight Simulator 4 and Flight Simulator 5 – Meigs Fields in Chicago (“the coolest little airport in the world”) was the well known base for all fans of the simulator: this was, where many of us started their first flights, with hours and hours of touch-and-go patterns to get used to the little Cessna (or later the Lear Jet).

Chicago - Flight Simulator 5

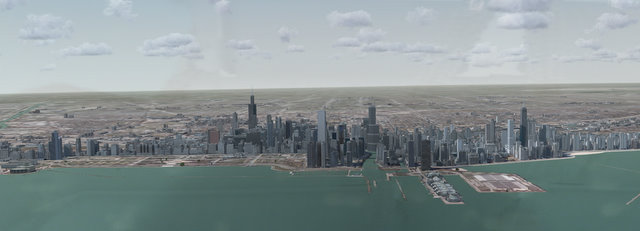
The picture above shows a screenshot taken in the 5.1 version of Microsoft’s Flight Simulator. Approaching Chicago from Lake Michigan, flying straight to the West. Meigs Field is out of sight, just off the left side of the picture. To the right of the “skyline”, you can see John Hancock Center, Sears Tower (now “Willis Tower”) is in the back, behind that reddish looking building. At the time this version of Flight Simulator was “new”, the graphics was by far the best one had seen on flight simulation on a PC.

Since then, 15 years of computer development have passed: processors with capabilities far beyond what we had ever dreamt of, graphics boards with a thousand times more memory than my computer once had, harddisks that now can store terabytes of data – compared to the 1.44MB Disks we once had… and the result is stunning:

FSX - Chicago

Chicago – from about the same place the first picture was taken some fifteen years earlier. We are now looking at a photorealistic scenery with almost all major buildings of downtown Chicago. High-resolution aerial photos are mapped to the ground, each and every building is given a natural view by applying photo-realistic textures to all visible areas of the 3D-Models.

aerosoft's US Cities - ChicagoX - Picture 1 aerosoft's US Cities - ChicagoX - Picture 2 aerosoft's US Cities - ChicagoX - Picture 3

I am rarely using my Flight Simulator these days – and I have not been flying in Chicago for many years now – but today, I bought aerosoft’s US Cities ChicagoX just to have that trip back in time… and it provided a stunning view for sure…

Posted in FSX | Tagged , | 1 Comment

Finalizing the Eee PC Installation

After the base installation, the system requires a couple of additional applications – here is the install list:

  • Anti-Virus Software: of course, the most important thing to go on the system after the initial installation.
  • Windows Home Server Connector Software: to include the system in the WHS environment (again)
  • TrueCrypt: to allow for data encryption
  • Using the Google Updater, the following software is installed: Adobe Reader, Firefox, Google Earth, Picasa and Skype.
  • DivX for the movies – I just need the player from the package.
  • iTunes to help with the iPhone
  • MS Office 2007 (Word, Excel, PowerPoint, Outlook)

That – basically – is the minimum stuff I need on the Eee PC to allow for daily work, eMail, Internet and some Music and Video while travelling…

Posted in Allgemein, EeePC | Tagged | Leave a comment

Installing Windows 7 on the Eee PC

Now, with the bootable USB Stick prepared and all (relevant) data backed up, I am restarting the Eee PC and booting up the Windows 7 Installation DVD. Since my system already has a Windows XP installed, the next question I am confronted with is to keep the current installation (and upgrade it) or to install a brand-new system, reformatting the disk first.

I am in favour of a brand-new install – but looking at the Partition Table of that Eee PC raises an eyebrow (or two):

  • Drive 0 – Partition 1 – 72.1 GB
  • Drive 0 – Partition 2 – 72.1 GB
  • Drive 0 – Partition 3: PE – 4.9 GB
  • Drive 0 – Partition 4 – 47 MB

Eh… quick reboot to revisit the “old” Windows XP – I need to check out the partitioning first! OK – there is a C: drive and a D: drive – I actually never noticed because all I am using the Eee PC for is eMail and other light-weight stuff… anyhow. In this case, I will install into Drive 0 – Partition 1 (which I will format first).

With that deed done, I let the installer copy the files, expand them and install my Windows 7.

What am I supposed to say? After a little while of copying files, rebooting, testing my video and me setting up some basic data (such as the host name, password, etc.) my little Eee PC starts… Windows 7!

Now, before doing much to it, let’s check some things:

  • Memory used: the Eee PC has got 2GB or RAM – after booting up Windows 7, Task Manager shows 559MB used.
  • Device Manager: checking out how many hardware deviced Windows 7 could not install drivers for… and here comes the surprise: there is not a single device listed with issues – every device identified has received at least a suitable (maybe not current) driver…

Still, the ASUS Website suggests some additional installations, in this order:

  1. Chipset Drivers for the Intel 945 Chipset: I downloaded the driver version 9.1.1.1016 from ASUS earlier, so let’s install that one now. The installer flawlessly copies the updated driver files and then requires a system restart.
  2. SATA AHCI Driver: previously downloaded was version 8.9.0.1023. This is a manual install via driver update (from the device manager) but no issue at all. Also requires a system restart. Once back, the system recognized “new” hardware, obviously a result of the updated driver. Once additional drivers had been installed, the system needed a third restart.
  3. VGA Display Driver: although the default driver just seems to work OK, I decided to go with the recommended AUS Driver, version 8.15.10.1867. Installation, again, is a no-brainer, just start the installer and click “Next”. Screen will flicker during the installation but should return to normal once finished. This one – of course – requires a restart of the system as well…
  4. Hotkey Service: Hm… downloaded driver version 1.11.01 with no clue what it does… the installer does not provide a hint either. This one – what do you think? – requires a restart as well. And by the way, it became quite clear what it is needed for: the Hotkey Service allows the management of the quick access keys to toggle WLAN, Touchpad, etc.
  5. Touchpad: This one is version 13.2.6.1. Although the touchpad is working after the original Windows 7 Installation, the Hotkey Service now complains that the touchpad is not having an appropriate driver. And testing the button: yes, correct, I cannot switch on/off the touchpad (although I do get a display in the screen)… another setup, another restart 🙂 – after the restart, the Touchpad Hotkey is working as expected.
  6. Bluetooth Driver: I don’t really use bluetooth on the Eee PC (yet) but install the driver anyway – version 6.2.0.9600. Who-ha! No restart this time!
  7. LAN: the default Windows 7 Driver worked without issues – I am still updating to the ASUS Driver, just in case. Now – that one is good for a laugh: it says “Install Driver fail” but then continued just to say “Installed sucessfully”… which one now? Well – I lost connection to my WHS, so I guess another reboot should tell which of the two stories is actually true… luckily, it was the “Sucess Story” – the network is OK and WHS is reachable again.
  8. Audio: as for the audio driver, the document ASUS describes the update procedure in lists version 6.0.1.5898. The web site gave me 6.0.1.5948 – so I am giving that on a go. And another restart…
  9. WLAN: driver version is 8.0.0.238 – works perfectly, no problems connecting to my home network.
  10. Super Hybrid Engine: This one goes to version 2.0.9 – and requires a reboot after installation. This little application, abbreviated SHE, is responsible for the netbook’s power management and hopefully enhances battery life greatly.

With this last utility installed and freshly rebooted, my memory usage is at 515MB, 9.5GB space used on my C: Drive and Windows 7 up and running. I am now running the performance index – let’s see what this one turns out to be (and it will not be the supa-dupa-fast PC but it does not have to be that!) – the Performance Index turns out to be 2.0, based on the performance of the graphics card. (Processor: 2.3, RAM: 4.5, HDD: 5.4)

Some more statistics:

  • Total time to reboot from cold to login dialog: 30 seconds.
  • Time from entering password to finished loading desktop: 15 seconds.

This now concludes this blog entry on setting up the system… installing the rest of the software is covered in another post.

Posted in Allgemein, EeePC | Tagged , | Leave a comment

Updating the Eee PC

Well, time to do some stuff on the Eee PC – I got an Asus Eee PC 1005HA quite a while ago and really like it. However, it came with one of the last versions of Windows XP and I am curios as to how it performs under Windows 7. Newer deals on that model are actually Windows 7-based, so I thought, I should give it a try. But first, the system requires a BIOS Update in order to be ready for the new operating system.

Flashing the new BIOS is quite easy with ASUS – they install a tool called ASUS Update with the system and it allows the every-day-regulary-end-user to update to a new version of the BIOS while in Windows XP. The flashing of the BIOS worked quite nicely, took about 5 minutes or so. After the reboot, I have to enter the BIOS Setup (or load the default values) – but by going into the BIOS, I can easily determine that the new version is installed – I am now on Revision 1203.

Next thing to do is to install Windows 7. With the Eee PC, this is not as easy as putting in the DVD and just wait – because there is no DBD Drive. So the first thing to do is to prepare a matching Windows 7 Bootable USB Stick.

Posted in Allgemein, EeePC | Leave a comment

Bootable USB Sticks

This has been bugging me for years but I never really had a real reason to find out more about it: how to make a USB Stick bootable? Well, now I have not one but two reasons, so I decided to give it a try – and this is why:

  1. I need to install a new version of Windows 7 so I downloaded the ISO Image from the MSDN Account. However, writing it to a DVD (again) takes time and resources, given that I will forget where I put the DVD once the system is installed. Hence, having it on a USB Stick will save time and a DVD.
  2. I want to backup my ASUS EEEPCs Harddisk, before  installing the new OS – and I want to completely image it, just in case. However, the EEE PC does not have a DVD Drive and therefore, the imaging software cannot be started (it’s on CD).

One of the first things to do was to create an active partition with the appropriate file system – everyone can do so using the Windows GUI but the command line tool is also interesting, so I decided to use that one:

  1. Open a Windows Command Prompt
  2. Type diskpart to start the Partition Editor. It will scan your system drives and then provide a prompt, DISKPART>
  3. Type list disk to list all drives on the computer.
  4. Identify the USB Stick (primarily by looking at the Size column. Note the associated Disk Number from Column one. My stick showed up as Disk 2.
  5. Select the appropriate USB Stick by typing select disk [Disk Number]. So in my case, sel dis 2.
  6. Type list partition to list the partitions on the active disk. My USB Stick has one primary partition, Partition 1.
  7. By typing select partition [Partition Number], the particion becomes active. In my case, select partition 1.
  8. Now, the selected partition is formatted: type format fs=FAT32 label=”MYLABEL” QUICK OVERRIDE. That performs a quickformat on the partition, labels it MYLABEL and overrides any current mounting. Obviously, this creates a FAT32 file system, you had to type fs=NTFS to get an NTFS file system.
  9. Type active to make the selected partition an active partition.
  10. Type exit to leave the partition manager.

With the USB Stick now formatted and containing an active partition, I started to copy the files from my CD onto the USB Stick (in this case, the Paragon Software. One can now try to boot from that USB Stick, provided the computer’s BIOS supports booting from USB devices. However, even if supporting “Boot from USB”, you may not see success right now: my BIOS does not really use the “Boot from ext. device” function to book from USB – it displays the USB Stick under the HDD Priority list but it does reset it every time it sucessfully booted! Therefore, I need to go in and check that the USB Disk is really the first HDD to boot from!

Having prepared all that, my EEE PC started the USB Operating System without any problems…

Additional Note: In the meantime, I came across USB Sticks that failed on Step 7 of the above procedure. So in order to continue, the following must be done:

  • 6a: Type clean to erase all information from the USB Stick. Make absolutely sure you have the correct disk selected!
  • 6b: Type create partition primary to create a new primary partition on the USB Stick.
  • 6c: Continue the above process, re-starting with Step 6.
Posted in Allgemein | Leave a comment