For many Windows applications that require a server operating system (as opposed to a Windows Workstation), Windows Server 2008 R2 is the operating system of choice – and it represents the latest version of the Windows Server family publicly available. All good reasons to have a quick look at a straight forward installation – we will be doing nothing fancy in this post, merely running the default setup.
Prerequisites – What do you need?
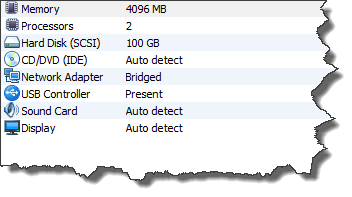
Honestly, you do not need much – mainly, the Windows Server 2008 R2 Installation DVD and the hardware to put it on – or, like in this case, a virtual machine. In any case, the hardware (or virtual hardware) should be somewhat reasonable – don’t expect to run the server on an old processor with 512MB RAM… here is my hardware configuration:
 So now insert your installation media or mount an ISO image (for VMWare) and fire up the system…
Getting the Installation done
When the system boots the installation media, Windows Server 2008 cannot hide it is closely related to the later Workstation operating systems – instead of the textual setup you got in the “old days”, you are now presented with the graphical user experience the desktop users have as well – if you like it or not…
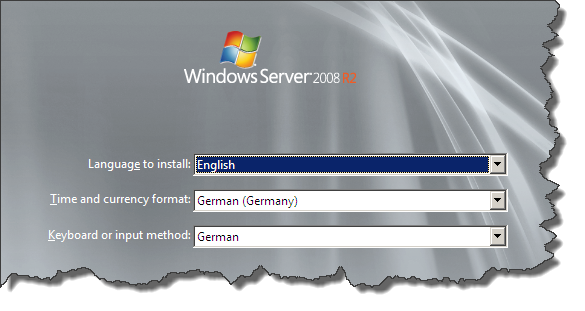
The first choice you are given is the Language Selection which not only determines the language of the operating system but also the date and time format the system will be using as well as the keyboard layout.
In my case – living in Germany – I am leaving the server language on English but switch the date format and the keyboard layout to German:
 Having made my choice, the next page of the Installation Wizard allows only one option: Install now! Setup is now starting to perform its job – and depending on your system, that might take a while. Depending on the type of installation media, you may be presented with an option to select the operating system you want to install. What does that mean?
Well, it means that your installation media allows you to install more than one type of Windows Server 2008 R2 – there is the Standard Installation, the Enterprise Server and the Datacenter Server (as well as the Web Server). These all are different incarnations of the same operating system – providing different features and having a different cost to they licenses. Why would Microsoft create different installation media for any of these types if the distinction can be made by the license key? So if you get this choice, then make sure you are selecting the type of server that matches your license key!
Next is the Software License Agreement – read it, understand it and then click the I accept the license terms button. That takes you to the Installation Type page of the Installation Wizard.
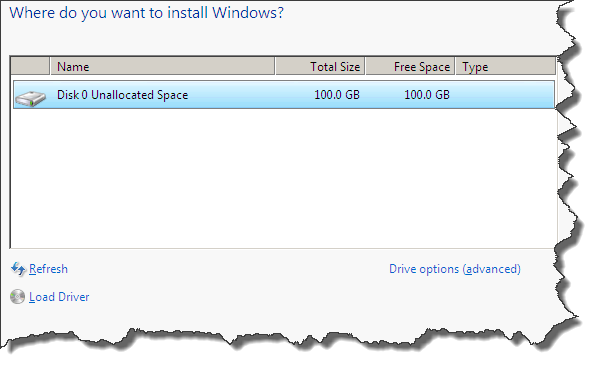
 In my case, there is not much of a choice since I am not upgrading an existing system – and I want the custom installation anyway! Clicking on the Custom (advanced) option leads to the next question: where to install the operating system?
 My small virtual machine does not really have more than one hard disk attached to it – in a real-world scenario, you would of course see all the hard disks of your server and might even have to load specific drivers in case you are using dedicated hardware for disk mirroring, etc. In this case, Disk 0 is the only available location so I can continue with the installation.
The Installation Wizard now has enough information collected to perform the actual installation of the files – this can take a little while, depending on the environment.
 During the installation process, your system will restart automatically so you might want to make sure that this time it is not booting from the installation media but from the hard disk…
Setup is still not done at this point – you will see the system updating the registry and then returning to the installation progress dialog. And yes, there will be another reboot of the system as well as an initial preparation phase before you are presented with the finished operating system.
 One thing that is missing in the setup is the specification of the system administrator’s account and password – right? Well, Microsoft has decided to take the elegant way here – the built-in administrative account named Administrator (wow, what a surprise!) has simply set the password expiration flag so you are forced to provide a new password the first time you are logging in (which is now).
 So go ahead, click the OK button and type in the desired password… but don’t be surprised if you see the following message:
“Unable to update the password. The value provided for the new password does not meet the length, complexity, or history requirements of the domain.”
Right… that means exactly what? Well – it usually means that you have chosen a password not accepted as strong enough. Usually, it is either too short or you have tried to use the user name Administrator as password or the term password as password… get used to it: you need to use a strong password here – something like IWantToConnect2010. Once successful, the system informs you that your password has been changed (so you better remember it!) and takes you to your Windows Desktop – just like you are used to it from Windows 7.
You also will have no choice but to notice that Microsoft is trying to help with the next steps by automatically bringing up the Initial Configuration Tasks dialog. You can close the window but unless you tick the option Do not show this window at logon in the lower left corner of the dialog, it will come back the next time you log on.
But even if you close the Initial Configuration Tasks dialog, Microsoft is not letting you off the hook – you are now getting the Server Manager started for you… same thing here: you can close it but it will come back after each new log on unless you tick the option Do not show me this console at logon.
Not to get me wrong: the Server Manager is a very important and pretty cool feature of Windows Server 2008 R2 – but I prefer to decide which applications I want to use when myself…
A Note to VMWare Users
You are not going to have a lot of fun with the virtualized version of Windows Server 2008 R2 before you have installed VMWare Tools so I am suggesting that you are making that the very first task after you have logged in!
Conclusion
Congratulations – we are done with the base installation now. The system is up and running but be aware: it is of no use so far, we have not even done a single bit of the most basic configuration yet – so this server is neither usable nor secure! But then, this post is named Base Installation and we will cover the Base Configuration elsewhere…
In general, I have to admit that Microsoft is doing a pretty good job with the installers (as well as with the system administration utilities as we will see later) – it is no rocket science to get this server installed and running (it will require a bit more than that to get it configured properly) – clear point goes to Redmond for this straight forward, easy to use and efficient installer!
Disclaimer
All trademarks, product names and companies’ names & logos shown on this website are property of their respective owners. They have been placed on this web site purely for illustration and are hereby explicitly acknowledged.
