After the initial installation of Windows Server 2008 R2, the system is far from being usable. There are at least a few steps that remain to be done before the system can be considered usable even in the slightest way. And depending on your environment, your requirements and possible external (or internal) guidances you have to follow, there may be even more.
The Server Manager – your friend and helper
Many administrators might disagree when I am saying that the Server Manager is a good friend and nice help in the daily work – and they may have a point there: many things that require manual interaction in the Server Manager can be more reliably (and more important: more reproducibly) performed using PowerShell Scripts. However, to the inexperienced user, the Server Manager provides help and guidance where otherwise none would be (although you could argue if an inexperienced user should install and configure a system like this).
The Server Manager’s icon is located next to the Start Button in the Task Bar – and if you have not switched it off, it will automatically start when you log on.
What remains to be done?
At a minimum, a couple of things:
- Adjust the computer’s name – it currently has an artificially calculated host name!
- Configure network access where required
- Run the Windows Updates to make sure your system is up to date
And there may be many more things, depending on what you want to achieve or have to provide as prerequisites for applications you want to host on this machine.
Disclaimer
Let me explicitly state that the configuration options, settings and comments represent my personal taste for a casual configuration – enough to do some testing in non-vital environments with non-essential data.
Under no condition should these settings be considered adequate for production use in a corporate environment!
Changing the Computer’s Name
When your computer is placed in a network, it requires a unique address – usually, that is provided automatically or you are setting it manually to make sure your server always has the same network address. A popular network address is the TCP/IP Address which is a quadruple triplet of numbers in the format xxx.xxx.xxx.xxx – sometimes automatically assigned, sometimes manually.
However, it is not a very intuitive naming that people can easily remember – therefore, each computer has a named address – called the host name. The host name is like your name – your friends will easily remember and they will call your name if they want something. Hopefully, you are the only one of your name in the room then, otherwise there might be some confusion…
With the Server Manager open (and Windows knowing you did not change the host name yet), you will find a link to Change System Properties in the Computer Information section of the Server Manager.
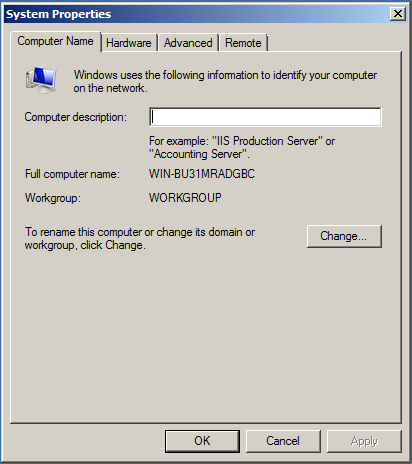
If you click that link, the system will display the System Properties dialog:
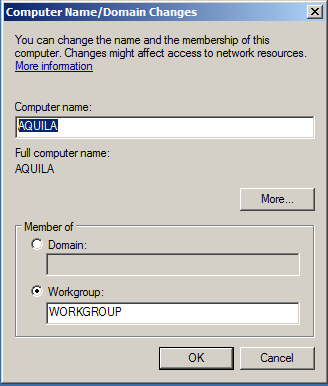
 You can see, the Full Computer Name is somewhat… jerky. Click the Change button to give the server a name people can more easily remember – sometimes, this might be a name like FILESERVER or WEBSITE, or you are having a habit to name your various servers after cities or animals… it does not matter, anything is better than WIN-BU31MRADGBC…
 So our computer’s host name is going to change to AQUILA – which is latin for “eagle”. This change requires you to reboot the system to become effective – so please click the OK Button, then the Close button on the main dialog and confirm the system restart Windows is suggesting to you.
Once your system is back and you can see the Server Manager again, you should see the result of the configuration – the Full Computer Name is now listed as AQUILA.
Configure Network Access
Depending on your network and server configuration, you may have to manually put your hands on your network settings. The Server Manager allows quick access to the Network Connections via the View Network Connections link in the Server Manager’s Computer Information section.
 As you can see in the Connectivity column, this system currently does not have access to the Internet. Honestly, that might exactly be the way you want it! But in our case, that means the system will not be able to access the Windows Update site in the next step so it needs to be addressed.
Note: larger organization may have other means of distributing the regular updates Microsoft is issuing for their operating systems (and other products). But in smaller environments, it may be required to connect the server to the Internet directly which obviously poses a security threat.
For the sake of this post, I will ignore this threat and open the connection without having a virus scanner installed and a firewall properly configured. I am explicitly discouraging this procedure for business relevant systems and in business relevant environments!
If you select the network connection in question and then click the Change settings of this connection button beneath the window’s address bar, the Local Area Connection Properties dialog is displayed. Make the required adjustments, then wait for the Network Connections dialog to refresh the status.
Note: In this case, the problem was caused by the TCP/IP configuration not being properly set by DHCP.
 Windows Update
With the network connections now working, it is time to download and install any update that Microsoft has issued between the finalization of the installation media used and now – and that can be quite a few.
Again, the Server Manager can guide you – first of all, there is a Configure Updates link in the Security Information section. That one will not actually perform any update but will let you specify how the server should deal with updates:
- Install Updates automatically: if you enable this option, the server will by itself check with Microsoft if there are any updates available and will apply them. Although this is the recommended setting by Microsoft, I would strongly discourage that on a controlled environment. Updating the server automatically without knowing the impact of such update might not be such a good idea if you are responsible for system availability…
- Download Updates and let me choose whether to install them: well – that one still automatically phones home to Microsoft but at least it does not install anything. To me, this is as useless as a winter coat on a warm summer day – there is no point in having it.
- Check of updates but let me choose whether to download and install them: another one of these “more than nothing but not what you need” settings – not better than the last one.
- Never check for updates: the setting for me – the administrator is responsible!
Now let me make this one clear: the setting is referring to the automated, unattended installation of updates! Although I do not want that to happen, I want the updates to be evaluated and installed.
But I believe this is what you are paying your Administrators for! So instead of having the system automatically phone home, you might want to consider making it an integral part of your system administrator’s job to make sure your servers are up-to-date and secure! But in that case, you also have to provide them the time and the tools to do so!
Note: Setting the Windows Update Option to Never check for updates is based upon the assumption that the update information is taken from Microsoft. There are, however, scenarios where the system is configured to automatically check for updates by contacting an in-house, corporate-controlled update server which is only fed with verified and approved updates. In such a case, it is more than efficient to use the option Install updates automatically because the process of evaluation and approval of an update has taken place – just not “inside” the system itself.
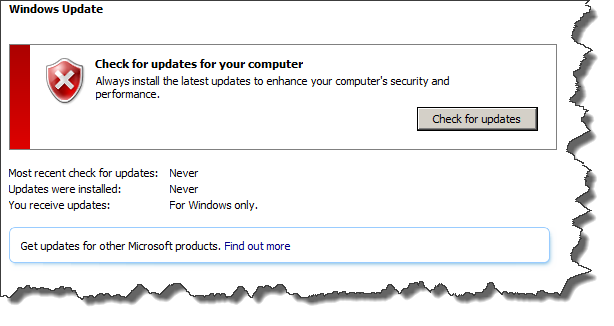
If no such option is available, you now have to kick off the update process manually. You can initiate it by clicking Start -> All Programs -> Windows Update. With the setting above, you will see an ugly red warning shield – ignore it and click the Check for Updates button.
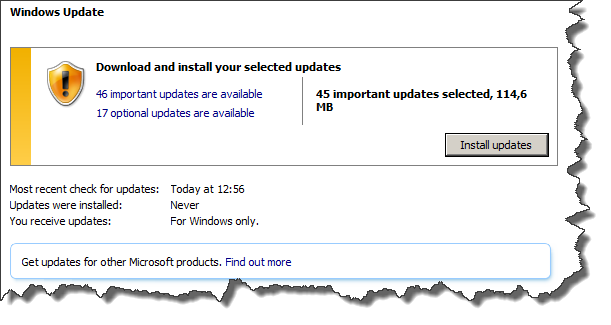
 After talking with Microsoft’s server, your system will find a number of updates to apply. You can review the selected updates by clicking the xx important updates are available link where you can also remove selected packages. Once you click the Install updates button, the system will download and install the patches.
 Once all updates have been applied, the system will – most likely – require a reboot.
Conclusion
After the base installation, there is very little to be done in order to connect the system to the Internet, download the latest patches and have a system which can be considered “preliminary configured for testing purposes”.
However, many things remain to be done before a server could be considered ready for production. Besides the selection and configuration of specific server roles which may be required for hosted applications (e.g. Internet Information Server or Fileserver Services), there is a large number of important aspects to be considered and configured – to name a few:
- Virus Protection and Firewall Settings
- User accounts in case the server is not part of a domain
- Remote Desktop Settings
- Server Roles & Features
- Performance and Stability Monitoring
What we have seen here is the topmost tip of the proverbial iceberg – and as with icebergs, there is much more hidden under the surface than you can see! If you want to use a system for your own testing, fair enough – besides the virus protection, I would be happy with that. If you want to use it in production, consult a professional server administrator, either in-house or external.
Don’t put vital corporate data onto an un- or under-protected system! Loss of data is much more expensive than any amount you would pay for reasonable server administration!
